The Bowser Express: Difference between revisions
Itsajumpman (talk | contribs) (Added Miscellaneous section for the Lego Mario Set of the Level to be featured) Tag: Mobile edit |
m (Text replacement - "(\| *)Jap([RMCN\d]* *=)" to "$1Jpn$2") |
||
| (8 intermediate revisions by 4 users not shown) | |||
| Line 1: | Line 1: | ||
{{level infobox | {{level infobox | ||
|image=[[File: | |image=[[File:SM3DWBF Bowser Express.jpg|250px]] | ||
|code={{world|bowser|train}} | |code={{world|bowser|train}} | ||
|world=[[World Bowser]] | |world=[[World Bowser]] | ||
| Line 20: | Line 20: | ||
==Layout== | ==Layout== | ||
[[File:The Bowser Express.jpg|thumb|left|250px]] | |||
The level starts on a platform near a train with some [[Skipsqueak]]s nearby. The player needs to hop on the train and avoid a nearby Spike Bar in order to reach an area infested with [[Conkdor]]s and [[Bully|Bullies]]. A pool of water comes soon after that where the player must navigate past some [[Madpole]]s in order to get back on the train. The player must now avoid a Spike Bar and enter a room filled with [[Mini Goomba]]s. A [[Hammer Bro]] guards the nearby [[Warp Pipe|pipe]] which brings the player to [[Pom Pom]]. After defeating her, a [[Warp Box]] brings the player to the area with the [[Goal Pole]]. As with the [[Bullet Bill Express]], the train starts off at a platform before speeding up and leaving, and if the player chooses not to board the train or fails to in time, they will lose a life due to being left behind by the level's auto-scrolling camera and the train itself. | The level starts on a platform near a train with some [[Skipsqueak]]s nearby. The player needs to hop on the train and avoid a nearby Spike Bar in order to reach an area infested with [[Conkdor]]s and [[Bully|Bullies]]. A pool of water comes soon after that where the player must navigate past some [[Madpole]]s in order to get back on the train. The player must now avoid a Spike Bar and enter a room filled with [[Mini Goomba]]s. A [[Hammer Bro]] guards the nearby [[Warp Pipe|pipe]] which brings the player to [[Pom Pom]]. After defeating her, a [[Warp Box]] brings the player to the area with the [[Goal Pole]]. As with the [[Bullet Bill Express]], the train starts off at a platform before speeding up and leaving, and if the player chooses not to board the train or fails to in time, they will lose a life due to being left behind by the level's auto-scrolling camera and the train itself. | ||
==[[Green Star]]s== | ==Collectables== | ||
===[[Green Star]]s=== | |||
{| class="wikitable" style="text-align: center" | |||
!Image | |||
!Location | |||
|- | |||
|[[File:SM3DW WB-T 1st Green Star.jpg|150px]] | |||
|On top of the train at the start of the level. | |||
|- | |||
|[[File:SM3DW WB-T 2nd Green Star.jpg|150px]] | |||
|The player needs to collect all eight [[Green Coin]]s from the [[Green Ring]] before they disappear. | |||
|- | |||
|[[File:SM3DW WB-T 3rd Green Star.jpg|150px]] | |||
|In a passageway with a [[Fire Bro]]. | |||
|} | |||
==[[Stamp]]== | ===[[List of Super Mario 3D World stamps|Stamp]]=== | ||
{{Multiple image | {{Multiple image | ||
|align=right | |align=right | ||
|direction=horizontal | |direction=horizontal | ||
|width=70 | |width=70 | ||
|image1=SM3DW-ConkdorStamp.png | |image1=SM3DW-ConkdorStamp.png | ||
|alt1=Wii U version | |alt1=Wii U version | ||
| Line 38: | Line 49: | ||
|alt2=Switch version | |alt2=Switch version | ||
}} | }} | ||
{| class="wikitable" style="text-align: center" | |||
!Image | |||
!Location | |||
|- | |||
|[[File:SM3DW The Bowser Express stamp.jpg|150px]] | |||
|The player needs to [[Ground Pound]] the second ? Block in the room with Mini Goombas; it is a Platform Block that extends to the room's roof, where the stamp is. The stamp is a [[Conkdor]] pecking. | |||
|} | |||
==Enemies== | ==Enemies== | ||
{{number of enemies | |||
Skipsqueak SM3DW Prima.jpg|[[Skipsqueak]] | |image1=[[File:Skipsqueak SM3DW Prima.jpg|x50px]] | ||
GoombaTowerSM3DW.jpg|[[Goomba Tower]] | |name1=[[Skipsqueak]] | ||
Conkdor Artwork - Super Mario 3D World.png|[[Conkdor]] | |count1=4 | ||
Bully Artwork - Super Mario 3D World.png|[[ | |image2=[[File:Goomba Artwork - Super Mario 3D World.png|x50px]] | ||
Madpole SM3DW Prima.jpg|[[Madpole]] | |name2=[[Goomba]] | ||
Horned Ant Trooper SM3DW Prima.jpg|[[Horned Ant Trooper]] | |count2=5 (including 4 from stacks) | ||
Mini Goomba SM3DW Prima.jpg|[[Mini Goomba]] | |image3=[[File:GoombaTowerSM3DW.jpg|x50px]] | ||
|name3=[[Goomba Tower]] | |||
Hammer Bro SM3DW Prima.jpg|[[Hammer Bro]] | |count3=1 | ||
Fire Bro SM3DW Prima.jpg|[[Fire Bro]] | |image4=[[File:Conkdor Artwork - Super Mario 3D World.png|x50px]] | ||
|name4=[[Conkdor]] | |||
|count4=8 | |||
|image5=[[File:Bully Artwork - Super Mario 3D World.png|50px]] | |||
|name5=[[Bully]] | |||
|count5=3 | |||
|image6=[[File:Madpole SM3DW Prima.jpg|x50px]] | |||
|name6=[[Madpole]] | |||
|count6=4 | |||
|image7=[[File:Horned Ant Trooper SM3DW Prima.jpg|x50px]] | |||
|name7=[[Horned Ant Trooper]] | |||
|count7=16 | |||
|image8=[[File:Mini Goomba SM3DW Prima.jpg|x50px]] | |||
|name8=[[Mini Goomba]] | |||
|count8=6 | |||
|image9=[[File:Hammer Bro SM3DW Prima.jpg|x50px]] | |||
|name9=[[Hammer Bro]] | |||
|count9=1 | |||
|image10=[[File:Fire Bro SM3DW Prima.jpg|x50px]] | |||
|name10=[[Fire Bro]] | |||
|count10=1 | |||
|image11=[[File:PomPomSM3DW.jpg|x50px]] | |||
|name11=[[Pom Pom]] | |||
|count11=1 (boss) | |||
}} | |||
==Names in other languages== | ==Names in other languages== | ||
{{foreign names | {{foreign names | ||
| | |Jpn=突入!エネミーエクスプレス | ||
| | |JpnR=Totsunyū! Enemī ekusupuresu | ||
| | |JpnM=Rush! Enemy Express | ||
|Spa=Asalto al convoy enemigo | |Spa=Asalto al convoy enemigo | ||
|SpaM=Enemy convoy assault | |SpaM=Enemy convoy assault | ||
| Line 75: | Line 113: | ||
|RusR=Ekspress Bouzera | |RusR=Ekspress Bouzera | ||
|RusM=Bowser's express | |RusM=Bowser's express | ||
| | |ChiS=冲入!敌人快车 | ||
| | |ChiSR=Chōngrù! Dírén Kuàichē | ||
| | |ChiSM=Dash in! Enemy Express | ||
|ChiT=衝入!敵人快車 | |||
|ChiTR=Chōngrù! Dírén Kuàichē | |||
|ChiTM=Dash in! Enemy Express | |||
|Kor=돌진! 에너미 익스프레스 | |Kor=돌진! 에너미 익스프레스 | ||
|KorR=Doljin! Eneomi Ikseupeureseu | |KorR=Doljin! Eneomi Ikseupeureseu | ||
Latest revision as of 16:40, January 7, 2025
| Level | |
|---|---|
| The Bowser Express | |

| |
| Level code | World |
| World | World Bowser |
| Game | Super Mario 3D World Super Mario 3D World + Bowser's Fury |
| Time limit | 400 seconds |
| Boss | Pom Pom |
| << << Directory of levels >> >> | |
The Bowser Express, or World ![]() Bowser-
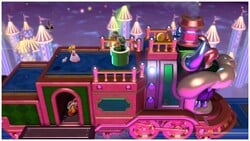
Bowser-![]() Train, is a boss course and the fourth overall level in World Bowser in Super Mario 3D World and its Nintendo Switch port Super Mario 3D World + Bowser's Fury. This level is a train-style level that is modeled after Bowser. At the end of the level, the player must battle Pom Pom for the second time. This level features various enemies and obstacles, such as spiked rollers that swing back and forth.
Train, is a boss course and the fourth overall level in World Bowser in Super Mario 3D World and its Nintendo Switch port Super Mario 3D World + Bowser's Fury. This level is a train-style level that is modeled after Bowser. At the end of the level, the player must battle Pom Pom for the second time. This level features various enemies and obstacles, such as spiked rollers that swing back and forth.
In Mario Party 10, the Bowser Battle Minigame Bowser's Sinister Slots takes place on the Bowser Express.
The Bowser Express's background is reused in Super Mario Maker 2, in the airship theme of the Super Mario 3D World style.
Completion of this level unlocks Footlight Lane and Deepwater Dungeon.
Layout[edit]
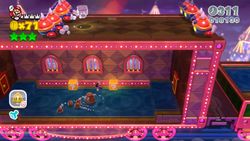
The level starts on a platform near a train with some Skipsqueaks nearby. The player needs to hop on the train and avoid a nearby Spike Bar in order to reach an area infested with Conkdors and Bullies. A pool of water comes soon after that where the player must navigate past some Madpoles in order to get back on the train. The player must now avoid a Spike Bar and enter a room filled with Mini Goombas. A Hammer Bro guards the nearby pipe which brings the player to Pom Pom. After defeating her, a Warp Box brings the player to the area with the Goal Pole. As with the Bullet Bill Express, the train starts off at a platform before speeding up and leaving, and if the player chooses not to board the train or fails to in time, they will lose a life due to being left behind by the level's auto-scrolling camera and the train itself.
Collectables[edit]
Green Stars[edit]
| Image | Location |
|---|---|

|
On top of the train at the start of the level. |

|
The player needs to collect all eight Green Coins from the Green Ring before they disappear. |

|
In a passageway with a Fire Bro. |
Stamp[edit]
| Image | Location |
|---|---|

|
The player needs to Ground Pound the second ? Block in the room with Mini Goombas; it is a Platform Block that extends to the room's roof, where the stamp is. The stamp is a Conkdor pecking. |
Enemies[edit]
| Image | Name | Count |
|---|---|---|

|
Skipsqueak | 4 |
| Goomba | 5 (including 4 from stacks) | |
| Goomba Tower | 1 | |
| Conkdor | 8 | |
| Bully | 3 | |

|
Madpole | 4 |

|
Horned Ant Trooper | 16 |

|
Mini Goomba | 6 |

|
Hammer Bro | 1 |

|
Fire Bro | 1 |
| Pom Pom | 1 (boss) |
Names in other languages[edit]
| Language | Name | Meaning | Notes |
|---|---|---|---|
| Japanese | 突入!エネミーエクスプレス[?] Totsunyū! Enemī ekusupuresu |
Rush! Enemy Express | |
| Chinese (simplified) | 冲入!敌人快车[?] Chōngrù! Dírén Kuàichē |
Dash in! Enemy Express | |
| Chinese (traditional) | 衝入!敵人快車[?] Chōngrù! Dírén Kuàichē |
Dash in! Enemy Express | |
| Dutch | Aan boord van de Bowser-express[?] | On board of the Bowser express | |
| German | Sturm auf den Schergen-Express[?] | Assault on the henchmen express | |
| Italian | Treno nemico[?] | Enemy train | |
| Korean | 돌진! 에너미 익스프레스[?] Doljin! Eneomi Ikseupeureseu |
Charge! Enemy Express | |
| Portuguese | Assalto ao comboio do Bowser[?] | Assault on Bowser's train | |
| Russian | Экспресс Боузера[?] Ekspress Bouzera |
Bowser's express | |
| Spanish | Asalto al convoy enemigo[?] | Enemy convoy assault |


