Tubular: Difference between revisions
m (Text replacement - "Fra([AE]?M? *)=" to "Fre$1=") |
m (Text replacement - "(\| *)Jap([RMCN\d]* *=)" to "$1Jpn$2") |
||
| (13 intermediate revisions by 10 users not shown) | |||
| Line 1: | Line 1: | ||
{{level infobox | {{level infobox | ||
|title=Tubular | |title=Tubular | ||
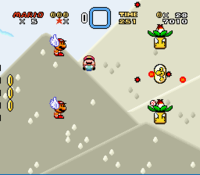
|image=[[File:Tubular SMW.png| | |image=[[File:Tubular SMW.png|200px]]<br>Screenshot from ''Super Mario World'' | ||
|code=9-2 | |code=9-2 | ||
|game=''[[Super Mario World]]'' | |game=''[[Super Mario World]]'' | ||
| Line 8: | Line 8: | ||
|before=[[Gnarly|<<]] | |before=[[Gnarly|<<]] | ||
|after=[[Way Cool|>>]] | |after=[[Way Cool|>>]] | ||
|track=[[Ground Theme (Super Mario World)|Ground Theme]] | |||
|sample=[[File:Overworld Theme Super Mario World.oga]] | |||
}} | }} | ||
'''Tubular''' is the second [[level]] of the [[Special Zone]] in ''[[Super Mario World]]''. Little to no ground is present in the level, so the whole level must be traversed with either a [[Power Balloon]] or a [[Cape Feather]]. | '''Tubular''' is the second [[level]] of the [[Special Zone]] in ''[[Super Mario World]]''. Little to no ground is present in the level, so the whole level must be traversed with either a [[Power Balloon]] or a [[Cape Feather]]. | ||
== | ==Layout== | ||
Tubular consists of one long area, which the player has 300 seconds on the [[Time Limit|timer]] to complete. The level contains six [[Dragon Coin]]s and only one exit. | Tubular consists of one long area, which the player has 300 seconds on the [[Time Limit|timer]] to complete. The level contains six [[Dragon Coin]]s and only one exit. | ||
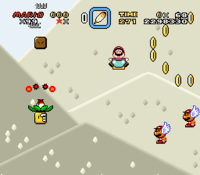
[[File:TubularPBalloon.png|thumb|left| | [[File:TubularPBalloon.png|thumb|left|Screenshot of the beginning area from ''Super Mario World'']] | ||
The first part of the level is a series of pipes of various lengths, with [[Jumping Piranha Plant]]s and [[Chargin' Chuck]]s trying to block [[Mario]] or [[Luigi]]'s way. After this area, there is a long gap with three [[Power Balloon]]s in [[? Block]]s that the player must get in order to cross a very wide pit. The player must dodge a multitude of enemies, including countless fire balls spat by [[Volcano Lotus]]es, [[Koopa Paratroopa]]s, and the Confused Chuck and Passin' Chuck variations of the Chargin' Chuck. | The first part of the level is a series of pipes of various lengths, with [[Jumping Piranha Plant]]s and [[Chargin' Chuck]]s trying to block [[Mario]] or [[Luigi]]'s way. After this area, there is a long gap with three [[Power Balloon]]s in [[? Block]]s that the player must get in order to cross a very wide pit. The player must dodge a multitude of enemies, including countless fire balls spat by [[Volcano Lotus]]es, [[Koopa Paratroopa]]s, and the Confused Chuck and Passin' Chuck variations of the Chargin' Chuck. | ||
One alternative to this strategy is to start the level with a [[Cape Feather]] and [[Yoshi (species)|Blue Yoshi]]. This way, the player can jump off of Chargin' Chucks heads and various ? Blocks until the column of Koopa Paratroopas is reached. Eating one of these Koopa Paratroopas allow the player to fly through the rest of the level, reaching the [[Giant Gate]] just in time. After the level is completed, the player is given the option to save. | One alternative to this strategy is to start the level with a [[Cape Feather]] and [[Yoshi (species)|Blue Yoshi]]. This way, the player can jump off of Chargin' Chucks heads and various ? Blocks until the column of Koopa Paratroopas is reached. Eating one of these Koopa Paratroopas allow the player to fly through the rest of the level, reaching the [[Giant Gate]] just in time. After the level is completed, the player is given the option to save. | ||
The level can also be | The level can also be cleared with just the Cape Feather; however, this requires absolute precision as to exactly where Mario jumps and glides, including requiring him to jump on one of the Passin' Chucks' balls as it arcs downwards to get onto a higher platform. | ||
If Mario or Luigi passes the Giant Gate while under the effects of a Power Balloon, he receives a [[Super Mushroom]]. | If Mario or Luigi passes the Giant Gate while under the effects of a Power Balloon, he receives a [[Super Mushroom]]. | ||
==Enemies== | ==Enemies== | ||
{| | {{number of enemies | ||
|image1=[[File:SMW KoopaParatroopa Red.png]] | |||
|name1=[[Koopa Paratroopa]] (red) | |||
|count1=5 | |||
|image2=[[File:SMWJumpingPiranhaPlant.png]] | |||
|name2=[[Jumping Piranha Plant]] | |||
|[[Koopa Paratroopa]] (red) | |count2=2 | ||
|5 | |image3=[[File:Volcano Lotus SMW sprite.png]] | ||
| | |name3=[[Volcano Lotus]] | ||
|count3=4 | |||
|[[Jumping Piranha Plant]] | |image4=[[File:PitchingChuckL.gif]] | ||
|2 | |name4=[[Chargin' Chuck|Confused Chuck]] | ||
| | |count4=2 | ||
|image5=[[File:SMW Passin' Chuck.gif]] | |||
|[[Volcano Lotus]] | |name5=[[Chargin' Chuck|Passin' Chuck]] | ||
|4 | |count5=2 | ||
| | |image6=[[File:SMW Clappin' Chuck.gif]] | ||
|name6=[[Chargin' Chuck|Clappin' Chuck]] | |||
|[[Chargin' Chuck|Confused Chuck]] | |count6=2 | ||
|2 | |image7=[[File:SMWCharginChuck.png]] | ||
| | |name7=Lookout Chuck | ||
|count7=6 (if stomped) | |||
|[[Chargin' Chuck|Passin' Chuck]] | }} | ||
|2 | |||
| | ==Map== | ||
{{Wide image|TubularMap.png|1200|The level map of Tubular}} | |||
|[[Chargin' Chuck|Clappin' Chuck]] | |||
|2 | |||
| | |||
|Lookout Chuck | |||
|6 (if stomped) | |||
|} | |||
==Names in other languages== | ==Names in other languages== | ||
{{foreign names | {{foreign names | ||
| | |Jpn=おたのしみ コース | ||
| | |JpnN=SNES | ||
| | |JpnR=Otanoshimi Kōsu | ||
| | |JpnM=Fun Course | ||
| | |Jpn2=おたのしみ コース2 | ||
| | |Jpn2N=GBA | ||
|Jpn2R=Otanoshimi Kōsu 2 | |||
|Jpn2M=Fun Course 2 | |||
|Ger=Exzeptionell | |Ger=Exzeptionell | ||
|GerM=Exceptional | |GerM=Exceptional | ||
|Fre=Tubulaire | |Fre=Tubulaire | ||
|FreM=Tubular | |FreM=Tubular | ||
|Ita= | |Ita=Tubolare<ref>{{cite|date=November 15, 2018|title=''[[Super Mario Bros. Encyclopedia|Super Mario Bros. Enciclopedia]]''|publisher=Magazzini Salani|language=it|isbn=889367436X|page=59}}</ref> | ||
|ItaM=Tubular | |ItaM=Tubular | ||
|Spa=Tubiguay | |Spa=Tubiguay | ||
| Line 83: | Line 79: | ||
{{SMW levels}} | {{SMW levels}} | ||
[[Category:Secret levels]] | [[Category:Secret levels]] | ||
[[Category:Sky areas]] | [[Category:Sky areas]] | ||
[[Category:Super Mario World levels]] | [[Category:Super Mario World levels]] | ||
[[it:Tubolare]] | |||
Latest revision as of 17:00, January 7, 2025
| Level | |||
|---|---|---|---|
| Tubular | |||
 Screenshot from Super Mario World | |||
| Level code | 9-2 | ||
| World | Special Zone | ||
| Game | Super Mario World | ||
| Time limit | 300 seconds | ||
| Music track | Ground Theme | ||
| |||
| << Directory of levels >> | |||
Tubular is the second level of the Special Zone in Super Mario World. Little to no ground is present in the level, so the whole level must be traversed with either a Power Balloon or a Cape Feather.
Layout[edit]
Tubular consists of one long area, which the player has 300 seconds on the timer to complete. The level contains six Dragon Coins and only one exit.
The first part of the level is a series of pipes of various lengths, with Jumping Piranha Plants and Chargin' Chucks trying to block Mario or Luigi's way. After this area, there is a long gap with three Power Balloons in ? Blocks that the player must get in order to cross a very wide pit. The player must dodge a multitude of enemies, including countless fire balls spat by Volcano Lotuses, Koopa Paratroopas, and the Confused Chuck and Passin' Chuck variations of the Chargin' Chuck.
One alternative to this strategy is to start the level with a Cape Feather and Blue Yoshi. This way, the player can jump off of Chargin' Chucks heads and various ? Blocks until the column of Koopa Paratroopas is reached. Eating one of these Koopa Paratroopas allow the player to fly through the rest of the level, reaching the Giant Gate just in time. After the level is completed, the player is given the option to save.
The level can also be cleared with just the Cape Feather; however, this requires absolute precision as to exactly where Mario jumps and glides, including requiring him to jump on one of the Passin' Chucks' balls as it arcs downwards to get onto a higher platform.
If Mario or Luigi passes the Giant Gate while under the effects of a Power Balloon, he receives a Super Mushroom.
Enemies[edit]
| Image | Name | Count |
|---|---|---|
| Koopa Paratroopa (red) | 5 | |
| Jumping Piranha Plant | 2 | |
| Volcano Lotus | 4 | |
| Confused Chuck | 2 | |
| Passin' Chuck | 2 | |
| Clappin' Chuck | 2 | |
| Lookout Chuck | 6 (if stomped) |
Map[edit]
Names in other languages[edit]
| Language | Name | Meaning | Notes |
|---|---|---|---|
| Japanese | おたのしみ コース[?] Otanoshimi Kōsu |
Fun Course | SNES |
| おたのしみ コース2[?] Otanoshimi Kōsu 2 |
Fun Course 2 | GBA | |
| French | Tubulaire[?] | Tubular | |
| German | Exzeptionell[?] | Exceptional | |
| Italian | Tubolare[1] | Tubular | |
| Spanish | Tubiguay[?] | Tube-cool |
Trivia[edit]
- In the unreleased game Super Mario's Wacky Worlds, the title "Tubular" would have referred to a collection of three worlds.
Notes[edit]
- ^ November 15, 2018. Super Mario Bros. Enciclopedia. Magazzini Salani (Italian). ISBN 889367436X. Page 59.

