Yōsei no Mori: Difference between revisions
From the Super Mario Wiki, the Mario encyclopedia
Jump to navigationJump to search
m (Text replacement - "(\|[\n ]*)(appeared|appeared_in|appearance|appearances)([\n ]*=)" to "$1appears_in$3") |
No edit summary |
||
| (9 intermediate revisions by 3 users not shown) | |||
| Line 1: | Line 1: | ||
{{another language}} | {{another language}} | ||
{{world infobox | {{world infobox | ||
|title=Yōsei no Mori | |title=Yōsei no Mori | ||
|image=[[File:M&WLevel1.png]] | |image=[[File:M&WLevel1.png]] | ||
| | |game=''[[Mario & Wario]]'' | ||
|levels=10 | |levels=10 | ||
|before=<< | |before=<< | ||
|after=[[Yosu Ko|>>]] | |after=[[Yosu Ko|>>]] | ||
}} | }} | ||
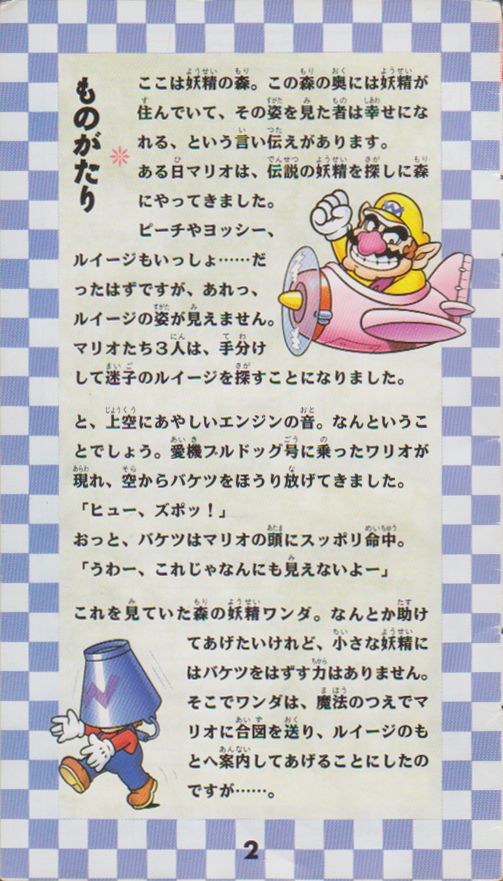
'''Yōsei no Mori''' is the first stage | '''Yōsei no Mori''' is the first stage in ''[[Mario & Wario]]''. It is a forest and the setting where [[Mario]], [[Luigi]], [[Princess Peach]] and [[Yoshi]] went to see the fairy of fortune, only to be confronted by [[Wario]] before [[Wanda]] arrives to help the protagonists throughout the game.<ref>{{cite|page={{file link|WarioToMonogatari.png|2}}|title=''Mario & Wario'' instruction booklet|date=1993|publisher=Nintendo|language=ja}}</ref> The courses are all single-screen and lack any traps, being the first stage. There are no [[Star (Mario & Wario)|Star]]s to collect. The object that Wario drops on the protagonist is a [[bucket]] with a flipped purple "M." A [[Wiggler]] is visible during the courses. | ||
==Levels== | ==Levels== | ||
{| style="text-align: center | {| style="text-align: center" class=wikitable | ||
!width="1%"|Level | !width="1%"|Level | ||
!width="1%"|Image | !width="1%"|Image | ||
| Line 21: | Line 19: | ||
|[[Level 1-1 (Mario & Wario)|Level 1-1]] | |[[Level 1-1 (Mario & Wario)|Level 1-1]] | ||
|[[File:M&W Level 1-1 Map.png|200px]] | |[[File:M&W Level 1-1 Map.png|200px]] | ||
| | |[[Wanda]] guides her character using [[Flip-Flop Block]]s. It is also the first course with the [[elevator]] object. | ||
|N/A | |N/A | ||
|- | |- | ||
|[[Level 1-2 (Mario & Wario)|Level 1-2]] | |[[Level 1-2 (Mario & Wario)|Level 1-2]] | ||
|[[File:M&W Level 1-2 Map.png|200px]] | |[[File:M&W Level 1-2 Map.png|200px]] | ||
| | |Similar to Level 1-1 but with the addition of spikes. | ||
|[[Spike Trap|Spikes]] | |[[Spike Trap|Spikes]] | ||
|- | |- | ||
|[[Level 1-3 (Mario & Wario)|Level 1-3]] | |[[Level 1-3 (Mario & Wario)|Level 1-3]] | ||
|[[File:M&W Level 1-3 Map.png|200px]] | |[[File:M&W Level 1-3 Map.png|200px]] | ||
|[[Coin Block]]s | |Another simple course and the first to have [[Coin Block]]s. | ||
|Spikes | |Spikes | ||
|- | |- | ||
|[[Level 1-4 (Mario & Wario)|Level 1-4]] | |[[Level 1-4 (Mario & Wario)|Level 1-4]] | ||
|[[File:M&W Level 1-4 Map.png|200px]] | |[[File:M&W Level 1-4 Map.png|200px]] | ||
| | |A zigzag path where Flip-Flop Blocks are used as the player character climbs the ladders. | ||
|Spikes | |Spikes | ||
|- | |- | ||
|[[Level 1-5 (Mario & Wario)|Level 1-5]] | |[[Level 1-5 (Mario & Wario)|Level 1-5]] | ||
|[[File:M&W Level 1-5 Map.png|200px]] | |[[File:M&W Level 1-5 Map.png|200px]] | ||
|The course | |The first course to have [[Timer Block]]s. | ||
|Spikes | |Spikes | ||
|- | |- | ||
|[[Level 1-6 (Mario & Wario)|Level 1-6]] | |[[Level 1-6 (Mario & Wario)|Level 1-6]] | ||
|[[File:M&W Level 1-6 Map.png|200px]] | |[[File:M&W Level 1-6 Map.png|200px]] | ||
|The | |The first course to have [[Rock Block]]s. | ||
|Spikes | |Spikes | ||
|- | |- | ||
|[[Level 1-7 (Mario & Wario)|Level 1-7]] | |[[Level 1-7 (Mario & Wario)|Level 1-7]] | ||
|[[File:M&W Level 1-7 Map.png|200px]] | |[[File:M&W Level 1-7 Map.png|200px]] | ||
| | |Another course with Timer Blocks, also having a row of several Coin Blocks. | ||
|Spikes | |Spikes | ||
|- | |- | ||
|[[Level 1-8 (Mario & Wario)|Level 1-8]] | |[[Level 1-8 (Mario & Wario)|Level 1-8]] | ||
|[[File:M&W Level 1-8 Map.png|200px]] | |[[File:M&W Level 1-8 Map.png|200px]] | ||
| | |Essentially Level 1-4 but with Timer Blocks | ||
|Spikes | |Spikes | ||
|- | |- | ||
|[[Level 1-9]] | |[[Level 1-9]] | ||
|[[File:M&W Level 1-9 Map.png|200px]] | |[[File:M&W Level 1-9 Map.png|200px]] | ||
| | |Timer Blocks are used to allow the player character to pass the elevators. | ||
|Spikes | |Spikes | ||
|- | |- | ||
|[[Level 1-10]] | |[[Level 1-10]] | ||
|[[File:M&W Level 1-10 Map.png|200px]] | |[[File:M&W Level 1-10 Map.png|200px]] | ||
| | |Another course with several Rock Blocks, also being the first with an enemy, Guriguri. | ||
|[[Guriguri]] | |[[Guriguri]] | ||
|} | |} | ||
| Line 78: | Line 76: | ||
==Names in other languages== | ==Names in other languages== | ||
{{foreign names | {{foreign names | ||
| | |Jpn={{ruby|妖精|ようせい}}の{{ruby|森|もり}} | ||
| | |JpnC=<ref>{{cite|language=ja|publisher=Nintendo|title=''Mario & Wario'' instruction booklet|page=12|date=1993}}</ref> | ||
| | |JpnR=Yōsei no Mori | ||
|JpnM=Fairy's Forest | |||
}} | }} | ||
Latest revision as of 10:38, March 15, 2025
The title of this article is official, but it comes from a non-English source.
If an acceptable English name is found, then the article should be moved to the new title.
| Yōsei no Mori | |
|---|---|

| |
| Game | Mario & Wario |
| Level(s) | 10 |
| << List of worlds >> | |
Yōsei no Mori is the first stage in Mario & Wario. It is a forest and the setting where Mario, Luigi, Princess Peach and Yoshi went to see the fairy of fortune, only to be confronted by Wario before Wanda arrives to help the protagonists throughout the game.[1] The courses are all single-screen and lack any traps, being the first stage. There are no Stars to collect. The object that Wario drops on the protagonist is a bucket with a flipped purple "M." A Wiggler is visible during the courses.
Levels[edit]
| Level | Image | Description | Enemies and obstacles |
|---|---|---|---|
| Level 1-1 | 
|
Wanda guides her character using Flip-Flop Blocks. It is also the first course with the elevator object. | N/A |
| Level 1-2 | 
|
Similar to Level 1-1 but with the addition of spikes. | Spikes |
| Level 1-3 | 
|
Another simple course and the first to have Coin Blocks. | Spikes |
| Level 1-4 | 
|
A zigzag path where Flip-Flop Blocks are used as the player character climbs the ladders. | Spikes |
| Level 1-5 | 
|
The first course to have Timer Blocks. | Spikes |
| Level 1-6 | 
|
The first course to have Rock Blocks. | Spikes |
| Level 1-7 | 
|
Another course with Timer Blocks, also having a row of several Coin Blocks. | Spikes |
| Level 1-8 | 
|
Essentially Level 1-4 but with Timer Blocks | Spikes |
| Level 1-9 | 
|
Timer Blocks are used to allow the player character to pass the elevators. | Spikes |
| Level 1-10 | 
|
Another course with several Rock Blocks, also being the first with an enemy, Guriguri. | Guriguri |
Media[edit]
| File info |
Names in other languages[edit]
| Language | Name | Meaning | Notes |
|---|---|---|---|
| Japanese | Yōsei no Mori |
Fairy's Forest |
References[edit]
| Mario & Wario | |
|---|---|
| Main characters | Luigi • Mario • Princess Peach • Wanda • Wario • Yoshi |
| Enemies | Dodorigesu Jr. • Guriguri • Komorin • Tsubōn • Unibo |
| Stages | Yōsei no Mori • Yosu Ko • Kumotori Yama • Kōri no Dōkutsu • Honō no Dōkutsu • Pukupuku Kai • Balloon Bridge • Karakara Sabaku • Wario no Niwa • Wario Tei • EXTRA |
| Items & obstacles | 1-Up Mushroom • Bucket • Coin Block • Elevator • Flip-Flop Block • Fūsen Block • Hammer • Jump Block • Magic Wand • Nebaneba Block • Rock Block • Star • Switch Block • Time Kinoko • Timer Block • Toge Block |
| Other | Bulldog • Staff • Gallery • Media |