World 4-Fortress 2: Difference between revisions
(Add a glitchy way to do this level; feel free to improve my words by checking out the video and comparing it with my words) |
m (Text replacement - "([Cc])olor-link" to "$1olor link") |
||
| (17 intermediate revisions by 9 users not shown) | |||
| Line 1: | Line 1: | ||
{{ | {{image|more=yes|Needs in-game screenshot from the original NES version}} | ||
{{level infobox | |||
|title={{world|4|fort}} 2 | |title={{world|4|fort}} 2 | ||
|image=[[File:SMAS SMB3 World 4-F2 Screenshot.png]] | |image=[[File:SMAS SMB3 World 4-F2 Screenshot.png]] | ||
| Line 6: | Line 7: | ||
|game=''[[Super Mario Bros. 3]]'' | |game=''[[Super Mario Bros. 3]]'' | ||
|limit=300 seconds | |limit=300 seconds | ||
|boss=[[Boom Boom]] | |boss=[[Boom Boom]] (grounded) | ||
| | |before_alt= | ||
|before=[[World 4-5 (Super Mario Bros. 3)|<<]] [[World 4-6 (Super Mario Bros. 3)|<<]] | |before=[[World 4-5 (Super Mario Bros. 3)|<<]] [[World 4-6 (Super Mario Bros. 3)|<<]] | ||
|after=[[World 4-Airship (Super Mario Bros. 3)|>>]] | |after=[[World 4-Airship (Super Mario Bros. 3)|>>]] | ||
|track=Fortress BGM | |||
|sample=[[File:Fortress Theme Super Mario Bros 3.oga]] | |||
}} | }} | ||
'''{{world|4|fort}} 2''' is the eighth level and the second [[fortress]] of [[Giant Land]] in ''[[Super Mario Bros. 3]]''. It becomes accessible after clearing either World [[World 4-5 (Super Mario Bros. 3)|4-5]] or [[World 4-6 (Super Mario Bros. 3)|4-6]] and its own completion unlocks {{world | '''{{world|4|fort}} 2''' is the eighth level and the second [[fortress]] of [[Giant Land]] in ''[[Super Mario Bros. 3]]''. It becomes accessible after clearing either World [[World 4-5 (Super Mario Bros. 3)|4-5]] or [[World 4-6 (Super Mario Bros. 3)|4-6]] and its own completion unlocks {{world link|4|airship3|World 4-Airship (Super Mario Bros. 3)}}. This level introduces [[P Warp Door]]s. | ||
==Layout== | ==Layout== | ||
| Line 17: | Line 20: | ||
If the player enters the secret door, they will be brought to the bottom of a vertically long area made up of several [[Warp Pipe]]s and [[Directional Lift]]s. The room also wraps around, meaning if the player moves through the left side of the screen, they will appear on the right and vice versa. Using the Arrow Lifts and Warp Pipes, the player can reach another pipe at the top that will drop the player into a room with some [[coin]]s and [[Hidden Block]]s that can lead to a Brick Block containing a [[1-Up Mushroom]]. Going through the pipe on the floor will take the player to a room with a [[Mega ? Block]] containing three 1-Up Mushrooms, and if the player is powered-up with a [[Super Leaf]], [[Tanooki Suit]], or [[P-Wing|Magic Wing]], the player can fly to the left to reach an area with many coins. Going through the Warp Pipe to the right will take the player back into the fortress near Boom Boom. | If the player enters the secret door, they will be brought to the bottom of a vertically long area made up of several [[Warp Pipe]]s and [[Directional Lift]]s. The room also wraps around, meaning if the player moves through the left side of the screen, they will appear on the right and vice versa. Using the Arrow Lifts and Warp Pipes, the player can reach another pipe at the top that will drop the player into a room with some [[coin]]s and [[Hidden Block]]s that can lead to a Brick Block containing a [[1-Up Mushroom]]. Going through the pipe on the floor will take the player to a room with a [[Mega ? Block]] containing three 1-Up Mushrooms, and if the player is powered-up with a [[Super Leaf]], [[Tanooki Suit]], or [[P-Wing|Magic Wing]], the player can fly to the left to reach an area with many coins. Going through the Warp Pipe to the right will take the player back into the fortress near Boom Boom. | ||
==Enemies== | ==Enemies== | ||
{| class="wikitable" style="text-align: center" | |||
! Name !! Count | |||
|- | |||
| [[File:SMB3 Dry Bones Sprite.gif]]<br>[[Dry Bones]] || 8 | |||
|- | |||
| [[File:Rotodisc.gif]]<br>[[Roto-Disc]] || 1 | |||
|- | |||
| [[File:PiranhaPlantRed.gif]]<br>[[Piranha Plant]] || 3 | |||
|- | |||
| style="background: black" | [[File:Boomboom.gif]]<br>{{color link|white|Boom Boom}} || 1 (boss) | |||
|} | |||
==Level statistics== | ==Level statistics== | ||
| Line 32: | Line 39: | ||
*Secret areas: 1, split between three rooms | *Secret areas: 1, split between three rooms | ||
{{SMB3 | {{SMB3 levels}} | ||
[[Category:Fortresses]] | [[Category:Fortresses]] | ||
[[Category:Sewers]] | |||
[[Category:Volcanic areas]] | [[Category:Volcanic areas]] | ||
[[Category:Super Mario Bros. 3 levels]] | [[Category:Super Mario Bros. 3 levels]] | ||
Latest revision as of 17:38, December 31, 2024
It has been requested that more images be uploaded for this article. Remove this notice only after the additional images have been added. Specifics: Needs in-game screenshot from the original NES version
| Level | |||
|---|---|---|---|
| World 4- | |||

| |||
| Level code | World 4-Fortress 2 | ||
| World | Giant Land | ||
| Game | Super Mario Bros. 3 | ||
| Time limit | 300 seconds | ||
| Boss | Boom Boom (grounded) | ||
| Music track | Fortress BGM | ||
| |||
| << << Directory of levels >> | |||
World 4-![]() Fortress 2 is the eighth level and the second fortress of Giant Land in Super Mario Bros. 3. It becomes accessible after clearing either World 4-5 or 4-6 and its own completion unlocks World 4-
Fortress 2 is the eighth level and the second fortress of Giant Land in Super Mario Bros. 3. It becomes accessible after clearing either World 4-5 or 4-6 and its own completion unlocks World 4-![]() Airship. This level introduces P Warp Doors.
Airship. This level introduces P Warp Doors.
Layout[edit]
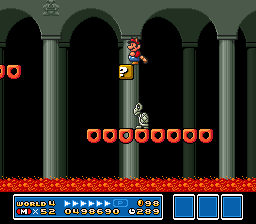
The player starts at the bottom of some stone stairs, which ends at a pool of lava. To get across, the player needs to move across a group of broken up platforms made up of Donut Lifts, with a ? Block containing a power-up in the middle of the area. Afterward is a narrow hall with some Dry Bones and a Brick Block containing a Switch Block. The Brick Block can be used as a platform to reach a hall leading to Boom Boom, though hitting the Switch Block will reveal a door to a secret area.
If the player enters the secret door, they will be brought to the bottom of a vertically long area made up of several Warp Pipes and Directional Lifts. The room also wraps around, meaning if the player moves through the left side of the screen, they will appear on the right and vice versa. Using the Arrow Lifts and Warp Pipes, the player can reach another pipe at the top that will drop the player into a room with some coins and Hidden Blocks that can lead to a Brick Block containing a 1-Up Mushroom. Going through the pipe on the floor will take the player to a room with a Mega ? Block containing three 1-Up Mushrooms, and if the player is powered-up with a Super Leaf, Tanooki Suit, or Magic Wing, the player can fly to the left to reach an area with many coins. Going through the Warp Pipe to the right will take the player back into the fortress near Boom Boom.
Enemies[edit]
| Name | Count |
|---|---|
Dry Bones |
8 |
 Roto-Disc |
1 |
Piranha Plant |
3 |
Boom Boom |
1 (boss) |
Level statistics[edit]
- Power-ups: 2 (Super Mushrooms or Fire Flowers)
- 1-Up Mushrooms: 4
- Secret areas: 1, split between three rooms