Vanilla Dome 1: Difference between revisions
m (-POV) |
m (Text replacement - "(\| *)Jap([RMCN\d]* *=)" to "$1Jpn$2") |
||
| (74 intermediate revisions by 46 users not shown) | |||
| Line 1: | Line 1: | ||
{{level | {{level infobox | ||
|title=Vanilla Dome 1 | |title=Vanilla Dome 1 | ||
|image=[[ | |image=[[File:Vannila1.png|256px]]<br>Screenshot from ''Super Mario World'' | ||
|code= | |code=3-1 | ||
|game=''[[Super Mario World]]'' | |game=''[[Super Mario World]]'' | ||
| | |world=[[Vanilla Dome]] | ||
| | |limit=400 seconds | ||
| | |before=[[2 Morton's Castle|<<]] | ||
| | |after=[[Vanilla Dome 2|>>]] | ||
|secret=[[Vanilla Secret 1|**]] | |||
|track=[[Ground Theme (Super Mario World)#Super Mario World|Underground BGM]] | |||
|sample=[[File:Underground Theme Super Mario World.oga]] | |||
}} | }} | ||
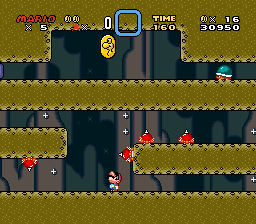
'''Vanilla Dome 1''' is the first [[level]] of the [[Vanilla Dome]] in ''[[Super Mario World]]''. It can be accessed by completing [[2 Morton's Castle|#2 Morton's Castle]]. [[Mario]] has 400 seconds to complete the stage. By completing the level through the [[Giant Gate]], the player gains access to [[Vanilla Dome 2]]. If the player gets the [[secret exit]], the player gains access to [[Vanilla Secret 1]]. | |||
==Layout== | |||
[[File:SMA2 Vanilla Dome 1.png|thumb|left|Screenshot from ''Super Mario World: Super Mario Advance 2'']] | |||
[[Category: | Mario begins the level near a staircase-like structure, where a [[Spike Top]] climbs the structure, forcing the hero to be careful when jumping down to the floor. [[Swoop]]ers hang on the ceiling, waiting for Mario to attack, and they cover almost all the ceiling in this area. A [[Flying ? Block]] near a [[Buzzy Beetle]] can be found here, on a rocky platform. As Mario ventures through the cavern, he finds a large structure made of [[Rotating Block]]s blocking the way. The only way to progress is passing underneath the Rotating Blocks, in a straight platform with Buzzy Beetles trying to stop Mario. Mario can, however, find a variety of things among the blocks, including a [[Red Shell|Red]] and a [[Blue Shell]], some [[coin]]s and the first [[Dragon Coin]] of the stage. When Mario finally finds his way through the Rotating Block structure, he finds a [[? Block]] in the floor, and a Buzzy Beetle. He can then find a green [[Warp Pipe]] ahead of a [[Koopa Paratroopa]], which brings him to a long underground corridor with an extremely large yellow platform bobbing in the [[lava]]. Mario has to use a [[Super Star]] in a nearby ? Block to gain invincibility and defeat any enemy in his way, while running as fast as possible on the yellow platform before it sinks in the lava. A Dragon Coin can be found near the green pipe. | ||
[[Category: | |||
[[Category: | This pipe brings him to the [[Midway Gate]] of the level, located on a platform in thin air. Mario must follow the way infested with Buzzy Beetles, to a pair of Rotating Blocks. By flipping this blocks, Mario gains access to a couple of straight paths with Spike Tops and a lone Buzzy Beetle. The upper path has a Dragon Coin on it, though the ceiling is low, requiring Mario to be [[Small Mario]] to access the coin. Mario eventually finds some pipes that he must use to cross an abyss. A [[Jumping Piranha Plant]] and a Koopa Paratroopa can be found here. If Mario has pressed the green ! Switch at [[Green Switch Palace]], he can collect a Dragon Coin above some green ! Blocks near the abyss. After this, Mario finds a maze-like structure filled with Buzzy Beetles, and Koopa Shells. The last Dragon Coin of the level can be found here. Near the Blue Shell, Mario can find the Giant Gate, ending the level. | ||
===Exits=== | |||
This level has a [[secret exit]] which, when found, gives Mario access to Vanilla Secret 1. In order to find this secret exit, Mario can press the red [[! Switch]] at the [[Red Switch Palace]], jump with a [[Yoshi (species)|Yoshi]] and dismount for extra height, or if he is quick enough, he can have a Yoshi eat a Blue Shell in the beginning of the Rotating Block structure to fly to the exit. | |||
After the structure made of Rotating Blocks, Mario can find a ? Block in the floor, along with a Buzzy Beetle. If Mario pressed the Red ! Switch, the red Dotted Line Blocks turn into ! Blocks, allowing him to reach the [[key]] and the [[keyhole]]. | |||
==Enemies== | |||
{{number of enemies | |||
|image1=[[File:SMW Spike Top.png]] | |||
|name1=[[Spike Top]] | |||
|count1=6 | |||
|image2=[[File:Swooper SMW sprite.png]] | |||
|name2=[[Swoop]]er | |||
|count2=5 | |||
|image3=[[File:SMWBuzzyBeetle.png]] | |||
|name3=[[Buzzy Beetle]] | |||
|count3=23 | |||
|image4=[[File:SMW KoopaParatroopa Green.png]] | |||
|name4=[[Koopa Paratroopa]] (green) | |||
|count4=1 | |||
|image5=[[File:SMW KoopaParatroopa Red.png]] | |||
|name5=Koopa Paratroopa (red) | |||
|count5=2 | |||
|image6=[[File:ShellGreen.png]] | |||
|name6=[[Koopa Troopa|Koopa Shell]] (green) | |||
|count6=1 | |||
|image7=[[File:ShellRed.png]] | |||
|name7=Koopa Shell (red) | |||
|count7=1 | |||
|image8=[[File:ShellBlue.png]] | |||
|name8=Koopa Shell (blue) | |||
|count8=2 | |||
|image9=[[File:Yellow Shell.png]] | |||
|name9=Koopa Shell (yellow) | |||
|count9=1 | |||
|image10=[[File:BlarggSMW.png]] | |||
|name10=[[Blargg]] | |||
|count10=4 | |||
|image11=[[File:SMWJumpingPiranhaPlant.png]] | |||
|name11=[[Jumping Piranha Plant]] | |||
|count11=1 | |||
|image12=[[File:SMW Passin' Chuck.gif]] | |||
|name12=[[Chargin' Chuck|Passin' Chuck]] | |||
|count12=1 | |||
}} | |||
==Names in other languages== | |||
{{foreign names | |||
|Jpn=バニラドーム コース1 | |||
|JpnR=Banira Dōmu Kōsu 1 | |||
|JpnM=Vanilla Dome Course 1 | |||
|Spa=Colina Vainilla 1 | |||
|SpaM=Vanilla Hill 1 | |||
|Fre=Dome Vanille 1 | |||
|FreM=Vanilla Dome 1 | |||
|Ger=Vanille-Dom 1 | |||
|GerM=Vanilla Dome 1 | |||
|Ita=Cupola Vaniglia 1 | |||
|ItaM=Vanilla Dome 1 | |||
}} | |||
{{SMW levels}} | |||
[[Category:Underground areas]] | |||
[[Category:Super Mario World levels]] | |||
[[Category:Levels with a secret exit]] | |||
Latest revision as of 16:15, January 7, 2025
| Level | |||
|---|---|---|---|
| Vanilla Dome 1 | |||
 Screenshot from Super Mario World | |||
| Level code | 3-1 | ||
| World | Vanilla Dome | ||
| Game | Super Mario World | ||
| Time limit | 400 seconds | ||
| Music track | Underground BGM | ||
| |||
| << Directory of levels >> ** | |||
Vanilla Dome 1 is the first level of the Vanilla Dome in Super Mario World. It can be accessed by completing #2 Morton's Castle. Mario has 400 seconds to complete the stage. By completing the level through the Giant Gate, the player gains access to Vanilla Dome 2. If the player gets the secret exit, the player gains access to Vanilla Secret 1.
Layout[edit]
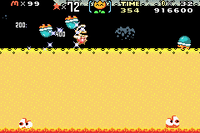
Mario begins the level near a staircase-like structure, where a Spike Top climbs the structure, forcing the hero to be careful when jumping down to the floor. Swoopers hang on the ceiling, waiting for Mario to attack, and they cover almost all the ceiling in this area. A Flying ? Block near a Buzzy Beetle can be found here, on a rocky platform. As Mario ventures through the cavern, he finds a large structure made of Rotating Blocks blocking the way. The only way to progress is passing underneath the Rotating Blocks, in a straight platform with Buzzy Beetles trying to stop Mario. Mario can, however, find a variety of things among the blocks, including a Red and a Blue Shell, some coins and the first Dragon Coin of the stage. When Mario finally finds his way through the Rotating Block structure, he finds a ? Block in the floor, and a Buzzy Beetle. He can then find a green Warp Pipe ahead of a Koopa Paratroopa, which brings him to a long underground corridor with an extremely large yellow platform bobbing in the lava. Mario has to use a Super Star in a nearby ? Block to gain invincibility and defeat any enemy in his way, while running as fast as possible on the yellow platform before it sinks in the lava. A Dragon Coin can be found near the green pipe.
This pipe brings him to the Midway Gate of the level, located on a platform in thin air. Mario must follow the way infested with Buzzy Beetles, to a pair of Rotating Blocks. By flipping this blocks, Mario gains access to a couple of straight paths with Spike Tops and a lone Buzzy Beetle. The upper path has a Dragon Coin on it, though the ceiling is low, requiring Mario to be Small Mario to access the coin. Mario eventually finds some pipes that he must use to cross an abyss. A Jumping Piranha Plant and a Koopa Paratroopa can be found here. If Mario has pressed the green ! Switch at Green Switch Palace, he can collect a Dragon Coin above some green ! Blocks near the abyss. After this, Mario finds a maze-like structure filled with Buzzy Beetles, and Koopa Shells. The last Dragon Coin of the level can be found here. Near the Blue Shell, Mario can find the Giant Gate, ending the level.
Exits[edit]
This level has a secret exit which, when found, gives Mario access to Vanilla Secret 1. In order to find this secret exit, Mario can press the red ! Switch at the Red Switch Palace, jump with a Yoshi and dismount for extra height, or if he is quick enough, he can have a Yoshi eat a Blue Shell in the beginning of the Rotating Block structure to fly to the exit.
After the structure made of Rotating Blocks, Mario can find a ? Block in the floor, along with a Buzzy Beetle. If Mario pressed the Red ! Switch, the red Dotted Line Blocks turn into ! Blocks, allowing him to reach the key and the keyhole.
Enemies[edit]
| Image | Name | Count |
|---|---|---|
| Spike Top | 6 | |
| Swooper | 5 | |
| Buzzy Beetle | 23 | |
| Koopa Paratroopa (green) | 1 | |
| Koopa Paratroopa (red) | 2 | |
| Koopa Shell (green) | 1 | |
| Koopa Shell (red) | 1 | |
| Koopa Shell (blue) | 2 | |
| Koopa Shell (yellow) | 1 | |
| Blargg | 4 | |
| Jumping Piranha Plant | 1 | |
| Passin' Chuck | 1 |
Names in other languages[edit]
| Language | Name | Meaning | Notes |
|---|---|---|---|
| Japanese | バニラドーム コース1[?] Banira Dōmu Kōsu 1 |
Vanilla Dome Course 1 | |
| French | Dome Vanille 1[?] | Vanilla Dome 1 | |
| German | Vanille-Dom 1[?] | Vanilla Dome 1 | |
| Italian | Cupola Vaniglia 1[?] | Vanilla Dome 1 | |
| Spanish | Colina Vainilla 1[?] | Vanilla Hill 1 |
