Skeleton Goonies' Lava Lair: Difference between revisions
FanOfYoshi (talk | contribs) m (→Names in other languages: Typo) |
No edit summary |
||
| (15 intermediate revisions by 9 users not shown) | |||
| Line 1: | Line 1: | ||
{{ | {{level infobox | ||
|image=[[File:SkeletonGooniesLavaLair.png|270px]] | |image=[[File:SkeletonGooniesLavaLair.png|270px]] | ||
|code=6-S | |code=6-S | ||
| Line 5: | Line 5: | ||
|before=[[King Bowser's Castle (Yoshi's Woolly World)|<<]] | |before=[[King Bowser's Castle (Yoshi's Woolly World)|<<]] | ||
|after=[[Wonderful World of Wool|>>]] | |after=[[Wonderful World of Wool|>>]] | ||
| | |track=Special Course | ||
}} | }} | ||
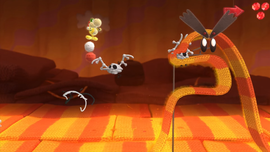
'''Skeleton Goonies' Lava Lair''' is the final | '''Skeleton Goonies' Lava Lair''' is the final course of [[World 6 (Yoshi's Woolly World)|World 6]] in ''[[Yoshi's Woolly World]]''. It is unlocked after all forty [[Smiley Flower]]s in each other course of World 6 are collected. It is a treacherous course with [[lava]] all across the bottom. All the terrain Yoshi can stand on, short of the area with the [[Goal Ring]], is an impermanent [[Cascading Stone]]. As per the name, enemies mostly consist of [[Skeleton Goonie]]s. To stay above the lava, the player has to carefully bounce off Skeleton Goonies while [[swallow|eat]]ing some of them to create [[yarn ball]]s. As with all special courses, there are no [[Checkpoint (Yoshi's Woolly World)|Checkpoints]]. There is only one source of [[heart (item)|heart]]s in the entire course, and its only at the end. | ||
==Layout== | ==Layout== | ||
The | The course begins with many Cascading Stones in a descending staircase pattern. The last two have gaps between them. A wave of six [[Skeleton Goonie]]s fly by, leaving only leaving space above the lowest Cascading Stone. Afterward, the pattern of Cascading Stones goes back up, but with gaps between each of the three stones. The last of these is paired with a stone of the same height, but following them is open air. Skeleton Goonies soar over this area, and the height boost from [[stomp]]ing them is helpful in avoiding scattered [[Lava Geyser]]s. Afterwards, four blocks of tiny Cascading Stones appear in a descending staircase with gaps for Lava Geysers to burst from. A Sketeton Goonie heralds this pattern stopping. Then the final two Cascading Stones are in a staircase pattern starting from a higher point. meaning a Skeleton Goonie has to be stomped to proceed to them. There is a wall in front of the final Cascading Stone, which ends on a [[Winged Cloud]] near the lava. A Skeleton Goonie roughly matching the height of the final Cascading Stone flies through the wall. When the Winged Cloud is activated, it reveals a Cascading Stone at the bottom of the wall, which can be stood on to safely and easily pass under the wall and jumped off of to reach taller Cascading Stones. Afterward, there is a contiguous set of thin Cascading Stones. A Warp Pipe from the top of the screen is inline with the center this formation of stones, and it dumps out an infinite supply of [[Flightless Skeleton Goonie]]s. More stones in a rising staircase formation with gaps appear, followed by the course's first [[Gargantua Blargg]]. It rushes to the left and does not follow Yoshi. It is followed by another group of scattered Skeleton Goonies, enabling the player to regain height for a second Gargantua Blargg attack. More Skeleton Goonies follow, leading to more Cascading Stones and Winged Clouds. This time, the stones are thin and alternate between high and low, though all of them are close to the to the lava There are two red [[Shy Guy]]s present on the far right end. After leaving, four more Skeleton Goonies appear, followed by a set of three Gargantua Blarggs. There are no Skeleton Goonies between each Blargg, so Yoshi has to stay above the height of all incoming Blarggs. The far right of this area ends on a [[Warp Pipe]] from the top of the screen, with a single Cascading Stone underneath it. Once this Cascading Stone drops low enough, a Skeleton Goonie appears to allow Yoshi to climb back to the Warp Pipe. | ||
The Warp Pipe is a one way exit to the area with the [[Goal Ring]], which has no hazards. A final Winged Cloud is here, granting Yoshi all ten of the course's [[heart (item)|heart]]s and the final [[Smiley Flower]]. However, there are no enemies here to make yarn balls with to hit the cloud. Such a yarn ball has to be obtained from the other area of the course. | |||
==Collectibles== | ==Collectibles== | ||
===[[Smiley Flower]]s=== | ===[[Smiley Flower]]s=== | ||
{| class="wikitable" style="text-align: center" | |||
!Image | |||
!Location | |||
|- | |||
|[[File:YWW 6-S SF1.jpg|150px]] | |||
|Behind a Cascading Stone just before reaching the Skeleton Goonies that need to be bounced on. | |||
|- | |||
|[[File:YWW 6-S SF2.jpg|150px]] | |||
|Just above the group of Skeleton Goonies that needs to be jumped on, just before the first group of Lava Geysers. | |||
|- | |||
|[[File:YWW 6-S SF3.jpg|150px]] | |||
|In a Winged Cloud below the [[Flightless Skeleton Goonie]]-spawning warp pipe. | |||
|- | |||
|[[File:YWW 6-S SF4.jpg|150px]] | |||
|In the ''right'' Winged Cloud just above the Cascading Stones after the first Blargg. | |||
|- | |||
|[[File:YWW 6-S SF5.jpg|150px]] | |||
|In a Winged Cloud just before the Goal Ring. | |||
|} | |||
===[[Wonder Wool]]s=== | ===[[Wonder Wool]]s=== | ||
{{multiple image | |||
|align = right | |||
|direction = vertical | |||
|footer = NES Yoshi (North American/European design on left, Japanese design on right) | |||
|width = 125 | |||
|image1 = YWW 6-S NES Yoshi.jpg | |||
|image2 = NES Yoshi (Japan).png | |||
}} | |||
{| class="wikitable" style="text-align: center" | |||
!Image | |||
!Location | |||
|- | |||
|[[File:YWW 6-S WW1.jpg|150px]] | |||
|On top of the lowest Cascading Stone immediately after the first large group of Skeleton Goonies. | |||
|- | |||
|[[File:YWW 6-S WW2.jpg|150px]] | |||
|Near the lava, by the group of Skeleton Goonies that need to be jumped on, just after the second Smiley Flower. | |||
|- | |||
|[[File:YWW 6-S WW3.jpg|150px]] | |||
|Just behind the first Blargg. Yoshi must jump on a Skeleton Goonie to safely get it. | |||
|- | |||
|[[File:YWW 6-S WW4.jpg|150px]] | |||
|In the ''left'' Winged Cloud just above the Cascading Stones after the first Blargg. | |||
|- | |||
|[[File:YWW 6-S WW5.jpg|150px]] | |||
|Behind a Cascading Stone just below the warp pipe leading to the Goal Ring. | |||
|} | |||
Collecting all of the Wonder Wools knits NES Yoshi back together. | Collecting all of the Wonder Wools knits NES Yoshi back together. | ||
| Line 38: | Line 70: | ||
*[[Skeleton Goonie]]s | *[[Skeleton Goonie]]s | ||
*[[Flightless Skeleton Goonie]]s | *[[Flightless Skeleton Goonie]]s | ||
*[[Blargg]]s | *[[Gargantua Blargg]]s | ||
*[[Shy Guy]]s | *[[Shy Guy]]s | ||
==Names in other languages== | ==Names in other languages== | ||
{{foreign names | {{foreign names | ||
| | |Jpn=ほねあほーどりのあほー | ||
| | |JpnR=Hone Ahōdori no Ahō | ||
| | |JpnM=Lit. "Fools of the Skeleton Goonies"<br>A reference to the Goonies' Japanese namesake「あほうどり」(''ahōdori'', albatross), which is from「阿呆」(''ahō'', fool) and compounded「鳥」(''tori'', bird) | ||
|Kor=뼈닥멍청새의 은신처 | |Kor=뼈닥멍청새의 은신처 | ||
|Ger=Lavafluss der Skelett-Birdies<ref>{{cite|author=Sergej Jurataev|date=February 9, 2017|url=https://www.giga.de/tipp/komplettloesung-alle-level-geloest-mit-video-walkthrough-poochy-yoshis-woolly-world/page/7/|title=Poochy & Yoshi's Woolly World: Komplettlösung - Welt 6 komplett gelöst mit Video-Walkthrough|publisher=GIGA|accessdate=December 14, 2024|language=de}}</ref> | |||
|GerM=Lava flow of the Skeleton Birdies | |||
|KorR=Ppyeodakmeongcheongsae'ui Eunshincheo | |KorR=Ppyeodakmeongcheongsae'ui Eunshincheo | ||
|KorM=Skeleton Goonie's Lair | |KorM=Skeleton Goonie's Lair | ||
|Spa=A toda lava | |||
|SpaM=Full Lava Ahead | |||
|Ita=Skeletro Gabby, perché ti arrabbi? | |||
|ItaM=Skeleton Goonies, why are you angry? | |||
}} | }} | ||
==References== | |||
{{YWW | <references/> | ||
[[Category:Yoshi's Woolly World | |||
{{YWW levels}} | |||
[[Category:Yoshi's Woolly World levels]] | |||
[[Category:Volcanic areas]] | |||
Latest revision as of 10:22, January 30, 2025
| Level | |
|---|---|
| Skeleton Goonies' Lava Lair | |

| |
| Level code | 6-S |
| Game | Yoshi's Woolly World |
| Music track | Special Course |
| << Directory of levels >> | |
Skeleton Goonies' Lava Lair is the final course of World 6 in Yoshi's Woolly World. It is unlocked after all forty Smiley Flowers in each other course of World 6 are collected. It is a treacherous course with lava all across the bottom. All the terrain Yoshi can stand on, short of the area with the Goal Ring, is an impermanent Cascading Stone. As per the name, enemies mostly consist of Skeleton Goonies. To stay above the lava, the player has to carefully bounce off Skeleton Goonies while eating some of them to create yarn balls. As with all special courses, there are no Checkpoints. There is only one source of hearts in the entire course, and its only at the end.
Layout[edit]
The course begins with many Cascading Stones in a descending staircase pattern. The last two have gaps between them. A wave of six Skeleton Goonies fly by, leaving only leaving space above the lowest Cascading Stone. Afterward, the pattern of Cascading Stones goes back up, but with gaps between each of the three stones. The last of these is paired with a stone of the same height, but following them is open air. Skeleton Goonies soar over this area, and the height boost from stomping them is helpful in avoiding scattered Lava Geysers. Afterwards, four blocks of tiny Cascading Stones appear in a descending staircase with gaps for Lava Geysers to burst from. A Sketeton Goonie heralds this pattern stopping. Then the final two Cascading Stones are in a staircase pattern starting from a higher point. meaning a Skeleton Goonie has to be stomped to proceed to them. There is a wall in front of the final Cascading Stone, which ends on a Winged Cloud near the lava. A Skeleton Goonie roughly matching the height of the final Cascading Stone flies through the wall. When the Winged Cloud is activated, it reveals a Cascading Stone at the bottom of the wall, which can be stood on to safely and easily pass under the wall and jumped off of to reach taller Cascading Stones. Afterward, there is a contiguous set of thin Cascading Stones. A Warp Pipe from the top of the screen is inline with the center this formation of stones, and it dumps out an infinite supply of Flightless Skeleton Goonies. More stones in a rising staircase formation with gaps appear, followed by the course's first Gargantua Blargg. It rushes to the left and does not follow Yoshi. It is followed by another group of scattered Skeleton Goonies, enabling the player to regain height for a second Gargantua Blargg attack. More Skeleton Goonies follow, leading to more Cascading Stones and Winged Clouds. This time, the stones are thin and alternate between high and low, though all of them are close to the to the lava There are two red Shy Guys present on the far right end. After leaving, four more Skeleton Goonies appear, followed by a set of three Gargantua Blarggs. There are no Skeleton Goonies between each Blargg, so Yoshi has to stay above the height of all incoming Blarggs. The far right of this area ends on a Warp Pipe from the top of the screen, with a single Cascading Stone underneath it. Once this Cascading Stone drops low enough, a Skeleton Goonie appears to allow Yoshi to climb back to the Warp Pipe.
The Warp Pipe is a one way exit to the area with the Goal Ring, which has no hazards. A final Winged Cloud is here, granting Yoshi all ten of the course's hearts and the final Smiley Flower. However, there are no enemies here to make yarn balls with to hit the cloud. Such a yarn ball has to be obtained from the other area of the course.
Collectibles[edit]
Smiley Flowers[edit]
| Image | Location |
|---|---|

|
Behind a Cascading Stone just before reaching the Skeleton Goonies that need to be bounced on. |

|
Just above the group of Skeleton Goonies that needs to be jumped on, just before the first group of Lava Geysers. |

|
In a Winged Cloud below the Flightless Skeleton Goonie-spawning warp pipe. |

|
In the right Winged Cloud just above the Cascading Stones after the first Blargg. |

|
In a Winged Cloud just before the Goal Ring. |
Wonder Wools[edit]
Collecting all of the Wonder Wools knits NES Yoshi back together.
Enemies[edit]
Names in other languages[edit]
| Language | Name | Meaning | Notes |
|---|---|---|---|
| Japanese | ほねあほーどりのあほー[?] Hone Ahōdori no Ahō |
Lit. "Fools of the Skeleton Goonies" A reference to the Goonies' Japanese namesake「あほうどり」(ahōdori, albatross), which is from「阿呆」(ahō, fool) and compounded「鳥」(tori, bird) |
|
| German | Lavafluss der Skelett-Birdies[1] | Lava flow of the Skeleton Birdies | |
| Italian | Skeletro Gabby, perché ti arrabbi?[?] | Skeleton Goonies, why are you angry? | |
| Korean | 뼈닥멍청새의 은신처[?] Ppyeodakmeongcheongsae'ui Eunshincheo |
Skeleton Goonie's Lair | |
| Spanish | A toda lava[?] | Full Lava Ahead |
References[edit]
- ^ Sergej Jurataev (February 9, 2017). Poochy & Yoshi's Woolly World: Komplettlösung - Welt 6 komplett gelöst mit Video-Walkthrough. GIGA (German). Retrieved December 14, 2024.


