Allergia Gardens: Difference between revisions

From the Super Mario Wiki, the Mario encyclopedia
Jump to navigationJump to search
mNo edit summary
m (Text replacement - "(\| *)Jap([RMCN\d]* *=)" to "$1Jpn$2")
 
(31 intermediate revisions by 12 users not shown)
Line 1: Line 1:
{{Location-infobox
{{location infobox
|name=Allergia Gardens
|title=Allergia Gardens
|image=Allergia_Gardens.PNG
|image=[[File:Allergia_Gardens.png|256px]]
|caption=
|inhabitants=[[Sir Worth-A-Lot]], [[Sir Steal-A-Lot]], [[Sir Hop-A-Lot]], [[Amphibigun]], [[Scare-Oh!]], [[Ratfael]], [[Treasure Pest]]
|inhabitants=[[Sir Worth-A-Lot]], [[Sir Steal-A-Lot]], [[Sir Hop-A-Lot]], [[Amphibigun]], [[Scare-Oh!]], [[Ratfael]], [[Treasure Pest]]
|first_appearance=''[[Wario: Master of Disguise]]'' (2007)
|first_appearance=''[[Wario: Master of Disguise]]'' (2007)
}}
}}
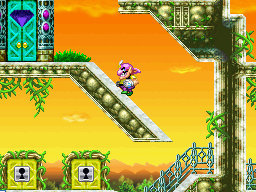
'''Allergia Gardens''' is the setting of the final episode of ''[[Wario: Master of Disguise]]''. [[Wario]] comes here in order to search for the fifth and final [[Wishstone]] fragment. It is a vast, labyrinthine {{wp|Hanging garden (cultivation)|hanging garden}} with many vines, spikes, and mushrooms. Many areas require the player to solve mushroom-based puzzles in order to continue. The purple doors with looping arrows on them will simply take Wario back to the same room; the green mushrooms in the area must all be pressed in order to turn the purple doors green and let Wario continue. Some of the mushrooms are invisible and require [[Genius Wario]] to see them and press them down. If a purple mushroom is pressed, either by Wario or by an enemy, the green mushrooms will be pushed back up and the player will have to start over, but once all of the green mushrooms in a given area are pressed, they will remain pressed and cannot be pushed back up. There are also red mushrooms that when pressed, cause vines that normally impede Wario's progress to wither.


'''Allergia Gardens''' is the final level in ''[[Wario: Master of Disguise]]''. [[Wario]] comes here in order to search for the fifth and final [[Wishstone]] fragment. The level takes place in a vast, labyrinthine garden at sunset with many vines, spikes, and mushrooms.
This area also features devices with huge gears in them, each with two switches on them. Pressing the switches in a certain order will cause a ladder to appear. The correct order for each switch is indicated by arrows displayed somewhere in the level. However, one of the arrow sets is invisible and requires Genius Wario to see it, and another set of arrows corresponds to a room with two switches, meaning the player must remember not only the directions of the arrows, but the colors as well.


Many areas require the player to solve mushroom-based puzzles in order to continue. The blue doors with looping arrows on them will simply take Wario back to the same room; the green mushrooms in the area must all be pressed in order to turn the blue doors green and let Wario continue. Some of the mushrooms are invisible and require [[Genius Wario]] to see them and press them down. If a blue mushroom is pressed, either by Wario or by an enemy, the green mushrooms will be pushed back up and the player will have to start over, but once all of the green mushrooms in a given area are pressed, they will remain pressed and cannot be pushed back up. There are also red mushrooms that when pressed, cause vines that normally impede Wario's progress to wither.
==Episodes==
 
{|class="wikitable" style="text-align: center"
The level also features devices with huge gears in them, each with two switches on them. Pressing the switches in a certain order will cause a ladder to appear. The correct order for each switch is indicated by arrows displayed somewhere in the level. However, one of the arrow sets is invisible and requires Genius Wario to see it, and another set of arrows corresponds to a room with two switches, meaning the player must remember not only the directions of the arrows, but the colors as well.
!width="235px"|Title
==History==
!Image
===Episode 10: The Final Face-Off!===
!Summary
Continuing from where the previous episode left off, [[Carpaccio]] leaves in search of the final Wishstone piece. [[Count Cannoli]] leads Wario to Allergia Gardens, then tells him that he's done playing tricks on him and that Carpaccio came here to protect the last piece of the Wishstone.
|-
 
!Episode 10:<br>[[The Final Face-Off!]]
When Wario catches up to Carpaccio, he takes the Crimson Diamond off of the door leading to where the final tablet is. Carpaccio then disappears and the color of a nearby door as well as the symbol on it changes. [[Goodstyle]] notes that the color of the door has changed and suspects that the garden is full of surprises. In order to change the blue doors back to green, Wario must hit all the green mushrooms in the area.
|[[File:WMODE10.png|192px]]
 
|Wario finds the last of the five Wishstone pieces, but reassembling it causes [[Terrormisu]], a demon who had been sealed inside it, to break free.
Wario eventually finds the Crimson Diamond and opens the big door. Carpaccio tries to stop him from reassembling the Wishstone, but Wario ignores him. The Wishstone reforms, and Tiaramisu emerges from it. She reveals that her true name is not Tiaramisu, but [[Terrormisu]], and that she is an ancient demon who had been sealed inside the Wishstone.
|-
 
![[Special Episode Part 5]]
Goodstyle now tells Wario the full story of the Wishstone. [[Poobah the Pharaoh]] had called upon Terrormisu to grant him a wish, but she demanded that he starve his people in exchange for it. The pharaoh agreed, but Terrormisu did not uphold her end of the bargain and instead stole everything from him, the turned his palace into a pyramid and sunk it beneath the desert sand. However, a mysterious stranger showed up and sealed Terrormisu away inside the Wishstone, then split it into five pieces.
|[[File:WMODSPE5.png|192px]]
 
|Terrormisu asks Wario and [[Count Cannoli]] to find some of her lost possessions, and offers "the most beautiful gem from her dimension" to whoever gets them first.
Terrormisu reveals that [[Sweatmore Peak]] is a nexus of dark power, which is how she was able to reach out to him and manipulate him despite being sealed inside the Wishstone. She prepares an attack, but Cannoli arrives just in time to save Carpaccio. He carries him off to safety while Wario fights Terrormisu. Once Wario defeats her, she gives up and flees to her home dimension.
|}
 
At this point, Goodstyle reveals his true form and identity. He is actually the first member of the Cannoli clan and the one who sealed Terrormisu away inside the Wishstone. He assumed his wand form in order to look for a master who could use his power to defeat Terrormisu once and for all, which is why he led Wario on his hunt for the Wishstone pieces. In exchange for defeating Terrormisu, Goodstyle gives Wario all of the treasure the Cannoli clan had accumulated.
 
Wario gloats about his newfound riches, but upon returning to the real world, he realizes that he is unable to take the treasure back with him.
 
===Special Episode: Part 5===
Terrormisu returns to Allergia Gardens because she left some of her possessions behind, and offers the "most beautiful gem from her dimension" to whoever can find them for her. Wario gives her the stuff, expecting an actual gem, but Terrormisu tells him that by "most beautiful gem from her dimension", she was talking about herself. She wants him to go back to her world with her so that they can conquer it together. Wario promptly leaves, with Terrormisu following behind.


==Enemies==
==Enemies==
Line 40: Line 33:
*[[Treasure Pest]]
*[[Treasure Pest]]
*[[Terrormisu]] (boss)
==[[Treasure chest#Wario: Master of Disguise|Treasure chest]] locations==
Note: A [[Treasure Pest]] will appear in place of one of the red chests, making it unobtainable on the first run.
===Episode 10===
{|class="wikitable
!
!Treasure
!Worth
!Location
|-
|[[File:WMoDRedChest.png]]
|Prince Redleg Pantaloon
|$21,930
|In the starting area on a high platform, reached by using [[Wicked Wario]].
|-
|[[File:WMoDRedChest.png]]
|Freaky Cat Glasses
|$3,212
|In a room behind a white door in the second green mushroom room. Cosmic Wario's laser must be used to hit a switch to access the chest.
|-
|[[File:WMoDRedChest.png]]
|Nostalgic Memory Picture
|$156
|Same room as the Freaky Cat Glasses.
|-
|[[File:WMoDRedChest.png]]
|Ears of Sanguineness
|$2,094
|Same room as the Freaky Cat Glasses.
|-
|[[File:WMoDPurpleChest.png]]
|Allergia Gardens Map
|
|In the upper-right corner of the room with the crumbling bridge and central platform with two Amphibiguns pointed in opposite directions.
|-
|[[File:WMoDRedChest.png]]
|Fishin' Hole Fishin' Pole
|$188
|In the upper-left corner of the room with the crumbling bridge and central platform with two Amphibiguns pointed in opposite directions.
|-
|[[File:WMoDPurpleChest.png]]
|Yellow Key
|
|In the isolated central area of the first room with Ratfaels, accessed by activating the green door in the bottom-right corner of the room, then doing the same in the next room.
|-
|[[File:WMoDRedChest.png]]
|Forever Tissue Box
|$101
|In the room with red mushrooms that spawn moving platforms, below the first mushroom.
|-
|[[File:WMoDRedChest.png]]
|Totally Legit UFO Photo
|$833
|In the upper-right corner of the room with red mushrooms that spawn moving platforms.
|-
|[[File:WMoDPurpleChest.png]]
|Red Key
|
|In the upper-right corner of the room with red mushrooms that spawn moving platforms, accessed either by pressing the mushrooms in order or using Arty Wario's blocks.
|-
|[[File:WMoDRedChest.png]]
|Midterm Clothespins
|$404
|Obtained by dropping down with [[Dragon Wario]] from the room to the left of where the Red Key is and unlocking the red door with the key.
|-
|[[File:WMoDRedChest.png]]
|Bluebird of Luckiness
|$997
|In an isolated area in the room with the first green mushroom puzzle, accessed by going to the left from where the Midterm Clothespins are.
|-
|[[File:WMoDRedChest.png]]
|Wooden Nostril Cleaners
|$640
|In the room to the right of the tall room with the red and blue doors, accessed with the Red Key.
|-
|[[File:WMoDPurpleChest.png]]
|Blue Key
|
|In the upper-right corner of the room with the Wooden Nostril Cleaners.
|-
|[[File:WMoDPurpleChest.png]]
|Crimson Diamond
|
|Obtained by unlocking the blue door and continuing upward into the above room where the chest is.
|}
===Special Episode: Part 5===
{|class="wikitable
!
!Treasure
!Worth
!Location
|-
|[[File:WMoDRedChest.png]]
|Dress of Cleaning Might
|$5,200
|Same location as the Fishin' Hole Fishin' Pole.
|-
|[[File:WMoDRedChest.png]]
|Spectacles of the Fool
|$18,000
|Same location as the Prince Redleg Pantaloon.
|-
|[[File:WMoDRedChest.png]]
|Lovely Burglar Mask
|$30,000
|Same location as the Bluebird of Luckiness.
|}


==Names in other languages==
{{Foreignname|
{{foreign names
|Jpn=くうちゅうていえん
|JpnR=Kūchū Teien
|JpnM=Floating Gardens
|Spa=Jardines Chus
|Spa=Jardines Chus
|SpaM=''Jardines'' means "gardens" and ''Chus'' comes from the Spanish onomatopoeia for sneezing, ''achús''
|SpaM=''Jardines'' means "gardens" and ''Chus'' comes from the Spanish onomatopoeia for sneezing, ''achús''
|Fra=Jardins Suspendus
|Fre=Jardins Suspendus
|FraM=Hanging gardens in refer to [[wikipedia:Hanging Gardens of Babylon|the Hanging Gardens of Babylon]]
|FreM=Hanging gardens
}}
}}


==Trivia==
==Trivia==
* This is the only level with no green chests in it, and by extension, the only one with no new Guise Gems or Mastery Gems to obtain.
[[File:WMODMissingTile.png|frame]]
{{BoxTop}}
*In the area where Wario must turn a gear three times to the right and two times to the left consecutively to make a ladder appear, there is a missing tile in the ceiling above the door.
*A painting with a portrait of Terrormisu can be seen in one of the rooms at this stage.
 
{{WMOD}}
{{WMOD}}
[[Category:Wario Places]]
[[Category:Wario Levels]]
[[Category:Mazes]]
[[Category:Mazes]]
[[Category:Wario: Master of Disguise locations]]

Latest revision as of 12:18, January 7, 2025

Allergia Gardens
Allergia Gardens.png
First appearance Wario: Master of Disguise (2007)
Inhabitants Sir Worth-A-Lot, Sir Steal-A-Lot, Sir Hop-A-Lot, Amphibigun, Scare-Oh!, Ratfael, Treasure Pest

Allergia Gardens is the setting of the final episode of Wario: Master of Disguise. Wario comes here in order to search for the fifth and final Wishstone fragment. It is a vast, labyrinthine hanging garden with many vines, spikes, and mushrooms. Many areas require the player to solve mushroom-based puzzles in order to continue. The purple doors with looping arrows on them will simply take Wario back to the same room; the green mushrooms in the area must all be pressed in order to turn the purple doors green and let Wario continue. Some of the mushrooms are invisible and require Genius Wario to see them and press them down. If a purple mushroom is pressed, either by Wario or by an enemy, the green mushrooms will be pushed back up and the player will have to start over, but once all of the green mushrooms in a given area are pressed, they will remain pressed and cannot be pushed back up. There are also red mushrooms that when pressed, cause vines that normally impede Wario's progress to wither.

This area also features devices with huge gears in them, each with two switches on them. Pressing the switches in a certain order will cause a ladder to appear. The correct order for each switch is indicated by arrows displayed somewhere in the level. However, one of the arrow sets is invisible and requires Genius Wario to see it, and another set of arrows corresponds to a room with two switches, meaning the player must remember not only the directions of the arrows, but the colors as well.

Episodes[edit]

Title Image Summary
Episode 10:
The Final Face-Off!
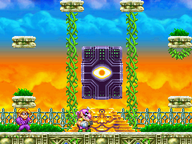
Episode 10 from Wario: Master of Disguise Wario finds the last of the five Wishstone pieces, but reassembling it causes Terrormisu, a demon who had been sealed inside it, to break free.
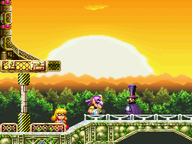
Special Episode Part 5 The beginning of Special Episode Part 5 in Wario: Master of Disguise. Terrormisu asks Wario and Count Cannoli to find some of her lost possessions, and offers "the most beautiful gem from her dimension" to whoever gets them first.

Enemies[edit]

Names in other languages[edit]

Language Name Meaning Notes
Japanese くうちゅうていえん[?]
Kūchū Teien
Floating Gardens
French Jardins Suspendus[?] Hanging gardens
Spanish Jardines Chus[?] Jardines means "gardens" and Chus comes from the Spanish onomatopoeia for sneezing, achús

Trivia[edit]

The missing tile in Allergia Gardens from Wario: Master of Disguise
  • In the area where Wario must turn a gear three times to the right and two times to the left consecutively to make a ladder appear, there is a missing tile in the ceiling above the door.
  • A painting with a portrait of Terrormisu can be seen in one of the rooms at this stage.