Champion's Road: Difference between revisions
No edit summary |
m (Text replacement - "(\| *)Jap([RMCN\d]* *=)" to "$1Jpn$2") |
||
| (143 intermediate revisions by 87 users not shown) | |||
| Line 1: | Line 1: | ||
{{ | {{level infobox | ||
|title=Champion's Road | |title=Champion's Road | ||
|image=[[File:Super Mario 3D World - Champion's Road.png|250px]] | |image=[[File:Super Mario 3D World - Champion's Road.png|250px]] | ||
|code={{world|crown|crown}} | |code={{world|crown|crown}} | ||
|world=[[World Crown]] | |world=[[World Crown]] | ||
|game=''[[Super Mario 3D World]]'' | |game=''[[Super Mario 3D World]]''<br>''[[Super Mario 3D World + Bowser's Fury]]'' | ||
|limit=500 seconds | |limit=500 seconds | ||
| | |before_alt= | ||
|before=[[Boss Blitz|<<]] [[Captain Toad's Fiery Finale|<<]] [[Mystery House Marathon|<<]] | |||
|before=[[Boss Blitz|<<]] | |after= | ||
|secret= | |secret= | ||
}} | }} | ||
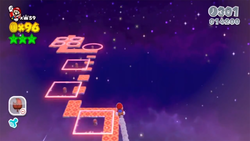
'''Champion's Road''', or '''{{world|crown|crown}}''', is the final level in ''[[Super Mario 3D World]]''. It is analogous to '''{{world|S8|crown}} | '''Champion's Road''' ('''Champion Road''' in the British English Wii U version), or '''{{world|crown|crown}}''', is the final level in ''[[Super Mario 3D World]]'' and its [[Nintendo Switch]] port ''[[Super Mario 3D World + Bowser's Fury]]''. It is analogous to the [[Grandmaster Galaxy]] of ''[[Super Mario Galaxy 2]]'', {{world link|S8|crown|Special 8-Crown}} of ''[[Super Mario 3D Land]]'', the [[Darker Side]] of ''[[Super Mario Odyssey]]'', and [[The Final-Final Test Badge Marathon]] in ''[[Super Mario Bros. Wonder]]'', designed to be the most challenging level in the game. The level is relatively lengthy, and contains no [[checkpoint]]s or power-ups, including the [[Invincibility Leaf]]. It is available as soon as its World is unlocked, which requires obtaining all [[Green Star]]s, [[Stamp]]s and Golden Flags available thus far. | ||
On the world map, Champion's Road is represented by a crown, which has a similar appearance to [[Boss Blitz Galaxy]]'s world map model in ''[[Super Mario Galaxy 2]]''. A heartbeat sound effect can be heard while standing near the level. Intended to be challenging, the [[Assist Block]] will never appear in this level. | |||
==Layout== | ==Layout== | ||
The first section of the level contains floating colorful blocks and [[Octoomba]]s on top of | [[File:SM3DW Plessie Greeting 2.jpg|thumb|left|Plessie greeting Toad]] | ||
The first section of the level contains floating colorful blocks and [[Octoomba]]s on top of dark purple blocks that move from side to side. After that, a [[Clear Pipe]] takes players to an elevating section with three [[Fire Bro]]s. On top of it, players must run across blocks that are only one block wide and must either defeat or dodge the several [[Chargin' Chuck]]s (which can also run across these blocks). A [[Warp Box]] then transports players to the next section. | |||
The next section requires players to run and time their jumps over [[Blinking Block|Blast Block]]s that alternate in double time. After traversing the Blast Blocks, players go into a Clear Pipe cannon that tosses them into an arena with respawning crumbling blocks, three [[Magikoopa]]s, and four [[Fire Bar]]s in each corner. Players must defeat all the Magikoopas in order for a Warp Box to appear. | |||
After the area with the Magikoopas and the crumbling blocks, players must travel across gray platforms while also avoiding swinging [[spiked roller]]s and [[Fuzzy|Fuzzies]]. The players can use a [[Potted Piranha Plant]] to help get rid of the Fuzzies. If the player gets rid of all the Fuzzies on the large block before the end of the section, they receive some [[Coin]]s. Then there is another Warp Box that takes players to the next section. | |||
In this section, players must wall-jump upward, with the aid of a spring platform. They also must avoid jumping into the [[Horned Ant Trooper]]s, but they can also use them to move up the walls. Past the wall-jumping, players must then jump on a series of [[Piranha Creeper]]s to go up. Then, players need to swim on a floating square of water that takes them through blue and red [[Spike Block]]s. When players succeed, they go into the Clear Pipe, which shoots them into the last obstacle part of the level. | |||
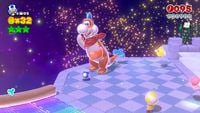
Players must use the [[Dash Panel]]s to dash through this section also while avoiding the shockwaves of [[Ring Burner]]s. The path takes them to a square area, where players must collect five [[Key Coin]]s for a Warp Box to open. Then, past the Warp Box, players go through Clear Pipes that spell out "THANK YOU!!" in neon lights. Then the players see several [[Sprixie|Sprixies]], [[Toad (species)|Toads]], [[Rabbit]]s, [[Luma]]s, [[Plessie]], and [[Captain Toad]] cheering for them near the Goal Pole. Unlike most regular stages, this stage's Goal Pole is the boss version. | |||
{{br|left}} | |||
==Collectables== | |||
===[[Green Star]]s=== | |||
{| class="wikitable" style="text-align: center" | |||
!Image | |||
!Location | |||
|- | |||
|[[File:SM3DW WCr-Cr 1st Green Star.jpg|150px]] | |||
|The first Green Star is found past the area with the Blast Blocks. | |||
|- | |||
|[[File:SM3DW WCr-Cr 2nd Green Star.jpg|150px]] | |||
|The second Green Star is at the end of the section with the Fuzzies and swinging spiked rollers. | |||
|- | |||
|[[File:SM3DW WCr-Cr 3rd Green Star.jpg|150px]] | |||
|The third Green Star is at the end of the dash section. | |||
|} | |||
==[[ | ===[[List of Super Mario 3D World stamps|Stamp]]=== | ||
{{Multiple image | |||
|align=right | |||
|direction=horizontal | |||
|width=100 | |||
|image1=SM3DW-LuckyCatMarioStamp.png | |||
|alt1=Wii U version | |||
|image2=SM3DW_BF_LuckyCatMarioStamp.png | |||
|alt2=Switch version | |||
}} | |||
== | {| class="wikitable" style="text-align: center" | ||
[[File: | !Image | ||
!Location | |||
|- | |||
|[[File:SM3DW Champion's Road stamp.jpg|150px]] | |||
|On the second step leading to the goal pole. The stamp is [[Lucky Cat Mario]]. | |||
|} | |||
==Enemies== | ==Enemies== | ||
{{number of enemies | |||
|image1=[[File:Octoomba SM3DW Prima.jpg|50px]] | |||
|name1=[[Octoomba]] | |||
|count1=3 | |||
|image2=[[File:Fire Bro SM3DW Prima.jpg|50px]] | |||
|name2=[[Fire Bro]] | |||
|count2=3 | |||
|image3=[[File:Chargin' Chuck Artwork - Super Mario 3D World.png|50px]] | |||
|name3=[[Chargin' Chuck]] | |||
|count3=5 | |||
|image4=[[File:Magikoopa Artwork - Super Mario 3D World.png|50px]] | |||
|name4=[[Magikoopa]] | |||
|count4=3 | |||
|image5=[[File:Honeycomb Skyway.jpg|50px]] | |||
|name5=[[Fire Bar]] | |||
|count5=4 | |||
|image6=[[File:SM3DWBF Spiked Roller.jpg|50px]] | |||
|name6=[[Spiked roller]] | |||
|count6=6 | |||
|image7=[[File:Piranha Plant SM3DW Prima.jpg|50px]] | |||
|name7=[[Piranha Plant]] | |||
|count7=1 | |||
|image8=[[File:Fuzzy SM3DW Prima.jpg|50px]] | |||
|name8=[[Fuzzy]] | |||
|count8=40 | |||
|image9=[[File:Horned Ant Trooper SM3DW Prima.jpg|50px]] | |||
|name9=[[Horned Ant Trooper]] | |||
|count9=12 | |||
|image10=[[File:Piranha Creeper SM3DW Prima.jpg|50px]] | |||
|name10=[[Piranha Creeper]] | |||
|count10=4 | |||
|image11=[[File:Ring Burner SM3DW Prima.jpg|50px]] | |||
|name11=[[Ring Burner]] | |||
|count11=8 | |||
}} | |||
==Music== | |||
{{Main|Gusty Garden Galaxy (theme)}} | |||
{{media table | |||
|file1=Super Mario 3D World - Champions Road.oga | |||
|title1=Champion Road | |||
|description1= | |||
|length1=0:30 | |||
}} | |||
The music that plays in this level is a rendition of "[[Gusty Garden Galaxy (theme)|Gusty Garden Galaxy]]" from ''[[Super Mario Galaxy]]'', which also plays in [[Honeycomb Starway]] and [[Honeycomb Skyway]]. The track is titled "Champion Road" in the ''[[Super Mario 3D World Original Soundtrack]]'', the level's British English name, due to the English version of the CD only releasing in Europe and Australia. | |||
This arrangement is also available as a song in ''[[Super Smash Bros. for Wii U]]'', where it can be heard on the [[Mario Galaxy (stage)|Mario Galaxy]] stage, and in ''[[Super Smash Bros. Ultimate]]'', where it can be played on any ''[[Super Smash Bros. (series)|Super Smash Bros.]]''- and ''[[Super Mario (series)|Super Mario]]''-series stage. Due to it being an arrangement of "Gusty Garden Galaxy", the song is listed after the original theme in the Sound Test of ''Super Smash Bros. Ultimate'', rather than after "The Great Tower Showdown 2" from this game's [[The Great Tower of Bowser Land]] level like in ''Super Smash Bros. for Wii U''. | |||
==Names in other languages== | ==Names in other languages== | ||
{{ | {{foreign names | ||
| | |Jpn=ファイナル!チャンピオンシップロード | ||
| | |JpnR=Fainaru! Chanpionshippu rōdo | ||
| | |JpnM=Final! Championship Road | ||
| | |Spa=La prueba final de los campeones | ||
| | |SpaM=Champions' ultimate test | ||
| | |Fre=Route de l’ultime défi | ||
| | |FreM=Road of the ultimate challenge | ||
|Dut=Kampioensweg | |Dut=Kampioensweg | ||
|DutM=Champion | |DutM=Champion road | ||
|Ger=Der Weg der Champions | |Ger=Der Weg der Champions | ||
|GerM=The road of the champions | |GerM=The road of the champions | ||
|Rus=Путь чемпиона | |||
|RusR=Put’ chempiona | |||
|RusM=Path of the champion | |||
|Ita=Percorso del campione | |||
|ItaM=Champion's Route | |||
|Por=Rota dos campeões | |||
|PorM=Champions' route | |||
|ChiS=最终!冠军之路 | |||
|ChiSR=Zuìzhōng! Guànjūn zhī Lù | |||
|ChiSM=Final! Champion's Road | |||
|ChiT=最終!冠軍之路 | |||
|ChiTR=Zuìzhōng! Guànjūn zhī Lù | |||
|ChiTM=Final! Champion's Road | |||
|Kor=파이널! 챔피언십 로드 | |||
|KorR=Paineol! Chaempieonsip Rodeu | |||
|KorM=Final! Championship Road | |||
}} | }} | ||
==Trivia== | ==Trivia== | ||
*The part where the Clear Pipe makes up the | *The part where the Clear Pipe makes up the phrase "THANK YOU!!" is similar to ''Super Mario 3D Land''{{'}}s {{world link|S8|crown|Special 8-Crown}}'s "THANK YOU!!", which is made of [[Flip Panel (platform)|Flip Panel]]s instead. | ||
**It is additionally a homage to [[World 9 (Super Mario Bros.: The Lost Levels)|World 9-4]] of ''[[Super Mario Bros.: The Lost Levels]]'', which ended with a series of blocks spelling "アリガトウ!" ("Arigatō!", Japanese for "Thank You!"). | **It is additionally a homage to [[World 9-4 (Super Mario Bros.: The Lost Levels)|World 9-4]] of ''[[Super Mario Bros.: The Lost Levels]]'', which ended with a series of blocks spelling "アリガトウ!" ("Arigatō!", Japanese for "Thank You!"). | ||
* | *Unlike in other levels, collecting all of the Key Coins does not interrupt gameplay to show the Warp Box opening, instead causing it to open immediately; this is likely to prevent the player from losing control on the Dash Panels and falling off the level. | ||
*In ''[[Super Mario 3D World + Bowser's Fury]]'', there is a minor visual glitch not present in the original Wii U version of the game, in which the Clear Pipe leading to the penultimate section of the course becomes invisible when the floating square of water passes across it. This glitch does not affect the ability to interact with the Clear Pipe when it occurs. | |||
{{ | {{SM3DW levels}} | ||
[[de:Der Weg der Champions]] | |||
[[Category: | [[Category:Cosmic areas]] | ||
[[Category: | [[Category:Super Mario 3D World levels]] | ||
Latest revision as of 11:36, January 7, 2025
| Level | |
|---|---|
| Champion's Road | |

| |
| Level code | World |
| World | World Crown |
| Game | Super Mario 3D World Super Mario 3D World + Bowser's Fury |
| Time limit | 500 seconds |
| << << << Directory of levels >> | |
Champion's Road (Champion Road in the British English Wii U version), or World ![]() Crown-
Crown-![]() Crown, is the final level in Super Mario 3D World and its Nintendo Switch port Super Mario 3D World + Bowser's Fury. It is analogous to the Grandmaster Galaxy of Super Mario Galaxy 2, Special 8-
Crown, is the final level in Super Mario 3D World and its Nintendo Switch port Super Mario 3D World + Bowser's Fury. It is analogous to the Grandmaster Galaxy of Super Mario Galaxy 2, Special 8-![]() Crown of Super Mario 3D Land, the Darker Side of Super Mario Odyssey, and The Final-Final Test Badge Marathon in Super Mario Bros. Wonder, designed to be the most challenging level in the game. The level is relatively lengthy, and contains no checkpoints or power-ups, including the Invincibility Leaf. It is available as soon as its World is unlocked, which requires obtaining all Green Stars, Stamps and Golden Flags available thus far.
Crown of Super Mario 3D Land, the Darker Side of Super Mario Odyssey, and The Final-Final Test Badge Marathon in Super Mario Bros. Wonder, designed to be the most challenging level in the game. The level is relatively lengthy, and contains no checkpoints or power-ups, including the Invincibility Leaf. It is available as soon as its World is unlocked, which requires obtaining all Green Stars, Stamps and Golden Flags available thus far.
On the world map, Champion's Road is represented by a crown, which has a similar appearance to Boss Blitz Galaxy's world map model in Super Mario Galaxy 2. A heartbeat sound effect can be heard while standing near the level. Intended to be challenging, the Assist Block will never appear in this level.
Layout[edit]
The first section of the level contains floating colorful blocks and Octoombas on top of dark purple blocks that move from side to side. After that, a Clear Pipe takes players to an elevating section with three Fire Bros. On top of it, players must run across blocks that are only one block wide and must either defeat or dodge the several Chargin' Chucks (which can also run across these blocks). A Warp Box then transports players to the next section.
The next section requires players to run and time their jumps over Blast Blocks that alternate in double time. After traversing the Blast Blocks, players go into a Clear Pipe cannon that tosses them into an arena with respawning crumbling blocks, three Magikoopas, and four Fire Bars in each corner. Players must defeat all the Magikoopas in order for a Warp Box to appear.
After the area with the Magikoopas and the crumbling blocks, players must travel across gray platforms while also avoiding swinging spiked rollers and Fuzzies. The players can use a Potted Piranha Plant to help get rid of the Fuzzies. If the player gets rid of all the Fuzzies on the large block before the end of the section, they receive some Coins. Then there is another Warp Box that takes players to the next section.
In this section, players must wall-jump upward, with the aid of a spring platform. They also must avoid jumping into the Horned Ant Troopers, but they can also use them to move up the walls. Past the wall-jumping, players must then jump on a series of Piranha Creepers to go up. Then, players need to swim on a floating square of water that takes them through blue and red Spike Blocks. When players succeed, they go into the Clear Pipe, which shoots them into the last obstacle part of the level.
Players must use the Dash Panels to dash through this section also while avoiding the shockwaves of Ring Burners. The path takes them to a square area, where players must collect five Key Coins for a Warp Box to open. Then, past the Warp Box, players go through Clear Pipes that spell out "THANK YOU!!" in neon lights. Then the players see several Sprixies, Toads, Rabbits, Lumas, Plessie, and Captain Toad cheering for them near the Goal Pole. Unlike most regular stages, this stage's Goal Pole is the boss version.
Collectables[edit]
Green Stars[edit]
Stamp[edit]
| Image | Location |
|---|---|

|
On the second step leading to the goal pole. The stamp is Lucky Cat Mario. |
Enemies[edit]
| Image | Name | Count |
|---|---|---|

|
Octoomba | 3 |

|
Fire Bro | 3 |
| Chargin' Chuck | 5 | |

|
Magikoopa | 3 |
| Fire Bar | 4 | |
| Spiked roller | 6 | |

|
Piranha Plant | 1 |

|
Fuzzy | 40 |

|
Horned Ant Trooper | 12 |

|
Piranha Creeper | 4 |

|
Ring Burner | 8 |
Music[edit]
- Main article: Gusty Garden Galaxy (theme)
| File info 0:30 |
The music that plays in this level is a rendition of "Gusty Garden Galaxy" from Super Mario Galaxy, which also plays in Honeycomb Starway and Honeycomb Skyway. The track is titled "Champion Road" in the Super Mario 3D World Original Soundtrack, the level's British English name, due to the English version of the CD only releasing in Europe and Australia.
This arrangement is also available as a song in Super Smash Bros. for Wii U, where it can be heard on the Mario Galaxy stage, and in Super Smash Bros. Ultimate, where it can be played on any Super Smash Bros.- and Super Mario-series stage. Due to it being an arrangement of "Gusty Garden Galaxy", the song is listed after the original theme in the Sound Test of Super Smash Bros. Ultimate, rather than after "The Great Tower Showdown 2" from this game's The Great Tower of Bowser Land level like in Super Smash Bros. for Wii U.
Names in other languages[edit]
| Language | Name | Meaning | Notes |
|---|---|---|---|
| Japanese | ファイナル!チャンピオンシップロード[?] Fainaru! Chanpionshippu rōdo |
Final! Championship Road | |
| Chinese (simplified) | 最终!冠军之路[?] Zuìzhōng! Guànjūn zhī Lù |
Final! Champion's Road | |
| Chinese (traditional) | 最終!冠軍之路[?] Zuìzhōng! Guànjūn zhī Lù |
Final! Champion's Road | |
| Dutch | Kampioensweg[?] | Champion road | |
| French | Route de l’ultime défi[?] | Road of the ultimate challenge | |
| German | Der Weg der Champions[?] | The road of the champions | |
| Italian | Percorso del campione[?] | Champion's Route | |
| Korean | 파이널! 챔피언십 로드[?] Paineol! Chaempieonsip Rodeu |
Final! Championship Road | |
| Portuguese | Rota dos campeões[?] | Champions' route | |
| Russian | Путь чемпиона[?] Put’ chempiona |
Path of the champion | |
| Spanish | La prueba final de los campeones[?] | Champions' ultimate test |
Trivia[edit]
- The part where the Clear Pipe makes up the phrase "THANK YOU!!" is similar to Super Mario 3D Land's Special 8-
 Crown's "THANK YOU!!", which is made of Flip Panels instead.
- It is additionally a homage to World 9-4 of Super Mario Bros.: The Lost Levels, which ended with a series of blocks spelling "アリガトウ!" ("Arigatō!", Japanese for "Thank You!").
- Unlike in other levels, collecting all of the Key Coins does not interrupt gameplay to show the Warp Box opening, instead causing it to open immediately; this is likely to prevent the player from losing control on the Dash Panels and falling off the level.
- In Super Mario 3D World + Bowser's Fury, there is a minor visual glitch not present in the original Wii U version of the game, in which the Clear Pipe leading to the penultimate section of the course becomes invisible when the floating square of water passes across it. This glitch does not affect the ability to interact with the Clear Pipe when it occurs.


