Drybake Stadium: Difference between revisions
Xavthedragon (talk | contribs) |
m (Text replacement - "(\| *)Jap([RMCN\d]* *=)" to "$1Jpn$2") |
||
| (28 intermediate revisions by 19 users not shown) | |||
| Line 1: | Line 1: | ||
{{ | {{level infobox | ||
|title=Drybake Stadium | |title=Drybake Stadium | ||
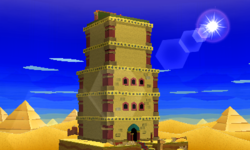
|image=[[File:DrybakeStadium.png|250px]] | |image=[[File:DrybakeStadium.png|250px]]<br>View of the stadium | ||
|code=W2-5 | |code=W2-5 | ||
|world=[[World 2 (Paper Mario: Sticker Star)|World 2]] | |world=[[World 2 (Paper Mario: Sticker Star)|World 2]] | ||
|game=''[[Paper Mario: Sticker Star]]'' | |game=''[[Paper Mario: Sticker Star]]'' | ||
|boss=[[Tower Power Pokey]] | |boss=[[Tower Power Pokey]] | ||
| | |before_alt= | ||
|before=[[Sandshifter Ruins|<<]] | |before=[[Sandshifter Ruins|<<]] | ||
|after= | |after= | ||
| Line 13: | Line 12: | ||
}} | }} | ||
'''Drybake Stadium''' is the fifth and final level of [[World 2 (Paper Mario: Sticker Star)|World 2]] in ''[[Paper Mario: Sticker Star]]''. It is a tower with a baseball stadium at the top. [[Tower Power Pokey]], the boss of this level appears. | '''Drybake Stadium''' is the fifth and final level of [[World 2 (Paper Mario: Sticker Star)|World 2]] in ''[[Paper Mario: Sticker Star]]''. It is a tower with a baseball stadium at the top. [[Tower Power Pokey]], the boss of this level appears. | ||
Drybake Stadium is one of two standard levels in the game to not contain any collectable [[Thing]]s, along with [[Bowser Jr.'s Flotilla]]. This is also the only level in the game in which [[Mural Goomba]]s and [[Mural Koopa]]s appear. | |||
==Layout== | ==Layout== | ||
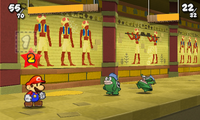
[[File:Drybake Stadium battle PMSS.png|thumb|left|Mario fights two Spikes in Drybake Stadium]] | |||
The first area is a flat desert area with some stairs to a gigantic hole for [[Paperization]]. Placing the three Tablet Piece scraps in the hole will reveal the stadium itself, as Mario and Kersti flee in shock. | The first area is a flat desert area with some stairs to a gigantic hole for [[Paperization]]. Placing the three Tablet Piece scraps in the hole will reveal the stadium itself, as Mario and Kersti flee in shock. | ||
| Line 26: | Line 28: | ||
The fifth floor is a very basic floor - it is a simple hallway with the final puzzle gate. Any Flower sticker must be placed on the left, and a POW Block should be placed on the right. The Toad will reveal the final elevator room, with a [[Heart Block]] and [[Save Block]] available. Taking the elevator will put Mario at "home plate" in the stadium, where the Royal Sticker can be found resting. Approaching it will reveal the Tower Power Pokey. After defeating it, Mario can collect the Royal Sticker and complete the level. The epilogue of the chapter also reveals that Kamek was the reason why the Stadium had disappeared. | The fifth floor is a very basic floor - it is a simple hallway with the final puzzle gate. Any Flower sticker must be placed on the left, and a POW Block should be placed on the right. The Toad will reveal the final elevator room, with a [[Heart Block]] and [[Save Block]] available. Taking the elevator will put Mario at "home plate" in the stadium, where the Royal Sticker can be found resting. Approaching it will reveal the Tower Power Pokey. After defeating it, Mario can collect the Royal Sticker and complete the level. The epilogue of the chapter also reveals that Kamek was the reason why the Stadium had disappeared. | ||
=== Sticker upgrade spot === | |||
In the third floor between the Save and Heart Blocks. | |||
==Area Tattle== | |||
===Outside the Stadium=== | |||
* ''Nothing here, Weird...'' (before all three [[Tablet Piece]]s are placed) | |||
* ''I'm surprised a tower like this was even built. I mean, look at this thing soar!'' (after the Stadium forms back) | |||
===Inside the Stadium Ruins=== | |||
*''Sure is solid for such an ancient construction. Hard to believe it's paper.'' | |||
===Roof of the Stadium=== | |||
*''This must be the roof, but something's off here...'' | |||
== Enemies == | == Enemies == | ||
| Line 41: | Line 57: | ||
==Names in other languages== | ==Names in other languages== | ||
{{ | {{foreign names | ||
|Jpn=カラカラスタジアム | |||
|JpnR=Kara Kara Sutajiamu | |||
|JpnM=Dry Dry Stadium | |||
|Spa=Estadio Lodoseco | |Spa=Estadio Lodoseco | ||
|SpaM="Drymud" Stadium | |SpaM="Drymud" Stadium | ||
|Ger=Nimmerfeuchte Arena | |Ger=Nimmerfeuchte Arena | ||
|GerM=Neverwet Arena | |GerM=Neverwet Arena | ||
| | |Ita=Stadio al Forno | ||
| | |ItaM=Baked Stadium | ||
| | |FreE=Stade d'Archisec | ||
| | |FreEM="Verydry"'s stadium | ||
|Chi= | |FreA=Stade Cuire-au-sec | ||
|ChiR= | |FreAM=Cook-to-dry stadium | ||
|Chi=干旱竞技场 (Simplified)<br>乾旱競技場 (Traditional) | |||
|ChiR=Gānhàn Jìngjìchǎng | |||
|ChiM=Dry Stadium | |ChiM=Dry Stadium | ||
}} | }} | ||
{{PMSS}} | {{PMSS}} | ||
[[Category:Deserts]] | [[Category:Deserts]] | ||
[[Category:Paper Mario: Sticker Star | [[Category:Dungeons]] | ||
[[Category:Stadiums]] | |||
[[Category:Paper Mario: Sticker Star locations]] | |||
[[it:Stadio al Forno]] | |||
Latest revision as of 13:23, January 7, 2025
| Level | |
|---|---|
| Drybake Stadium | |
 View of the stadium | |
| Level code | W2-5 |
| World | World 2 |
| Game | Paper Mario: Sticker Star |
| Boss | Tower Power Pokey |
| << Directory of levels >> | |
Drybake Stadium is the fifth and final level of World 2 in Paper Mario: Sticker Star. It is a tower with a baseball stadium at the top. Tower Power Pokey, the boss of this level appears.
Drybake Stadium is one of two standard levels in the game to not contain any collectable Things, along with Bowser Jr.'s Flotilla. This is also the only level in the game in which Mural Goombas and Mural Koopas appear.
Layout[edit]
The first area is a flat desert area with some stairs to a gigantic hole for Paperization. Placing the three Tablet Piece scraps in the hole will reveal the stadium itself, as Mario and Kersti flee in shock.
The first floor is a basic area with a few enemies such as Spikes, and the first of the tower's hieroglyphics puzzles. Above the Mural Toad are two holes where a Jump sticker must be placed on the left, and a Hammer on the right. If done correctly, the Toad will make a noise and lift the door up, allowing access to the elevator and second floor.
The second floor is an area with a few quicksand flows. To the right is a flow that leads directly into a spiked wall. Sinking into the quicksand and going under the wall will reveal a corridor with a few stickers and a Stone Entry scrap. This causes the nearby hieroglyphics to come to life and attack. After they are defeated, there is another quicksand flow that eventually leads to the nothingness in which the Stone Entry scrap should be placed to reveal access to the next floor.
The third floor is a damaged floor with a few more quicksand floors and another puzzle. Going left to the nearby sand flow will lead to a pack of Spikes, and, eventually, the puzzle door. Passing the puzzle door will reveal a secluded corridor with a few Paratroopas, a Paperization Block, and a sticker. At the gate, a Hammer sticker must be placed on the left, a Spike Helmet in the middle, and a Jump sticker on the right to reveal the elevator to the fourth floor.
Right at the entrance to the fourth floor, there are many Buzzy Beetles guarding the exit. Exiting the elevator room will put Mario in a quicksand-flooded hall. Taking the first walkway out to the tower's balcony will take Mario to a Sombrero Guy and another Luigi cameo. Back in the hallway, walking more left will reveal a hill of sand. Walking behind it will reveal a hole that can be walked through to reveal the rest of the floor. The next balcony exit has a few enemies and a pipe to the entrance. Re-entering the pipe and going right will reveal an upside-down door that can be pulled off with Paperize. Putting it back into place will make the door spill out some overflowing sand. Back inside the hall, there is an entrance to the fifth floor that was previously blocked by quicksand.
The fifth floor is a very basic floor - it is a simple hallway with the final puzzle gate. Any Flower sticker must be placed on the left, and a POW Block should be placed on the right. The Toad will reveal the final elevator room, with a Heart Block and Save Block available. Taking the elevator will put Mario at "home plate" in the stadium, where the Royal Sticker can be found resting. Approaching it will reveal the Tower Power Pokey. After defeating it, Mario can collect the Royal Sticker and complete the level. The epilogue of the chapter also reveals that Kamek was the reason why the Stadium had disappeared.
Sticker upgrade spot[edit]
In the third floor between the Save and Heart Blocks.
Area Tattle[edit]
Outside the Stadium[edit]
- Nothing here, Weird... (before all three Tablet Pieces are placed)
- I'm surprised a tower like this was even built. I mean, look at this thing soar! (after the Stadium forms back)
Inside the Stadium Ruins[edit]
- Sure is solid for such an ancient construction. Hard to believe it's paper.
Roof of the Stadium[edit]
- This must be the roof, but something's off here...
Enemies[edit]
- Paragoombas
- Spikes
- Koopa Paratroopas
- Buzzy Beetles
- Mural Goombas
- Mural Koopas
- Sombrero Guys
- Tower Power Pokey (boss)
Secret Door[edit]
The Secret Door is located right at the entrance. Inside are a few Flashy stickers.
Names in other languages[edit]
| Language | Name | Meaning | Notes |
|---|---|---|---|
| Japanese | カラカラスタジアム[?] Kara Kara Sutajiamu |
Dry Dry Stadium | |
| Chinese | 干旱竞技场 (Simplified) 乾旱競技場 (Traditional)[?] Gānhàn Jìngjìchǎng |
Dry Stadium | |
| French (NOA) | Stade Cuire-au-sec[?] | Cook-to-dry stadium | |
| French (NOE) | Stade d'Archisec[?] | "Verydry"'s stadium | |
| German | Nimmerfeuchte Arena[?] | Neverwet Arena | |
| Italian | Stadio al Forno[?] | Baked Stadium | |
| Spanish | Estadio Lodoseco[?] | "Drymud" Stadium |
