Super Block Land: Difference between revisions
mNo edit summary |
|||
| (65 intermediate revisions by 42 users not shown) | |||
| Line 1: | Line 1: | ||
{{ | {{about|the level in ''[[Super Mario 3D World]]''|the level in ''[[New Super Mario Bros. 2]]''|{{world link|star|5|World Star-5 (New Super Mario Bros. 2)}}}} | ||
{{level infobox | |||
|title=Super Block Land | |title=Super Block Land | ||
|image= | |image=[[File:Super_Block_Land.jpg|250px]] | ||
|code= | |code={{world|star2|5}} | ||
|world=[[World Star (Super Mario 3D World)]] | |world=[[World Star (Super Mario 3D World)|World Star]] | ||
|game=[[Super Mario 3D World]] | |game=''[[Super Mario 3D World]]''<br>''[[Super Mario 3D World + Bowser's Fury]]'' | ||
| | |limit= 400 seconds | ||
|before=[[The Great Goal Pole|<<]] | |||
|before=The Great Goal Pole | |after=[[Honeycomb Starway|>>]] | ||
|after=Honeycomb Starway | |||
}} | }} | ||
'''Super Block Land''', otherwise known as '''{{world|star2|5}}''', is the fifth level in [[World Star (Super Mario 3D World)|World Star]] from ''[[Super Mario 3D World]]'' and its [[Nintendo Switch]] port ''[[Super Mario 3D World + Bowser's Fury]]''. It is unlocked by completing [[The Great Goal Pole]] and its own completion unlocks [[Honeycomb Starway]]. Exclusive to this course is an arrangement of the overworld theme from ''[[Super Mario 3D Land]]'' as its background music track. | |||
Super Block Land, otherwise | |||
==Layout== | ==Layout== | ||
The level starts with some Bob-ombs on a small grassy platforms. Next there | The level starts with some Bob-ombs on a small grassy platforms. Next there are some Rectangular ? Blocks that gives the player a [[Super Leaf]]. There are also some [[Mega Block|Big Block]]s, as well as [[Mega ? Block]]s that produce multiple blocks when hit. Next are some Chargin' Chucks that will charge at the player. On top of some Big Blocks is a Hidden Block that contains a [[Mega Mushroom]]. At the end of this area is a [[Warp Box]] that takes the player to the [[Checkpoint Flag]]. In this area the player must find all five Key Coins to open the Warp Box to the [[Goal Pole]]. | ||
==[[Key Coin]] | ==[[Key Coin]] locations== | ||
* Key Coin 1: The first Key Coin is in plain sight next to some Big | *'''Key Coin 1''': The first Key Coin is in plain sight next to some Big Blocks and Chargin' Chucks. | ||
* Key Coin 2: The second Key Coin is in plain sight next to a raised level with a Bob-omb on it. | *'''Key Coin 2''': The second Key Coin is in plain sight next to a raised level with a Bob-omb on it. | ||
* Key Coin 3: After the raised floor, there will be some Brick Blocks on the ground. Ground Pound them to reveal the third Key Coin. | *'''Key Coin 3''': After the raised floor, there will be some Brick Blocks on the ground. Ground Pound them to reveal the third Key Coin. | ||
* Key Coin 4: Ground Pound the top left Block that raises to reach the fourth Key Coin. | *'''Key Coin 4''': Ground Pound the top left Block that raises to reach the fourth Key Coin. | ||
* Key Coin 5: The final Key Coin is in plain sight at the end of the room, before the Warp Box. | *'''Key Coin 5''': The final Key Coin is in plain sight at the end of the room, before the Warp Box. | ||
==[[Green Star]]s== | ==Collectables== | ||
===[[Green Star]]s=== | |||
{| class="wikitable" style="text-align: center" | |||
!Image | |||
!Location | |||
|- | |||
|[[File:SM3DW WS-5 1st Green Star.jpg|150px]] | |||
|At the end of the first area, there are some Blocks that will extend themselves when hit. They will lead up to a [[Mystery Box]] that takes the player to a room where they have ten seconds to extend the blocks to reach the first Green Star. | |||
|- | |||
|[[File:SM3DW WS-5 2nd Green Star.jpg|150px]] | |||
|Towards the beginning of the second area, the player must toss a bomb at the [[Rock Block]]. This reveals the second Green Star. | |||
|- | |||
|[[File:SM3DW WS-5 3rd Green Star.jpg|150px]] | |||
|Instead of entering the Warp Box at the end of the second area, there will be some Big Blocks high up. After making it to the top of them, they must hit the block that raises and Wall Jump between the blocks and the wall to find the final Green Star. | |||
|} | |||
==[[Stamp]]== | ===[[List of Super Mario 3D World stamps|Stamp]]=== | ||
{{Multiple image | |||
|align=right | |||
|direction=horizontal | |||
|width=100 | |||
|image1=SM3DW-TanookiLuigiStamp.png | |||
|alt1=Wii U version | |||
|image2=SM3DW_BF_TanookiLuigiStamp.png | |||
|alt2=Switch version | |||
}} | |||
{| class="wikitable" style="text-align: center" | |||
!Image | |||
!Location | |||
|- | |||
|[[File:SM3DW Super Block Land stamp.jpg|150px]] | |||
|At the end of the first area, there will be a Big Block on the ground. The player needs to ground pound it to reveal the stamp next to the Jump Square. The stamp is [[Kitsune Luigi]]. | |||
|} | |||
==Enemies== | ==Enemies== | ||
{{number of enemies | |||
|image1=[[File:Bob-omb SM3DW Prima.jpg|50px]] | |||
|name1=[[Bob-omb]] | |||
|count1=9<br>(excluding infinitely spawned ones) | |||
|image2=[[File:Chargin' Chuck Artwork - Super Mario 3D World.png|50px]] | |||
|name2=[[Chargin' Chuck]] | |||
|count2=8 | |||
|image3=[[File:Baddie Box SM3DW Prima.jpg|50px]] | |||
|name3=[[Baddie Box]] | |||
|count3=2 | |||
}} | |||
==Names in other languages== | |||
{{foreign names | |||
|Jpn=ブロックランド | |||
|JpnR=Burokku rando | |||
|JpnM=Block Land | |||
|Spa=El país de los bloques | |||
|SpaM=The blocks' country | |||
|Fre=Blocs en stock | |||
|FreM=Blocks in stock<br>Refers to ''Coke en stock'', the French title of the book ''{{wp|The Red Sea Sharks}}'' | |||
|Dut=Superblokkenland | |||
|DutM=Super Block Land | |||
|Ger=Bombenspaß im Land der Blöcke | |||
|GerM=Fun with bombs in Block Land | |||
|Ita=Terra dei blocchi | |||
|ItaM=Block land | |||
|Por=Blocolândia | |||
|PorM=Block land | |||
|Rus=Блок за блоком | |||
|RusR=Blok za blokom | |||
|RusM=Block after block | |||
|ChiS=砖块乐园 | |||
|ChiSR=Zhuānkuài Lèyuán | |||
|ChiSM=Block Land | |||
|ChiT=磚塊樂園 | |||
|ChiTR=Zhuānkuài Lèyuán | |||
|ChiTM=Block Land | |||
|Kor=블록 랜드 | |||
|KorR=Beullok Raendeu | |||
|KorM=Block Land | |||
}} | |||
{{ | {{SM3DW levels}} | ||
[[Category:Grasslands]] | |||
[[Category:Super Mario 3D World levels]] | |||
[[de:Bombenspaß im Land der Blöcke]] | |||
Latest revision as of 21:59, January 27, 2025
- This article is about the level in Super Mario 3D World. For the level in New Super Mario Bros. 2, see World
 Star-5.
| Level | |
|---|---|
| Super Block Land | |

| |
| Level code | World |
| World | World Star |
| Game | Super Mario 3D World Super Mario 3D World + Bowser's Fury |
| Time limit | 400 seconds |
| << Directory of levels >> | |
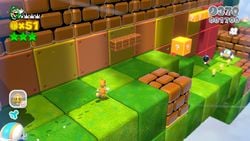
Super Block Land, otherwise known as World ![]() Star-5, is the fifth level in World Star from Super Mario 3D World and its Nintendo Switch port Super Mario 3D World + Bowser's Fury. It is unlocked by completing The Great Goal Pole and its own completion unlocks Honeycomb Starway. Exclusive to this course is an arrangement of the overworld theme from Super Mario 3D Land as its background music track.
Star-5, is the fifth level in World Star from Super Mario 3D World and its Nintendo Switch port Super Mario 3D World + Bowser's Fury. It is unlocked by completing The Great Goal Pole and its own completion unlocks Honeycomb Starway. Exclusive to this course is an arrangement of the overworld theme from Super Mario 3D Land as its background music track.
Layout[edit]
The level starts with some Bob-ombs on a small grassy platforms. Next there are some Rectangular ? Blocks that gives the player a Super Leaf. There are also some Big Blocks, as well as Mega ? Blocks that produce multiple blocks when hit. Next are some Chargin' Chucks that will charge at the player. On top of some Big Blocks is a Hidden Block that contains a Mega Mushroom. At the end of this area is a Warp Box that takes the player to the Checkpoint Flag. In this area the player must find all five Key Coins to open the Warp Box to the Goal Pole.
Key Coin locations[edit]
- Key Coin 1: The first Key Coin is in plain sight next to some Big Blocks and Chargin' Chucks.
- Key Coin 2: The second Key Coin is in plain sight next to a raised level with a Bob-omb on it.
- Key Coin 3: After the raised floor, there will be some Brick Blocks on the ground. Ground Pound them to reveal the third Key Coin.
- Key Coin 4: Ground Pound the top left Block that raises to reach the fourth Key Coin.
- Key Coin 5: The final Key Coin is in plain sight at the end of the room, before the Warp Box.
Collectables[edit]
Green Stars[edit]
| Image | Location |
|---|---|

|
At the end of the first area, there are some Blocks that will extend themselves when hit. They will lead up to a Mystery Box that takes the player to a room where they have ten seconds to extend the blocks to reach the first Green Star. |

|
Towards the beginning of the second area, the player must toss a bomb at the Rock Block. This reveals the second Green Star. |

|
Instead of entering the Warp Box at the end of the second area, there will be some Big Blocks high up. After making it to the top of them, they must hit the block that raises and Wall Jump between the blocks and the wall to find the final Green Star. |
Stamp[edit]
| Image | Location |
|---|---|

|
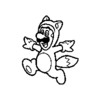
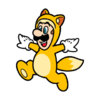
At the end of the first area, there will be a Big Block on the ground. The player needs to ground pound it to reveal the stamp next to the Jump Square. The stamp is Kitsune Luigi. |
Enemies[edit]
| Image | Name | Count |
|---|---|---|

|
Bob-omb | 9 (excluding infinitely spawned ones) |
| Chargin' Chuck | 8 | |

|
Baddie Box | 2 |
Names in other languages[edit]
| Language | Name | Meaning | Notes |
|---|---|---|---|
| Japanese | ブロックランド[?] Burokku rando |
Block Land | |
| Chinese (simplified) | 砖块乐园[?] Zhuānkuài Lèyuán |
Block Land | |
| Chinese (traditional) | 磚塊樂園[?] Zhuānkuài Lèyuán |
Block Land | |
| Dutch | Superblokkenland[?] | Super Block Land | |
| French | Blocs en stock[?] | Blocks in stock Refers to Coke en stock, the French title of the book The Red Sea Sharks |
|
| German | Bombenspaß im Land der Blöcke[?] | Fun with bombs in Block Land | |
| Italian | Terra dei blocchi[?] | Block land | |
| Korean | 블록 랜드[?] Beullok Raendeu |
Block Land | |
| Portuguese | Blocolândia[?] | Block land | |
| Russian | Блок за блоком[?] Blok za blokom |
Block after block | |
| Spanish | El país de los bloques[?] | The blocks' country |

