Megagame Muscles: Difference between revisions
No edit summary |
m (→Microgames) |
||
| (18 intermediate revisions by 13 users not shown) | |||
| Line 1: | Line 1: | ||
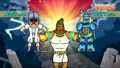
[[File:Megagame Muscles Stage 2 Players.png|thumb|[[Dr. Crygor]] and [[Mike]] in Megagame Muscles]] | [[File:Megagame Muscles Stage 2 Players.png|thumb|[[Dr. Crygor]] and [[Mike]] in Megagame Muscles]] | ||
'''Megagame Muscles''' is one of the extra stages in the Story mode of ''[[WarioWare: Move It!]]'', hosted by [[Mr. Sparkles]]. Acting as the successor to the [[Kelorometer]] in ''[[WarioWare: Smooth Moves]]'', the stage features 20 [[microgame]]s | '''Megagame Muscles''' is one of the extra stages in the Story mode of ''[[WarioWare: Move It!]]'', hosted by [[Mr. Sparkles]]. Acting as the successor to the [[Kelorometer]] in ''[[WarioWare: Smooth Moves]]'', the stage features 20 [[microgame]]s that primarily focus on vigorous movements. | ||
The intermission stage consists of [[Dr. Crygor]] standing on a stone fist as Mr. Sparkles floats in the air, wearing a toga and making poses. Mr. Sparkles moves up close holding a stone tablet to show the form. Similar to the Kelorometer, a four-digit muscle density indicator is present above Dr. Crygor with a gold frame, and a swirling vortex shows how many microgames (referred to as reps) are left. | The intermission stage consists of [[Dr. Crygor]] standing on a stone fist as Mr. Sparkles floats in the air, wearing a toga and making poses. Mr. Sparkles moves up close holding a stone tablet to show the form. Similar to the Kelorometer, a four-digit muscle density indicator is present above Dr. Crygor with a gold frame, and a swirling vortex shows how many microgames (referred to as reps) are left. | ||
If the player wins regardless of how much muscle they gained, Dr. Crygor jumps around, swinging large golden dumbells and exerting heavy effort. If the player loses but still gains muscle (or in the case of megagames, performs poorly), Dr. Crygor moves side-to-side holding small gray dumbells and exerting less effort; if the player loses and does not gain any muscle, Dr. Crygor lays on the fist, resting. After all the microgames are completed, Mr. Sparkles picks up Dr. Crygor and shakes him, with his body transforming based on how much muscle has been gained. Upon scoring a muscle density of 4400 or higher, the next extra stage is unlocked. | If the player wins regardless of how much muscle they gained, Dr. Crygor jumps around, swinging large golden dumbells and exerting heavy effort. If the player loses but still gains muscle (or in the case of megagames, performs poorly), Dr. Crygor moves side-to-side holding small gray dumbells and exerting less effort; if the player loses and does not gain any muscle, Dr. Crygor lays on the fist, resting. After all the microgames are completed, Mr. Sparkles picks up Dr. Crygor and shakes him, with his body transforming based on how much muscle has been gained. Upon scoring a muscle density of 4400 or higher, the next extra stage is unlocked. | ||
In multiplayer, [[Mike]] is also present on a stone fist as the second player, behaving in the same manner as Dr. Crygor. The stage also becomes competitive, with the player who gains the highest muscle density winning. | In multiplayer, [[Mike]] is also present on a stone fist as the second player, behaving in the same manner as Dr. Crygor. The stage also becomes competitive, with the player who gains the highest muscle density winning. | ||
==Microgames== | ==Microgames== | ||
The first and second microgames are selected from the following: | The first and second microgames are selected from the following: | ||
{|class="wikitable"style="text-align:center" | |||
|- | |||
!Microgame | |||
!Host(s) | |||
![[Form Stones|Form(s)]] | |||
!Level | |||
|- | |||
|[[File:WWMILooseDrawers.jpg|200px]]<br>[[Loose Drawers]] | |||
|[[File:Wario Icon WWMI.png|50px]]<br>[[Wario]] | |||
|[[File:WWMI Choo Choo.jpg|200px]]<br>Choo Choo | |||
|3 | |||
|- | |||
|[[File:WWMI Bomb Disposal.png|200px]]<br>[[Bomb Disposal]] | |||
|[[File:Kat Icon WWMI.png|30px]][[File:Ana Icon WWMI.png|35px]]<br>[[Kat & Ana]] | |||
|[[File:WWMI At Attention.jpg|200px]]<br>At Attention | |||
|3 | |||
|- | |||
|[[File:WWMI Scroll with It.png|200px]]<br>[[Scroll with It]] | |||
|[[File:Young Cricket Icon WWMI.png|50px]][[File:Master Mantis Icon WWMI.png|50px]]<br>[[Young Cricket]] & [[Master Mantis]] | |||
|[[File:WWMI Crocodile.jpg|200px]]<br>Crocodile | |||
|3 | |||
|- | |||
|[[File:WWMIPunchOut.jpg|200px]]<br>[[Punch-Out!! (WarioWare: Move It!)|Punch-Out!!]] | |||
|[[File:9-Volt Icon WWMI.png|50px]]<br>[[9-Volt]] | |||
|[[File:WWMI Lifter.jpg|200px]]<br>Lifter | |||
|3 | |||
|} | |||
The third and fourth microgames are selected from the following: | The third and fourth microgames are selected from the following: | ||
{|class="wikitable"style="text-align:center" | |||
|- | |||
!Microgame | |||
!Host(s) | |||
![[Form Stones|Form(s)]] | |||
!Level | |||
|- | |||
|[[File:Denied!.png|200px]]<br>[[Denied!]] | |||
|[[File:Mona Icon WWMI.png|50px]]<br>[[Mona]] | |||
|[[File:WWMI Sky Stretch.jpg|200px]]<br>Sky Stretch | |||
|3 | |||
|- | |||
|[[File:WWMI Cowboy Up.png|200px]]<br>[[Cowboy Up]] | |||
|[[File:Kat Icon WWMI.png|30px]][[File:Ana Icon WWMI.png|35px]]<br>[[Kat & Ana]] | |||
|[[File:WWMI Fashionista.jpg|200px]]<br>Fashionista | |||
|3 | |||
|- | |||
|[[File:WWMI Stamp Rally.png|200px]]<br>[[Stamp Rally]] | |||
|[[File:Young Cricket Icon WWMI.png|50px]][[File:Master Mantis Icon WWMI.png|50px]]<br>[[Young Cricket]] & [[Master Mantis]] | |||
|[[File:WWMI Squat.jpg|200px]]<br>Squat | |||
|3 | |||
|- | |||
|[[File:WWMIYoshiIsland.png|200px]]<br>[[Super Mario World 2: Yoshi's Island (microgame)|Super Mario World 2: Yoshi's Island]] | |||
|[[File:9-Volt Icon WWMI.png|50px]]<br>[[9-Volt]] | |||
|[[File:WWMI Choo Choo.jpg|200px]]<br>Choo Choo | |||
|1 | |||
|} | |||
The fifth microgame is a | The fifth microgame is a double-length microgame, and is selected from the following: | ||
{|class="wikitable"style="text-align:center" | |||
|- | |||
!Microgame | |||
!Host(s) | |||
![[Form Stones|Form(s)]] | |||
!Level | |||
|- | |||
|[[File:WWMIBucketBrigadeSingleplayer.jpg|200px]]<br>[[Bucket Brigade]] | |||
|[[File:Wario Icon WWMI.png|50px]]<br>[[Wario]] | |||
|[[File:WWMI Choo Choo.jpg|200px]]<br>Choo Choo | |||
|3 | |||
|- | |||
|[[File:Get the Ball Rolling.png|200px]]<br>[[Get the Ball Rolling]] | |||
|[[File:Dr Crygor Icon WWMI.png|40px]][[File:Penny Icon WWMI.png|40px]][[File:Mike Icon WWMI.png|40px]]<br>[[Dr. Crygor]], [[Penny]] & [[Mike]] | |||
|[[File:WWMI Big Cheese.jpg|200px]]<br>Big Cheese | |||
|3 | |||
|- | |||
|[[File:WWMI Cormorant Catch.png|200px]]<br>[[Cormorant Catch]] | |||
|[[File:Orbulon Icon WWMI.png|40px]]<br>[[Orbulon]] | |||
|[[File:WWMI Ba-KAW.jpg|100px]][[File:WWMI Knight.jpg|100px]]<br>Ba-KAW & Knight | |||
|3 | |||
|- | |||
|[[File:WWMI Shear Madness.png|200px]]<br>[[Shear Madness]] | |||
|[[File:Young Cricket Icon WWMI.png|50px]][[File:Master Mantis Icon WWMI.png|50px]]<br>[[Young Cricket]] & [[Master Mantis]] | |||
|[[File:WWMI Crocodile.jpg|200px]]<br>Crocodile | |||
|3 | |||
|} | |||
The sixth and seventh microgames are selected from the following: | The sixth and seventh microgames are selected from the following: | ||
{|class="wikitable"style="text-align:center" | |||
|- | |||
!Microgame | |||
!Host(s) | |||
![[Form Stones|Form(s)]] | |||
!Level | |||
|- | |||
|[[File:WWMICuttingBoard.jpg|200px]]<br>[[Cutting Board]] | |||
|[[File:Wario Icon WWMI.png|50px]]<br>[[Wario]] | |||
|[[File:WWMI Choo Choo.jpg|200px]]<br>Choo Choo | |||
|3 | |||
|- | |||
|[[File:WWMI Hunky-Dory.png|200px]]<br>[[Hunky-Dory]] | |||
|[[File:Dr Crygor Icon WWMI.png|40px]][[File:Penny Icon WWMI.png|40px]][[File:Mike Icon WWMI.png|40px]]<br>[[Dr. Crygor]], [[Penny]] & [[Mike]] | |||
|[[File:WWMI Massage.jpg|200px]]<br>Massage | |||
|3 | |||
|- | |||
|[[File:WWMI Wriggle Out.png|200px]]<br>[[Wriggle Out]] | |||
|[[File:Kat Icon WWMI.png|30px]][[File:Ana Icon WWMI.png|35px]]<br>[[Kat & Ana]] | |||
|[[File:WWMI At Attention.jpg|200px]]<br>At Attention | |||
|3 | |||
|- | |||
|[[File:WWMI Animal Crossing- New Horizons.png|200px]]<br>[[Animal Crossing: New Horizons]] | |||
|[[File:9-Volt Icon WWMI.png|50px]]<br>[[9-Volt]] | |||
|[[File:WWMI Tug-of-War.jpg|200px]]<br>Tug-of-War | |||
|2 | |||
|- | |||
|[[File:WWMI Pikmin 2.png|200px]]<br>[[Pikmin 2 (WarioWare: Move It!)|Pikmin 2]] | |||
|[[File:9-Volt Icon WWMI.png|50px]]<br>[[9-Volt]] | |||
|[[File:WWMI Knight.jpg|200px]]<br>Knight | |||
|3 | |||
|- | |||
|[[File:WWMI Fresh Squeezed.png|200px]]<br>[[Fresh Squeezed (WarioWare: Move It!)|Fresh Squeezed]] | |||
|[[File:WWMI Volcano Wario Erupts.png|100px]]<br>[[Volcano Wario]] | |||
|[[File:WWMI Lifter.jpg|200px]]<br>Lifter | |||
|3 | |||
|} | |||
The eighth and ninth microgames are selected from the following: | The eighth and ninth microgames are selected from the following: | ||
{|class="wikitable"style="text-align:center" | |||
|- | |||
!Microgame | |||
!Host(s) | |||
![[Form Stones|Form(s)]] | |||
!Level | |||
|- | |||
|[[File:WWMI Security Risk.png|200px]]<br>[[Security Risk]] | |||
|[[File:Dr Crygor Icon WWMI.png|40px]][[File:Penny Icon WWMI.png|40px]][[File:Mike Icon WWMI.png|40px]]<br>[[Dr. Crygor]], [[Penny]] & [[Mike]] | |||
|[[File:WWMI Big Cheese.jpg|200px]]<br>Big Cheese | |||
|3 | |||
|- | |||
|[[File:WWMI Shake Out the Kinks.png|200px]]<br>[[Shake Out the Kinks]] | |||
|[[File:Dr Crygor Icon WWMI.png|40px]][[File:Penny Icon WWMI.png|40px]][[File:Mike Icon WWMI.png|40px]]<br>[[Dr. Crygor]], [[Penny]] & [[Mike]] | |||
|[[File:WWMI Massage.jpg|200px]]<br>Massage | |||
|3 | |||
|- | |||
|[[File:WWMI Mountain Man.png|200px]]<br>[[Mountain Man]] | |||
|[[File:Orbulon Icon WWMI.png|40px]]<br>[[Orbulon]] | |||
|[[File:WWMI Ba-KAW.jpg|200px]]<br>Ba-KAW | |||
|2 | |||
|- | |||
|[[File:WWMI Hop for Home.png|200px]]<br>[[Hop for Home]] | |||
|[[File:Young Cricket Icon WWMI.png|50px]][[File:Master Mantis Icon WWMI.png|50px]]<br>[[Young Cricket]] & [[Master Mantis]] | |||
|[[File:WWMI Squat.jpg|200px]]<br>Squat | |||
|3 | |||
|} | |||
The tenth microgame is a megagame, taking 16 seconds, and can be one of the following: | The tenth microgame is a megagame, taking 16 seconds, and can be one of the following: | ||
{|class="wikitable"style="text-align:center" | |||
|- | |||
!Microgame | |||
!Host(s) | |||
![[Form Stones|Form(s)]] | |||
|- | |||
|[[File:WWMISpeedSkate.jpg|200px]]<br>[[Speed Skate]] | |||
|[[File:Wario Icon WWMI.png|50px]]<br>[[Wario]] | |||
|[[File:WWMI Choo Choo.jpg|200px]]<br>Choo Choo | |||
|- | |||
|[[File:Batter Up.png|200px]]<br>[[Batter Up (WarioWare: Move It!)|Batter Up]] | |||
|[[File:Mona Icon WWMI.png|50px]]<br>[[Mona]] | |||
|[[File:WWMI Knight.jpg|100px]][[File:WWMI Choo Choo.jpg|100px]]<br>Knight & Choo Choo | |||
|- | |||
|[[File:Going Swimmingly.png|200px]]<br>[[Going Swimmingly]] | |||
|[[File:Dr Crygor Icon WWMI.png|40px]][[File:Penny Icon WWMI.png|40px]][[File:Mike Icon WWMI.png|40px]]<br>[[Dr. Crygor]], [[Penny]] & [[Mike]] | |||
|[[File:WWMI Massage.jpg|200px]]<br>Massage | |||
|- | |||
|[[File:Handcar Escape.png|200px]]<br>[[Handcar Escape]] | |||
|[[File:Dr Crygor Icon WWMI.png|40px]][[File:Penny Icon WWMI.png|40px]][[File:Mike Icon WWMI.png|40px]]<br>[[Dr. Crygor]], [[Penny]] & [[Mike]] | |||
|[[File:WWMI Massage.jpg|200px]]<br>Massage | |||
|- | |||
|[[File:WWMI Pull-Up.png|200px]]<br>[[Pull-Up]] | |||
|[[File:Orbulon Icon WWMI.png|40px]]<br>[[Orbulon]] | |||
|[[File:WWMI Lifter.jpg|200px]]<br>Lifter | |||
|- | |||
|[[File:WWMI Snake Smack.png|200px]]<br>[[Snake Smack]] | |||
|[[File:Kat Icon WWMI.png|30px]][[File:Ana Icon WWMI.png|35px]]<br>[[Kat & Ana]] | |||
|[[File:WWMI Fashionista.jpg|200px]]<br>Fashionista | |||
|- | |||
|[[File:WWMI Open Wide.png|200px]]<br>[[Open Wide]] | |||
|[[File:Young Cricket Icon WWMI.png|50px]][[File:Master Mantis Icon WWMI.png|50px]]<br>[[Young Cricket]] & [[Master Mantis]] | |||
|[[File:WWMI Crocodile.jpg|100px]][[File:WWMI Tug-of-War.jpg|100px]]<br>Crocodile & Tug-of-War | |||
|- | |||
|[[File:WWMI Balloon Buster.png|200px]]<br>[[Balloon Buster]] | |||
|[[File:WWMI Volcano Wario Erupts.png|100px]]<br>[[Volcano Wario]] | |||
|[[File:WWMI Squat.jpg|200px]]<br>Squat | |||
|- | |||
|[[File:WWMI Rubber Stamp.png|200px]]<br>[[Rubber Stamp]] | |||
|[[File:WWMI Volcano Wario Erupts.png|100px]]<br>[[Volcano Wario]] | |||
|[[File:WWMI Knight.jpg|100px]][[File:WWMI Gift Giver.jpg|100px]]<br>Knight & Gift Giver | |||
|} | |||
The eleventh and twelfth microgames are selected from the following: | The eleventh and twelfth microgames are selected from the following: | ||
{|class="wikitable"style="text-align:center" | |||
|- | |||
!Microgame | |||
!Host(s) | |||
![[Form Stones|Form(s)]] | |||
!Level | |||
|- | |||
|[[File:WWMI Thigh Fishing.png|200px]]<br>[[Thigh Fishing]] | |||
|[[File:Young Cricket Icon WWMI.png|50px]][[File:Master Mantis Icon WWMI.png|50px]]<br>[[Young Cricket]] & [[Master Mantis]] | |||
|[[File:WWMI Squat.jpg|200px]]<br>Squat | |||
|3 | |||
|- | |||
|[[File:WWMI Service with a Smile.png|200px]]<br>[[Service with a Smile]] | |||
|[[File:Jimmy T Icon WWMI.png|50px]]<br>[[Jimmy T]] | |||
|[[File:WWMI Archer.jpg|200px]]<br>Archer | |||
|1 | |||
|- | |||
|[[File:WWMI Donkey Kong Jr Lv2.png|200px]]<br>[[Donkey Kong Jr. (WarioWare: Move It!)|Donkey Kong Jr.]] | |||
|[[File:9-Volt Icon WWMI.png|50px]]<br>[[9-Volt]] | |||
|[[File:WWMI Knight.jpg|200px]]<br>Knight | |||
|3 | |||
|- | |||
|[[File:WWMIThrowDown.png|200px]]<br>[[Throw Down]] | |||
|[[File:WWMI Volcano Wario Erupts.png|100px]]<br>[[Volcano Wario]] | |||
|[[File:WWMI Massage.jpg|200px]]<br>Massage | |||
|3 | |||
|} | |||
The thirteenth and fourteenth microgames are selected from the following: | The thirteenth and fourteenth microgames are selected from the following: | ||
{|class="wikitable"style="text-align:center" | |||
|- | |||
!Microgame | |||
!Host(s) | |||
![[Form Stones|Form(s)]] | |||
!Level | |||
|- | |||
|[[File:Star Light, Star Bright.png|200px]]<br>[[Star Light, Star Bright]] | |||
|[[File:Mona Icon WWMI.png|50px]]<br>[[Mona]] | |||
|[[File:WWMI Sky Stretch.jpg|200px]]<br>Sky Stretch | |||
|3 | |||
|- | |||
|[[File:Wiper Wave.png|200px]]<br>[[Wiper Wave]] | |||
|[[File:Mona Icon WWMI.png|50px]]<br>[[Mona]] | |||
|[[File:WWMI Sky Stretch.jpg|200px]]<br>Sky Stretch | |||
|3 | |||
|- | |||
|[[File:WWMI Chop to It.png|200px]]<br>[[Chop to It]] | |||
|[[File:Ashley Icon WWMI.png|50px]][[File:Red Icon WWMI.png|50px]]<br>[[Ashley]] & [[Red (WarioWare series)|Red]] | |||
|[[File:WWMI Tug-of-War.jpg|200px]]<br>Tug-of-War | |||
|3 | |||
|- | |||
|[[File:WWMI fishing microgame.jpg|200px]]<br>[[Reel It In]] | |||
|[[File:Jimmy T Icon WWMI.png|50px]]<br>[[Jimmy T]] | |||
|[[File:WWMI Archer.jpg|200px]]<br>Archer | |||
|3 | |||
|} | |||
The fifteenth microgame is a | The fifteenth microgame is a double-length microgame, and is selected from the following: | ||
{|class="wikitable"style="text-align:center" | |||
|- | |||
!Microgame | |||
!Host(s) | |||
![[Form Stones|Form(s)]] | |||
!Level | |||
|- | |||
|[[File:Biggest Fan 1P.png|200px]]<br>[[Biggest Fan (WarioWare: Move It!)|Biggest Fan]] | |||
|[[File:Mona Icon WWMI.png|50px]]<br>[[Mona]] | |||
|[[File:WWMI Sky Stretch.jpg|200px]]<br>Sky Stretch | |||
|3 | |||
|- | |||
|[[File:WWMI Squeaky-Clean.png|200px]]<br>[[Squeaky-Clean]] | |||
|[[File:Ashley Icon WWMI.png|50px]][[File:Red Icon WWMI.png|50px]]<br>[[Ashley]] & [[Red (WarioWare series)|Red]] | |||
|[[File:WWMI Tug-of-War.jpg|200px]]<br>Tug-of-War | |||
|3 | |||
|- | |||
|[[File:WWMI Spear Me.png|200px]]<br>[[Spear Me]] | |||
|[[File:Ashley Icon WWMI.png|50px]][[File:Red Icon WWMI.png|50px]]<br>[[Ashley]] & [[Red (WarioWare series)|Red]] | |||
|[[File:WWMI Tug-of-War.jpg|200px]]<br>Tug-of-War | |||
|3 | |||
|- | |||
|[[File:WWMI Water Hazards.png|200px]]<br>[[Water Hazards]] | |||
|[[File:Young Cricket Icon WWMI.png|50px]][[File:Master Mantis Icon WWMI.png|50px]]<br>[[Young Cricket]] & [[Master Mantis]] | |||
|[[File:WWMI Squat.jpg|200px]]<br>Squat | |||
|3 | |||
|- | |||
|[[File:WWMI Ring Fit Adventure.png|200px]]<br>[[Ring Fit Adventure]] | |||
|[[File:9-Volt Icon WWMI.png|50px]]<br>[[9-Volt]] | |||
|[[File:WWMI Fashionista.jpg|200px]]<br>Fashionista | |||
|3 | |||
|} | |||
The sixteenth and seventeenth microgames are selected from the following: | The sixteenth and seventeenth microgames are selected from the following: | ||
{|class="wikitable"style="text-align:center" | |||
|- | |||
!Microgame | |||
!Host(s) | |||
![[Form Stones|Form(s)]] | |||
!Level | |||
|- | |||
|[[File:WWMI prison microgame.jpg|200px]]<br>[[Jailbreak]] | |||
|[[File:Wario Icon WWMI.png|50px]]<br>[[Wario]] | |||
|[[File:WWMI Choo Choo.jpg|200px]]<br>Choo Choo | |||
|3 | |||
|- | |||
|[[File:WWMI Take the Plunger.jpg|200px]]<br>[[Take the Plunger]] | |||
|[[File:Mona Icon WWMI.png|50px]]<br>[[Mona]] | |||
|[[File:WWMI Knight.jpg|200px]]<br>Knight | |||
|3 | |||
|- | |||
|[[File:WWMIWrungOut.png|200px]]<br>[[Wrung Out]] | |||
|[[File:Dr Crygor Icon WWMI.png|40px]][[File:Penny Icon WWMI.png|40px]][[File:Mike Icon WWMI.png|40px]]<br>[[Dr. Crygor]], [[Penny]] & [[Mike]] | |||
|[[File:WWMI Massage.jpg|200px]]<br>Massage | |||
|3 | |||
|- | |||
|[[File:WWMI Unchained.png|200px]]<br>[[Unchained]] | |||
|[[File:Orbulon Icon WWMI.png|40px]]<br>[[Orbulon]] | |||
|[[File:WWMI Lifter.jpg|200px]]<br>Lifter | |||
|3 | |||
|- | |||
|[[File:WWMI Shell Shine.png|200px]]<br>[[Shell Shine]] | |||
|[[File:Kat Icon WWMI.png|30px]][[File:Ana Icon WWMI.png|35px]]<br>[[Kat & Ana]] | |||
|[[File:WWMI Fashionista.jpg|200px]]<br>Fashionista | |||
|3 | |||
|- | |||
|[[File:WWMI PMTOK microgame.png|200px]]<br>[[Paper Mario: The Origami King (microgame)|Paper Mario: The Origami King]] | |||
|[[File:9-Volt Icon WWMI.png|50px]]<br>[[9-Volt]] | |||
|[[File:WWMI Sky Stretch.jpg|200px]]<br>Sky Stretch | |||
|1 | |||
|} | |||
The eighteenth and nineteenth microgames are selected from the following: | The eighteenth and nineteenth microgames are selected from the following: | ||
{|class="wikitable"style="text-align:center" | |||
|- | |||
!Microgame | |||
!Host(s) | |||
![[Form Stones|Form(s)]] | |||
!Level | |||
|- | |||
|[[File:WWMIDeStocking.png|200px]]<br>[[De-Stocking]] | |||
|[[File:Mona Icon WWMI.png|50px]]<br>[[Mona]] | |||
|[[File:WWMI Knight.jpg|200px]]<br>Knight | |||
|3 | |||
|- | |||
|[[File:Gacha Now.png|200px]]<br>[[Gacha Now]] | |||
|[[File:Dr Crygor Icon WWMI.png|40px]][[File:Penny Icon WWMI.png|40px]][[File:Mike Icon WWMI.png|40px]]<br>[[Dr. Crygor]], [[Penny]] & [[Mike]] | |||
|[[File:WWMI Massage.jpg|200px]]<br>Massage | |||
|3 | |||
|- | |||
|[[File:WWMI Mario Bros.png|200px]]<br>[[Mario Bros. (WarioWare: Move It!)|Mario Bros.]] | |||
|[[File:9-Volt Icon WWMI.png|50px]]<br>[[9-Volt]] | |||
|[[File:WWMI Fashionista.jpg|200px]]<br>Fashionista | |||
|2 | |||
|- | |||
|[[File:WWMI Garlic Grab.png|200px]]<br>[[Garlic Grab]] | |||
|[[File:WWMI Volcano Wario Erupts.png|100px]]<br>[[Volcano Wario]] | |||
|[[File:WWMI Squat.jpg|200px]]<br>Squat | |||
|3 | |||
|} | |||
The twentieth and last microgame is a megagame, taking 16 seconds, and can be one of the following: | |||
{|class="wikitable"style="text-align:center" | |||
|- | |||
!Microgame | |||
!Host(s) | |||
![[Form Stones|Form(s)]] | |||
!Level | |||
|- | |||
|[[File:WWMI train microgame.jpg|200px]]<br>[[Locomotion]] | |||
|[[File:Wario Icon WWMI.png|50px]]<br>[[Wario]] | |||
|[[File:WWMI Choo Choo.jpg|200px]]<br>Choo Choo | |||
|3 | |||
|- | |||
|[[File:WWMIPepperMill.png|200px]]<br>[[Pepper Mill]] | |||
|[[File:Mona Icon WWMI.png|50px]]<br>[[Mona]] | |||
|[[File:WWMI Knight.jpg|200px]]<br>Knight | |||
|3 | |||
|- | |||
|[[File:WWMI diver microgame.jpg|200px]]<br>[[Seaweedy]] | |||
|[[File:Mona Icon WWMI.png|50px]]<br>[[Mona]] | |||
|[[File:WWMI Sky Stretch.jpg|200px]]<br>Sky Stretch | |||
|1 | |||
|- | |||
|[[File:WWMI Tissue Microgame.jpg|200px]]<br>[[You've Got Tissues]] | |||
|[[File:Dr Crygor Icon WWMI.png|40px]][[File:Penny Icon WWMI.png|40px]][[File:Mike Icon WWMI.png|40px]]<br>[[Dr. Crygor]], [[Penny]] & [[Mike]] | |||
|[[File:WWMI Massage.jpg|200px]]<br>Massage | |||
|1 | |||
|- | |||
|[[File:WWMIHarvestMan.png|200px]]<br>[[Harvest Man]] | |||
|[[File:Ashley Icon WWMI.png|50px]][[File:Red Icon WWMI.png|50px]]<br>[[Ashley]] & [[Red (WarioWare series)|Red]] | |||
|[[File:WWMI Scales.jpg|200px]]<br>Scales | |||
|3 | |||
|- | |||
|[[File:WWMI Speed Bag.png|200px]]<br>[[Speed Bag]] | |||
|[[File:Orbulon Icon WWMI.png|40px]]<br>[[Orbulon]] | |||
|[[File:WWMI Lifter.jpg|200px]]<br>Lifter | |||
|1 | |||
|- | |||
|[[File:WWMI nintendogs + cats.png|200px]]<br>[[nintendogs + cats]] | |||
|[[File:9-Volt Icon WWMI.png|50px]]<br>[[9-Volt]] | |||
|[[File:WWMI Massage.jpg|200px]]<br>Massage | |||
|1 | |||
|} | |||
==Mr. Sparkles' Comments== | |||
* | {{stub|section=y|There may be more comments within the number ranges written below}} | ||
* | *'''0 mus.''': "''That's not how a winner acts! Shape up, or you'll never get in shape!''" | ||
* | *'''1-3999 mus.''': "''That was good, but you can get even better! You're a li'l ball of potential!''" | ||
* | *'''4000-4399 mus.''': "''You're getting toned! Turn those uniceps into triceps!''" | ||
* | *'''4400-4599 mus.''': "''Wanna get even more buff? Great! You only work out what you work in!''" | ||
* | *'''4600-4799 mus.''': "''Hey, those muscles are starting to bulge! But could they be bulgier?''" | ||
* | *'''4800-4999 mus.''': "''Now that's a body suited for the space age!''" | ||
*'''5000+ mus.''': "''You've trained your way to gains! These are the muscles of the gods!''" | |||
==Gallery== | ==Gallery== | ||
| Line 102: | Line 428: | ||
WWMI Megagame Muscles 2P Transformation.png|Mr. Sparkles shaking Dr. Crygor and Mike after all 20 microgames | WWMI Megagame Muscles 2P Transformation.png|Mr. Sparkles shaking Dr. Crygor and Mike after all 20 microgames | ||
WWMI Megagame Muscles 2P Results.png|Mike winning the multiplayer version of Megagame Muscles | WWMI Megagame Muscles 2P Results.png|Mike winning the multiplayer version of Megagame Muscles | ||
WWMI Megagame Muscles 1P Results.jpg|Mr. Sparkles commenting on Dr. Crygor's physique | |||
</gallery> | </gallery> | ||
==Names in other languages== | ==Names in other languages== | ||
{{foreign names | {{foreign names | ||
| | |Jpn=マッスル★エクササイズ | ||
| | |JpnR=Massuru ★ ekusasaizu | ||
| | |JpnM=Muscle ★ Exercise | ||
|ChiS=肌肉★锻炼 | |ChiS=肌肉★锻炼 | ||
|ChiSR=Jīròu ★ Duànliàn | |ChiSR=Jīròu ★ Duànliàn | ||
Latest revision as of 10:19, April 18, 2025

Megagame Muscles is one of the extra stages in the Story mode of WarioWare: Move It!, hosted by Mr. Sparkles. Acting as the successor to the Kelorometer in WarioWare: Smooth Moves, the stage features 20 microgames that primarily focus on vigorous movements.
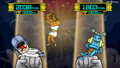
The intermission stage consists of Dr. Crygor standing on a stone fist as Mr. Sparkles floats in the air, wearing a toga and making poses. Mr. Sparkles moves up close holding a stone tablet to show the form. Similar to the Kelorometer, a four-digit muscle density indicator is present above Dr. Crygor with a gold frame, and a swirling vortex shows how many microgames (referred to as reps) are left.
If the player wins regardless of how much muscle they gained, Dr. Crygor jumps around, swinging large golden dumbells and exerting heavy effort. If the player loses but still gains muscle (or in the case of megagames, performs poorly), Dr. Crygor moves side-to-side holding small gray dumbells and exerting less effort; if the player loses and does not gain any muscle, Dr. Crygor lays on the fist, resting. After all the microgames are completed, Mr. Sparkles picks up Dr. Crygor and shakes him, with his body transforming based on how much muscle has been gained. Upon scoring a muscle density of 4400 or higher, the next extra stage is unlocked.
In multiplayer, Mike is also present on a stone fist as the second player, behaving in the same manner as Dr. Crygor. The stage also becomes competitive, with the player who gains the highest muscle density winning.
Microgames
The first and second microgames are selected from the following:
| Microgame | Host(s) | Form(s) | Level |
|---|---|---|---|
 Loose Drawers |
Wario |
 Choo Choo |
3 |
 Bomb Disposal |
Kat & Ana |
 At Attention |
3 |
 Scroll with It |
Young Cricket & Master Mantis |
 Crocodile |
3 |
 Punch-Out!! |
9-Volt |
 Lifter |
3 |
The third and fourth microgames are selected from the following:
| Microgame | Host(s) | Form(s) | Level |
|---|---|---|---|
 Denied! |
Mona |
 Sky Stretch |
3 |
 Cowboy Up |
Kat & Ana |
 Fashionista |
3 |
 Stamp Rally |
Young Cricket & Master Mantis |
 Squat |
3 |
 Super Mario World 2: Yoshi's Island |
9-Volt |
Choo Choo |
1 |
The fifth microgame is a double-length microgame, and is selected from the following:
| Microgame | Host(s) | Form(s) | Level |
|---|---|---|---|
 Bucket Brigade |
Wario |
Choo Choo |
3 |
 Get the Ball Rolling |
Dr. Crygor, Penny & Mike |
 Big Cheese |
3 |
 Cormorant Catch |
Orbulon |
  Ba-KAW & Knight |
3 |
 Shear Madness |
Young Cricket & Master Mantis |
Crocodile |
3 |
The sixth and seventh microgames are selected from the following:
| Microgame | Host(s) | Form(s) | Level |
|---|---|---|---|
 Cutting Board |
Wario |
Choo Choo |
3 |
 Hunky-Dory |
Dr. Crygor, Penny & Mike |
 Massage |
3 |
 Wriggle Out |
Kat & Ana |
At Attention |
3 |
 Animal Crossing: New Horizons |
9-Volt |
 Tug-of-War |
2 |
 Pikmin 2 |
9-Volt |
Knight |
3 |
 Fresh Squeezed |
 Volcano Wario |
Lifter |
3 |
The eighth and ninth microgames are selected from the following:
| Microgame | Host(s) | Form(s) | Level |
|---|---|---|---|
 Security Risk |
Dr. Crygor, Penny & Mike |
Big Cheese |
3 |
 Shake Out the Kinks |
Dr. Crygor, Penny & Mike |
Massage |
3 |
 Mountain Man |
Orbulon |
Ba-KAW |
2 |
 Hop for Home |
Young Cricket & Master Mantis |
Squat |
3 |
The tenth microgame is a megagame, taking 16 seconds, and can be one of the following:
| Microgame | Host(s) | Form(s) |
|---|---|---|
 Speed Skate |
Wario |
Choo Choo |
 Batter Up |
Mona |
Knight & Choo Choo |
 Going Swimmingly |
Dr. Crygor, Penny & Mike |
Massage |
 Handcar Escape |
Dr. Crygor, Penny & Mike |
Massage |
 Pull-Up |
Orbulon |
Lifter |
 Snake Smack |
Kat & Ana |
Fashionista |
 Open Wide |
Young Cricket & Master Mantis |
Crocodile & Tug-of-War |
 Balloon Buster |
Volcano Wario |
Squat |
 Rubber Stamp |
Volcano Wario |
 Knight & Gift Giver |
The eleventh and twelfth microgames are selected from the following:
| Microgame | Host(s) | Form(s) | Level |
|---|---|---|---|
 Thigh Fishing |
Young Cricket & Master Mantis |
Squat |
3 |
 Service with a Smile |
Jimmy T |
 Archer |
1 |
 Donkey Kong Jr. |
9-Volt |
Knight |
3 |
 Throw Down |
Volcano Wario |
Massage |
3 |
The thirteenth and fourteenth microgames are selected from the following:
| Microgame | Host(s) | Form(s) | Level |
|---|---|---|---|
 Star Light, Star Bright |
Mona |
Sky Stretch |
3 |
 Wiper Wave |
Mona |
Sky Stretch |
3 |
 Chop to It |
Ashley & Red |
Tug-of-War |
3 |
 Reel It In |
Jimmy T |
Archer |
3 |
The fifteenth microgame is a double-length microgame, and is selected from the following:
| Microgame | Host(s) | Form(s) | Level |
|---|---|---|---|
 Biggest Fan |
Mona |
Sky Stretch |
3 |
 Squeaky-Clean |
Ashley & Red |
Tug-of-War |
3 |
 Spear Me |
Ashley & Red |
Tug-of-War |
3 |
 Water Hazards |
Young Cricket & Master Mantis |
Squat |
3 |
 Ring Fit Adventure |
9-Volt |
Fashionista |
3 |
The sixteenth and seventeenth microgames are selected from the following:
| Microgame | Host(s) | Form(s) | Level |
|---|---|---|---|
 Jailbreak |
Wario |
Choo Choo |
3 |
 Take the Plunger |
Mona |
Knight |
3 |
 Wrung Out |
Dr. Crygor, Penny & Mike |
Massage |
3 |
 Unchained |
Orbulon |
Lifter |
3 |
 Shell Shine |
Kat & Ana |
Fashionista |
3 |
 Paper Mario: The Origami King |
9-Volt |
Sky Stretch |
1 |
The eighteenth and nineteenth microgames are selected from the following:
| Microgame | Host(s) | Form(s) | Level |
|---|---|---|---|
 De-Stocking |
Mona |
Knight |
3 |
 Gacha Now |
Dr. Crygor, Penny & Mike |
Massage |
3 |
 Mario Bros. |
9-Volt |
Fashionista |
2 |
 Garlic Grab |
Volcano Wario |
Squat |
3 |
The twentieth and last microgame is a megagame, taking 16 seconds, and can be one of the following:
| Microgame | Host(s) | Form(s) | Level |
|---|---|---|---|
 Locomotion |
Wario |
Choo Choo |
3 |
 Pepper Mill |
Mona |
Knight |
3 |
 Seaweedy |
Mona |
Sky Stretch |
1 |
 You've Got Tissues |
Dr. Crygor, Penny & Mike |
Massage |
1 |
 Harvest Man |
Ashley & Red |
 Scales |
3 |
 Speed Bag |
Orbulon |
Lifter |
1 |
 nintendogs + cats |
9-Volt |
Massage |
1 |
Mr. Sparkles' Comments
This section is a stub. Please consider expanding it to include any missing information. Specifics: There may be more comments within the number ranges written below
- 0 mus.: "That's not how a winner acts! Shape up, or you'll never get in shape!"
- 1-3999 mus.: "That was good, but you can get even better! You're a li'l ball of potential!"
- 4000-4399 mus.: "You're getting toned! Turn those uniceps into triceps!"
- 4400-4599 mus.: "Wanna get even more buff? Great! You only work out what you work in!"
- 4600-4799 mus.: "Hey, those muscles are starting to bulge! But could they be bulgier?"
- 4800-4999 mus.: "Now that's a body suited for the space age!"
- 5000+ mus.: "You've trained your way to gains! These are the muscles of the gods!"
Gallery
Dr. Crygor and Mike resting after a failed microgame with no activity
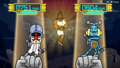
Dr. Crygor and Mike lifting small weights after a failed microgame with some microgame activity
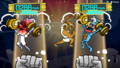
Dr. Crygor and Mike lifting large weights after a successful microgame
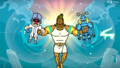
Mr. Sparkles shaking Dr. Crygor and Mike after all 20 microgames
Mike winning the multiplayer version of Megagame Muscles

Mr. Sparkles commenting on Dr. Crygor's physique


Names in other languages
| Language | Name | Meaning | Notes |
|---|---|---|---|
| Japanese | マッスル★エクササイズ[?] Massuru ★ ekusasaizu |
Muscle ★ Exercise | |
| Chinese (simplified) | 肌肉★锻炼[?] Jīròu ★ Duànliàn |
Muscle ★ Workout | |
| Chinese (traditional) | 肌肉★鍛鍊[?] Jīròu ★ Duànliàn |
Muscle ★ Workout | |
| French | Méga-jeu du muscle[?] | Mega-game of muscle | |
| German | ★ Muskel-training ★[?] | ★ Muscle training ★ | |
| Italian | Giochi Muscolimpici[?] | Muscolympic Games | |
| Korean | 머슬★엑서사이즈[?] Meoseul ★ Egseosaijeu |
Muscle ★ Exercise | |
| Spanish | Juegos musculímpicos[?] | Muscolympic Games |