Sunshine Seaside: Difference between revisions
LinkTheLefty (talk | contribs) mNo edit summary |
|||
| (47 intermediate revisions by 25 users not shown) | |||
| Line 1: | Line 1: | ||
{{ | {{level infobox | ||
|title=Sunshine Seaside | |title=Sunshine Seaside | ||
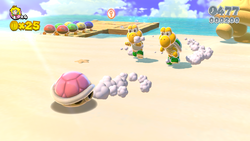
|image=[[File: | |image=[[File:SM3DW Peach in Koopa Shell.png|250px]] | ||
|code=World 5-1 | |code=World 5-1 | ||
|world=[[World 5 (Super Mario 3D World)|World 5]] | |world=[[World 5 (Super Mario 3D World)|World 5]] | ||
|game=''[[Super Mario 3D World]]'' | |game=''[[Super Mario 3D World]]''<br>''[[Super Mario 3D World + Bowser's Fury]]'' | ||
|limit=500 seconds | |limit=500 seconds | ||
| | |before_alt=[[Piranha Creeper Creek|**]] | ||
|before=[[Lava Rock Lair|<<]] | |before=[[Lava Rock Lair|<<]] | ||
|after=[[Tricky Trapeze Theater|>>]] | |after=[[Tricky Trapeze Theater|>>]] [[Backstreet Bustle|>>]] | ||
}} | }} | ||
'''Sunshine Seaside''', otherwise known as '''World 5-1''', is the first course in [[World 5 (Super Mario 3D World)|World 5]] from ''[[Super Mario 3D World]]''. The level is unlocked by either clearing [[Lava Rock Lair]] in [[World 4 (Super Mario 3D World)|World 4]], or entering the secret [[Warp Pipe]] in [[Piranha Creeper Creek]]. | '''Sunshine Seaside''', otherwise known as '''World 5-1''', is the first course in [[World 5 (Super Mario 3D World)|World 5]] from ''[[Super Mario 3D World]]'' and its [[Nintendo Switch]] port ''[[Super Mario 3D World + Bowser's Fury]]''. The level is unlocked by either clearing [[Lava Rock Lair]] in [[World 4 (Super Mario 3D World)|World 4]], or entering the secret [[Warp Pipe]] in [[Piranha Creeper Creek]]. Completion of this level unlocks both [[Tricky Trapeze Theater]] and [[Backstreet Bustle]]. | ||
==Layout== | ==Layout== | ||
The first and main area of this level is a sandy beach. Here, players find palm trees, sand statues and five [[Key Coin]]s. There are also [[Koopa Troopa]]s and a team of [[Chargin' Chuck]]s. The so-called "sea" ends at a [[Pit|bottomless pit]]. | The first and main area of this level is a sandy beach. Here, players find palm trees, sand statues and five [[Key Coin]]s. There are also [[Koopa Troopa]]s, [[Biddybud]]s, [[Mini Goomba]]s hidden within a Goomba statue, and a team of [[Chargin' Chuck]]s. The so-called "sea" ends at a [[Pit|bottomless pit]]. | ||
The Key Coins open the [[Warp Box]] to the next area, a floating island with the [[Checkpoint Flag]] and a [[Warp Pipe]]. Players are sent to a cavern where they ride [[Plessie]] through a river, dealing with [[Splounder]]s and moving bridges along the way. Another Warp Pipe at the end of the cave takes the players to the final island, where the [[Goal Pole]] and some [[Para-Biddybud]]s are found. | The Key Coins open the [[Warp Box]] to the next area, a floating island with the [[Checkpoint Flag]] and a [[Warp Pipe]]. Players are sent to a cavern where they ride [[Plessie]] through a river, dealing with [[Splounder]]s and moving bridges along the way. Another Warp Pipe at the end of the cave takes the players to the final island, where the [[Goal Pole]], a lone Koopa Troopa, and some [[Para-Biddybud]]s are found. | ||
==[[Green Star]]s== | ==Collectables== | ||
===[[Green Star]]s=== | |||
{| class="wikitable" style="text-align: center" | |||
!Image | |||
!Location | |||
|- | |||
|[[File:SM3DW W5-1 1st Green Star.jpg|150px]] | |||
|Inside the rightmost of the three [[Goomba]] sand statues near the start of the level. | |||
|- | |||
|[[File:SM3DW W5-1 2nd Green Star.jpg|150px]] | |||
|A secret room can be accessed via a Warp Pipe in a hole under the water, next to the first Warp Box. Inside it, players must step on every [[Color Panel]] on the ground to reveal the Green Star. | |||
|- | |||
|[[File:SM3DW W5-1 3rd Green Star.jpg|150px]] | |||
|There is a small cave in the wall to the very right of the first section. If players defeat every [[Biddybud]] there, [[Captain Toad]] gives them the final Green Star. | |||
|} | |||
==[[ | ===[[List of Super Mario 3D World stamps|Stamp]]=== | ||
[[File:SM3DW | {{Multiple image | ||
|align=right | |||
|direction=horizontal | |||
|width=100 | |||
|image1=SM3DW-KoopaTroopaStamp.png | |||
|alt1=Wii U version | |||
|image2=SM3DW_BF_KoopaTroopaStamp.png | |||
|alt2=Switch version | |||
}} | |||
{| class="wikitable" style="text-align: center" | |||
!Image | |||
!Location | |||
|- | |||
|[[File:SM3DW Sunshine Seaside stamp.jpg|150px]] | |||
|Above a wooden platform during Plessie's section. The stamp is an [[unshelled Koopa]]. | |||
|} | |||
==[[List of Luigi sightings in Super Mario 3D World|Luigi sightings]]== | |||
In the beginning area, the player can use a Sprixie's binoculars to see an 8-bit Luigi up in a tree. Also, if the player torches one of the bushes after the Plessie ride, another 8-bit Luigi can be seen. | |||
==Enemies== | ==Enemies== | ||
{{number of enemies | |||
|image1=[[File:Koopa Troopa Artwork - Super Mario 3D World.png|50px]] | |||
|name1=[[Koopa Troopa]] | |||
|count1=10 | |||
|image2=[[File:SM3DW Mario Stealing Koopa Shell.png|50px]] | |||
|name2=[[Unshelled Koopa Troopa|Unshelled Koopa]] | |||
|count2=(from Koopa Troopas) | |||
|image3=[[File:Biddybud SM3DW Prima.jpg|50px]] | |||
|name3=[[Biddybud]] | |||
|count3=22 | |||
|image4=[[File:Para-Biddybuds Artwork - Super Mario 3D World.png|50px]] | |||
|name4=[[Para-Biddybud]] | |||
|count4=4 | |||
|image5=[[File:Chargin' Chuck Artwork - Super Mario 3D World.png|50px]] | |||
|name5=[[Chargin' Chuck]] | |||
|count5=4 | |||
|image6=[[File:Mini Goomba SM3DW Prima.jpg|50px]] | |||
|name6=[[Mini Goomba]] | |||
|count6=6 | |||
|image7=[[File:Splounder SM3DW Prima.jpg|50px]] | |||
|name7=[[Splounder]] | |||
|count7=4 | |||
|image8=[[File:Coin Coffer SM3DW Prima.jpg|50px]] | |||
|name8=[[Coin Coffer]] | |||
|count8=3 | |||
}} | |||
==Gallery== | ==Gallery== | ||
<gallery> | <gallery> | ||
SM3DW Mario Stealing Koopa Shell.png|Mario holding a Koopa Shell | |||
SM3DW Sunshine Seaside.png|Mario and co. in Sunshine Seaside | |||
SM3DW Goomba Mask Screenshot.png|A Goomba Mask | |||
SM3DW Plessie Sliding.jpg | SM3DW Plessie Sliding.jpg|Riding on Plessie | ||
SM3DW Plessie Greeting.jpg | SM3DW Plessie Greeting.jpg|The end of the river | ||
</gallery> | </gallery> | ||
| Line 50: | Line 97: | ||
|JapR=Sansan bīchi | |JapR=Sansan bīchi | ||
|JapM=Sun Sun Beach | |JapM=Sun Sun Beach | ||
| | |FreE=Littoral tropical | ||
| | |FreEM=Tropical Shoreline | ||
| | |FreA=Rivage ensoleillé | ||
| | |FreAM=Sunny Shore | ||
|Ger=Sonnenbrand im Tropenstrand | |Ger=Sonnenbrand im Tropenstrand | ||
|GerM=Sunburn in the tropical beach | |GerM=Sunburn in the tropical beach | ||
|Dut=Zon, zee en sleutelmunten | |Dut=Zon, zee en sleutelmunten | ||
|DutM=Sun, sea and Key Coins | |DutM=Sun, sea and Key Coins | ||
| | |SpaA=Un paseo por la playa | ||
| | |SpaAM=A beach stroll | ||
|SpaE=Excursión por la playa Sol-Sol | |||
|SpaEM=Trip on Sun-Sun Beach | |||
|Ita=Tropico dei Koopa | |Ita=Tropico dei Koopa | ||
|ItaM=Koopas' tropics | |ItaM=Koopas' tropics | ||
| Line 67: | Line 116: | ||
|RusR=Solnechniy bereg | |RusR=Solnechniy bereg | ||
|RusM=Sunny Shore | |RusM=Sunny Shore | ||
|ChiS=阳光海滩 | |||
|ChiSR=Yángguāng Hǎitān | |||
|ChiSM=Sunshine Beach | |||
|ChiT=陽光海灘 | |||
|ChiTR=Yángguāng Hǎitān | |||
|ChiTM=Sunshine Beach | |||
|Kor=선샤인 비치 | |||
|KorR=Seonsyain Bichi | |||
|KorM=Sunshine Beach | |||
}} | }} | ||
{{SM3DW | {{SM3DW levels}} | ||
[[Category:Beaches]] | [[Category:Beaches]] | ||
[[Category:Super Mario 3D World levels]] | |||
[[Category:Super Mario 3D World | |||
[[de:Sonnenbrand am Tropenstrand]] | [[de:Sonnenbrand am Tropenstrand]] | ||
Latest revision as of 17:07, December 12, 2024
| Level | |
|---|---|
| Sunshine Seaside | |

| |
| Level code | World 5-1 |
| World | World 5 |
| Game | Super Mario 3D World Super Mario 3D World + Bowser's Fury |
| Time limit | 500 seconds |
| ** << Directory of levels >> >> | |
Sunshine Seaside, otherwise known as World 5-1, is the first course in World 5 from Super Mario 3D World and its Nintendo Switch port Super Mario 3D World + Bowser's Fury. The level is unlocked by either clearing Lava Rock Lair in World 4, or entering the secret Warp Pipe in Piranha Creeper Creek. Completion of this level unlocks both Tricky Trapeze Theater and Backstreet Bustle.
Layout[edit]
The first and main area of this level is a sandy beach. Here, players find palm trees, sand statues and five Key Coins. There are also Koopa Troopas, Biddybuds, Mini Goombas hidden within a Goomba statue, and a team of Chargin' Chucks. The so-called "sea" ends at a bottomless pit.
The Key Coins open the Warp Box to the next area, a floating island with the Checkpoint Flag and a Warp Pipe. Players are sent to a cavern where they ride Plessie through a river, dealing with Splounders and moving bridges along the way. Another Warp Pipe at the end of the cave takes the players to the final island, where the Goal Pole, a lone Koopa Troopa, and some Para-Biddybuds are found.
Collectables[edit]
Green Stars[edit]
| Image | Location |
|---|---|

|
Inside the rightmost of the three Goomba sand statues near the start of the level. |

|
A secret room can be accessed via a Warp Pipe in a hole under the water, next to the first Warp Box. Inside it, players must step on every Color Panel on the ground to reveal the Green Star. |

|
There is a small cave in the wall to the very right of the first section. If players defeat every Biddybud there, Captain Toad gives them the final Green Star. |
Stamp[edit]
| Image | Location |
|---|---|

|
Above a wooden platform during Plessie's section. The stamp is an unshelled Koopa. |
Luigi sightings[edit]
In the beginning area, the player can use a Sprixie's binoculars to see an 8-bit Luigi up in a tree. Also, if the player torches one of the bushes after the Plessie ride, another 8-bit Luigi can be seen.
Enemies[edit]
| Image | Name | Count |
|---|---|---|
| Koopa Troopa | 10 | |
| Unshelled Koopa | (from Koopa Troopas) | |

|
Biddybud | 22 |
| Para-Biddybud | 4 | |
| Chargin' Chuck | 4 | |

|
Mini Goomba | 6 |

|
Splounder | 4 |

|
Coin Coffer | 3 |
Gallery[edit]
Names in other languages[edit]
| Language | Name | Meaning | Notes |
|---|---|---|---|
| Japanese | サンサンビーチ[?] Sansan bīchi |
Sun Sun Beach | |
| Chinese (simplified) | 阳光海滩[?] Yángguāng Hǎitān |
Sunshine Beach | |
| Chinese (traditional) | 陽光海灘[?] Yángguāng Hǎitān |
Sunshine Beach | |
| Dutch | Zon, zee en sleutelmunten[?] | Sun, sea and Key Coins | |
| French (NOA) | Rivage ensoleillé[?] | Sunny Shore | |
| French (NOE) | Littoral tropical[?] | Tropical Shoreline | |
| German | Sonnenbrand im Tropenstrand[?] | Sunburn in the tropical beach | |
| Italian | Tropico dei Koopa[?] | Koopas' tropics | |
| Korean | 선샤인 비치[?] Seonsyain Bichi |
Sunshine Beach | |
| Portuguese | Baía soalheira[?] | Sunny bay | |
| Russian | Солнечный берег[?] Solnechniy bereg |
Sunny Shore | |
| Spanish (NOA) | Un paseo por la playa[?] | A beach stroll | |
| Spanish (NOE) | Excursión por la playa Sol-Sol[?] | Trip on Sun-Sun Beach |


