5 Roy's Castle: Difference between revisions
mNo edit summary |
mNo edit summary |
||
| (90 intermediate revisions by 54 users not shown) | |||
| Line 1: | Line 1: | ||
{{ | {{title|#5 Roy's Castle}} | ||
{{level | {{redirect|Roy's Castle|the New Super Mario Bros. U level|[[Roy's Conveyor Castle]]|the New Super Luigi U level|[[Roy's Ironclad Castle]]}} | ||
|title=Roy's Castle | {{level infobox | ||
|image=[[ | |title=#5 Roy's Castle | ||
|image=[[File:SMW RoyCastle.png]]<br>Screenshot from ''Super Mario World'' | |||
|code=5-Castle | |code=5-Castle | ||
|game=''[[Super Mario World]]'' | |game=''[[Super Mario World]]'' | ||
| | |world=[[Forest of Illusion]] | ||
|before= [[Forest of Illusion 3|<<]] | |limit=300 seconds | ||
|after= [[Chocolate Island 1|>>]] | |boss=[[Roy|Roy Koopa]] | ||
|before=[[Forest of Illusion 3|<<]] | |||
|after=[[Chocolate Island 1|>>]] | |||
|track=[[Castle (theme)|Castle]] | |||
|sample=[[File:Sub Castle Theme Super Mario World.oga]] | |||
}} | }} | ||
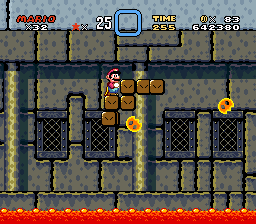
'''#5 Roy's Castle''' is the fifth [[castle]] in ''[[Super Mario World]]''. It is found at the end of the [[Forest of Illusion]], and can be accessed through the secret exit of [[Forest of Illusion 3]]. The castle includes a [[Snake Block]] that [[Mario]] and [[Luigi]] have to stay on to avoid the [[lava]] below. | {{quote|Mario found his way through the Forest of Illusion and has put an end to Roy Koopa of castle #5. Onward to the dangerous (but tasty) Chocolate Island!|In-game text|[[Super Mario World]]}} | ||
'''#5 Roy's Castle''' is the fifth [[castle]] in ''[[Super Mario World]]''. It is found at the end of the [[Forest of Illusion]], and can be accessed through the secret exit of [[Forest of Illusion 3]]. The castle includes a [[Snake Block|snake platform]] that [[Mario]] and [[Luigi]] have to stay on and follow to avoid the [[lava]] below. [[Roy|Roy Koopa]] is fought here. It is one of two castle levels in the original game to feature [[Dragon Coin]]s, the other being [[7 Larry's Castle|#7 Larry's Castle]]. | |||
== | ==Layout== | ||
[[ | Mario starts in a tight space at the top of the screen. He must run across the starting platform, encountering a large pool of lava at the end. To traverse this lava, Mario must follow a snake platform. The first [[Dragon Coin]] can be found at the beginning of the snake platform's path. As the snake platform moves across the pool of lava, Mario must follow it and avoid the bouncing [[Lava Bubble]]s. After some time, the snake platform reaches the end of the lava; however, it has not reached the end of its path yet. Mario must stay on the snake platform and follow it across a bed of [[Spike Trap|spike]]s. Some of these spikes are [[falling spike]]s. Three Dragon Coins can be found in the middle of the bed of spikes. After Mario gets past the spikes, the snake platform falls into a bottomless [[pit]]. | ||
After the snake platform segment of the castle is finished, Mario must jump onto a platform at the top of the screen and traverse across another tight space of three short platforms, this time with spikes at the top. There is a [[P Switch|Switch Block]] in the middle of the space, which Mario can activate to obtain a [[1-Up Mushroom]] in a cage of blocks at the top of the screen; however, doing this also frees an additional [[Bowser Statue]] from the cage. Next, Mario must traverse across a long mechanical bridge spanning across a pool of lava, while avoiding three Lava Bubbles and Bowser Statues shooting flames at him. After crossing the bridge, Mario finds three [[Stretch Block]]s suspended above a wide bottomless pit. Above the first Stretch Block, there is a green [[! Block]] that can be activated in the [[Green Switch Palace]] and contains a power-up. Mario must jump across the Stretch Blocks to cross the bottomless pit, while avoiding more bouncing Lava Bubbles and a single Bowser Statue between two blocks. The final Dragon Coin can be found above the second Stretch Block. After crossing the bottomless pit and avoiding one last Bowser Statue, Mario can finally open the door to the boss battle with [[Roy|Roy Koopa]]. | |||
[[ | |||
At the end of that room, the brothers make it to the boss, [[Roy Koopa]] | [[File:SMW RoyBattle.png|thumb|left|Screenshot of the boss fight from ''Super Mario World'']] | ||
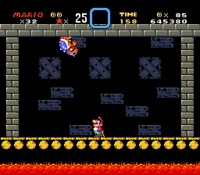
At the end of that room, the brothers make it to the boss, [[Roy|Roy Koopa]], whose fighting method is similar to that of [[Morton Koopa Jr.|Morton's]] in [[2 Morton's Castle|the second castle]], but the walls close in slightly as time goes on. After he is defeated, the two are able to rescue the [[Yoshi Egg]] that was trapped inside it. Like the other castles in ''Super Mario World'', it was destroyed shortly after. The cutscene has Mario prepare to detonate Roy's castle, only for the explosion to not occur, causing Mario to cautiously approach the castle before it humorously proceeds to blow up just as Mario investigates, leaving him covered in soot and tattered as well as a poof of steam emerge from his head. By completing this castle, the player gains access to [[Chocolate Island 1]]. | |||
{{br}} | |||
==Enemies== | ==Enemies== | ||
{{number of enemies | |||
|image1=[[File:SMW Lava Blubbe.png]] | |||
|name1=[[Lava Bubble]] | |||
< | |count1=8 | ||
{{SMW | |image2=[[File:SMW ZigzagLavaBubble.png]] | ||
[[Category: | |name2=Lava Bubble (zigzag) | ||
|count2=4 | |||
[[Category: | |image3=[[File:FallingSpikes.png]] | ||
[[Category: | |name3=[[Falling spike]] | ||
|count3=3 | |||
|image4=[[File:Grey Bowser Statue.png]] | |||
|name4=[[Bowser Statue]] (gray) | |||
|count4=4 | |||
|image5=[[File:SMWRoyKoopaSprite.png]] | |||
|name5=[[Roy|Roy Koopa]] | |||
|count5=1 (boss) | |||
}} | |||
==Trivia== | |||
*A reference to Roy's battle in this game is made in ''[[New Super Mario Bros. 2]]'', in the manner that the walls close in every time Roy is stomped on. | |||
==Names in other languages== | |||
{{foreign names | |||
|Jap=まよいのもりのしろ | |||
|JapR=Mayoi no Mori no Shiro | |||
|JapM=Mazing Wood's Castle | |||
|SpaE=Castillo 5º. Roy | |||
|SpaEM=5th Castle. Roy | |||
|Fre=<nowiki>#</nowiki>5 Chateau de Roy | |||
|FreM=<nowiki>#</nowiki>5 Roy's Fortress | |||
|Ger=5. Roys Festung | |||
|GerM=5. Roy's Fortress | |||
|Ita=Castello della Foresta delle Illusioni | |||
|ItaM=Forest of Illusion Castle | |||
}} | |||
{{SMW levels}} | |||
[[Category:Castles]] | |||
[[Category:Volcanic areas]] | |||
[[Category:Super Mario World levels]] | |||
Latest revision as of 00:53, December 1, 2024
- "Roy's Castle" redirects here. For the New Super Mario Bros. U level, see Roy's Conveyor Castle. For the New Super Luigi U level, see Roy's Ironclad Castle.
| Level | |||
|---|---|---|---|
| #5 Roy's Castle | |||
 Screenshot from Super Mario World | |||
| Level code | 5-Castle | ||
| World | Forest of Illusion | ||
| Game | Super Mario World | ||
| Time limit | 300 seconds | ||
| Boss | Roy Koopa | ||
| Music track | Castle | ||
| |||
| << Directory of levels >> | |||
- “Mario found his way through the Forest of Illusion and has put an end to Roy Koopa of castle #5. Onward to the dangerous (but tasty) Chocolate Island!”
- —In-game text, Super Mario World
#5 Roy's Castle is the fifth castle in Super Mario World. It is found at the end of the Forest of Illusion, and can be accessed through the secret exit of Forest of Illusion 3. The castle includes a snake platform that Mario and Luigi have to stay on and follow to avoid the lava below. Roy Koopa is fought here. It is one of two castle levels in the original game to feature Dragon Coins, the other being #7 Larry's Castle.
Layout[edit]
Mario starts in a tight space at the top of the screen. He must run across the starting platform, encountering a large pool of lava at the end. To traverse this lava, Mario must follow a snake platform. The first Dragon Coin can be found at the beginning of the snake platform's path. As the snake platform moves across the pool of lava, Mario must follow it and avoid the bouncing Lava Bubbles. After some time, the snake platform reaches the end of the lava; however, it has not reached the end of its path yet. Mario must stay on the snake platform and follow it across a bed of spikes. Some of these spikes are falling spikes. Three Dragon Coins can be found in the middle of the bed of spikes. After Mario gets past the spikes, the snake platform falls into a bottomless pit.
After the snake platform segment of the castle is finished, Mario must jump onto a platform at the top of the screen and traverse across another tight space of three short platforms, this time with spikes at the top. There is a Switch Block in the middle of the space, which Mario can activate to obtain a 1-Up Mushroom in a cage of blocks at the top of the screen; however, doing this also frees an additional Bowser Statue from the cage. Next, Mario must traverse across a long mechanical bridge spanning across a pool of lava, while avoiding three Lava Bubbles and Bowser Statues shooting flames at him. After crossing the bridge, Mario finds three Stretch Blocks suspended above a wide bottomless pit. Above the first Stretch Block, there is a green ! Block that can be activated in the Green Switch Palace and contains a power-up. Mario must jump across the Stretch Blocks to cross the bottomless pit, while avoiding more bouncing Lava Bubbles and a single Bowser Statue between two blocks. The final Dragon Coin can be found above the second Stretch Block. After crossing the bottomless pit and avoiding one last Bowser Statue, Mario can finally open the door to the boss battle with Roy Koopa.
At the end of that room, the brothers make it to the boss, Roy Koopa, whose fighting method is similar to that of Morton's in the second castle, but the walls close in slightly as time goes on. After he is defeated, the two are able to rescue the Yoshi Egg that was trapped inside it. Like the other castles in Super Mario World, it was destroyed shortly after. The cutscene has Mario prepare to detonate Roy's castle, only for the explosion to not occur, causing Mario to cautiously approach the castle before it humorously proceeds to blow up just as Mario investigates, leaving him covered in soot and tattered as well as a poof of steam emerge from his head. By completing this castle, the player gains access to Chocolate Island 1.
Enemies[edit]
| Image | Name | Count |
|---|---|---|
| Lava Bubble | 8 | |
| Lava Bubble (zigzag) | 4 | |
| Falling spike | 3 | |
| Bowser Statue (gray) | 4 | |
| Roy Koopa | 1 (boss) |
Trivia[edit]
- A reference to Roy's battle in this game is made in New Super Mario Bros. 2, in the manner that the walls close in every time Roy is stomped on.
Names in other languages[edit]
| Language | Name | Meaning | Notes |
|---|---|---|---|
| Japanese | まよいのもりのしろ[?] Mayoi no Mori no Shiro |
Mazing Wood's Castle | |
| French | #5 Chateau de Roy[?] | #5 Roy's Fortress | |
| German | 5. Roys Festung[?] | 5. Roy's Fortress | |
| Italian | Castello della Foresta delle Illusioni[?] | Forest of Illusion Castle | |
| Spanish (NOE) | Castillo 5º. Roy[?] | 5th Castle. Roy |
