World D-3: Difference between revisions
Trig Jegman (talk | contribs) m (→Layout) |
PlugMeister (talk | contribs) No edit summary |
||
| (19 intermediate revisions by 10 users not shown) | |||
| Line 1: | Line 1: | ||
{{ | {{level infobox | ||
|title=World D-3 | |title=World D-3 | ||
|image=[[File: | |image=[[File:SMBLL World D-3 Screenshot.png]] | ||
|code= | |code=D-3 | ||
|world=[[World D]] | |world=[[World D]] | ||
|game=''[[Super Mario Bros.: The Lost Levels]]'' | |game=''[[Super Mario Bros.: The Lost Levels]]'' | ||
|limit=400 seconds | |limit=400 seconds | ||
| | |before_alt= | ||
|before=[[World D-2|<<]] | |before=[[World D-2|<<]] | ||
|after=[[World D-4|>>]] | |after=[[World D-4|>>]] | ||
|secret= | |secret= | ||
|track=[[Ground Theme (Super Mario Bros.)|Ground Theme]] | |||
|sample=[[File:SMB Overworld Theme.oga]] | |||
}} | }} | ||
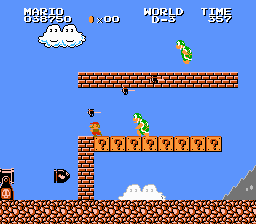
'''World D-3''' is the third level of [[World D]] in ''[[Super Mario Bros.: The Lost Levels]]''. The fortress walls in the background appear in the original version of the game with items being found in [[Brick Block]]s, but the walls are absent in the ''[[Super Mario All-Stars]]'' version, with items being found in [[Hidden Block]]s. | '''World D-3''' is the third level of [[World D]] in ''[[Super Mario Bros.: The Lost Levels]]'' and the nineteenth secret level overall in said game. The darker fortress walls in the background appear in the original version of the game with items being found in [[Brick Block|brick]]s, but the walls are absent in the ''[[Super Mario All-Stars]]'' version, with items being found in [[Hidden Block]]s. | ||
==Layout== | ==Layout== | ||
The player starts next to a group of six [[Bill Blaster|Turtle Cannon]]s, and in the third gap between them is a [[Brick Block|brick]] with a power-up. After a pipe with a [[Piranha Plant]], there are two [[Hammer Bro]]thers. that will charge at the player. Before the next Turtle Cannon, there is a row of [[Hidden Block]]s that can be used as cover against the next group of Hammer Brothers After another group of six Turtle Cannons is a [[Springboard]] that the player can use to reach the top of a pillar with a Red [[Koopa Troopa]] on it, which can be used to defeat the Hammer Brother below. Next is another Piranha Plant, three more Turtle Cannons, two Hammer Brothers, and a [[Koopa Paratroopa]] before Turtle Cannons in a stair formation that lead to the [[Goal Pole|flagpole]]. | |||
The player starts next to a group of six [[Bill Blaster]]s, and in the third gap between them is a [[Brick Block]] with a power-up. After a pipe with a [[Piranha Plant]], there are two [[Hammer Bro]] | |||
{{br|left}} | {{br|left}} | ||
==Enemies== | ==Enemies and obstacles== | ||
{{Number of enemies | |||
|image1=[[File:Bill Blaster Sprite SMB.png]] | |||
|name1=[[Bill Blaster|Turtle Cannon]] | |||
|count1=20 | |||
|image2=[[File:Bullet Bill Super Mario Bros.png]] | |||
|name2=[[Bullet Bill]] | |||
|count2=(infinitely spawned from Turtle Cannons) | |||
|image3=[[File:SMBLL Red Piranha Plant.png]] | |||
|name3=[[Piranha Plant|Red Piranha Plant]] | |||
|count3=2 | |||
|image4=[[File:SMB Hammer Bro Throwing Hammer Sprite.gif]] | |||
|name4=[[Hammer Bro]] | |||
|count4=7 | |||
|image5=[[File:SMB Red Koopa Troopa.gif]] | |||
|name5=[[Koopa Troopa|Red Koopa Troopa]] | |||
|count5=1 | |||
|image6=[[File:SMB Green Koopa Paratroopa Sprite.gif]] | |||
|name6=[[Koopa Paratroopa|Green Koopa Paratroopa]] | |||
|count6=1 | |||
}} | |||
==Items== | |||
[[File:SMAS LL World D-3 Title Card.png|thumb|Course icon]] | |||
{{Item locations | |||
|image1=[[File:SMBCoin.gif]] | |||
|name1=[[Coin]] | |||
|count1=18 | |||
|notes1=8 in [[? Block]]s, and 10 in one [[Coin Block]]. | |||
|image2=[[File:SMBLL Super Mushroom Sprite.png]][[File:Fire Flower SMB.gif]] | |||
|name2=[[Super Mushroom|Mushroom]]/[[Fire Flower]] | |||
|count2=1 | |||
|notes2= | |||
}} | |||
==Level maps== | |||
{{Wide image|NES LL World D-3 Map.png|3680|Map of World D-3}} | |||
{{Wide image|SMAS LL World D-3 Map.png|3936|Map of World D-3 (''[[Super Mario All-Stars]]'' version)}} | |||
== | ==Gallery== | ||
<gallery> | |||
SMAS LL World D-3 Screenshot.png|''[[Super Mario All-Stars]]'' version | |||
</gallery> | |||
{{SMBTLL | {{SMBTLL levels}} | ||
[[Category:Fortresses]] | |||
[[Category:Grasslands]] | [[Category:Grasslands]] | ||
[[Category:Super Mario Bros.: The Lost Levels | [[Category:Super Mario Bros.: The Lost Levels levels]] | ||
Latest revision as of 09:00, October 31, 2024
| Level | |||
|---|---|---|---|
| World D-3 | |||

| |||
| Level code | D-3 | ||
| World | World D | ||
| Game | Super Mario Bros.: The Lost Levels | ||
| Time limit | 400 seconds | ||
| Music track | Ground Theme | ||
| |||
| << Directory of levels >> | |||
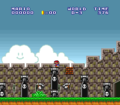
World D-3 is the third level of World D in Super Mario Bros.: The Lost Levels and the nineteenth secret level overall in said game. The darker fortress walls in the background appear in the original version of the game with items being found in bricks, but the walls are absent in the Super Mario All-Stars version, with items being found in Hidden Blocks.
Layout[edit]
The player starts next to a group of six Turtle Cannons, and in the third gap between them is a brick with a power-up. After a pipe with a Piranha Plant, there are two Hammer Brothers. that will charge at the player. Before the next Turtle Cannon, there is a row of Hidden Blocks that can be used as cover against the next group of Hammer Brothers After another group of six Turtle Cannons is a Springboard that the player can use to reach the top of a pillar with a Red Koopa Troopa on it, which can be used to defeat the Hammer Brother below. Next is another Piranha Plant, three more Turtle Cannons, two Hammer Brothers, and a Koopa Paratroopa before Turtle Cannons in a stair formation that lead to the flagpole.
Enemies and obstacles[edit]
| Image | Name | Count |
|---|---|---|
| Turtle Cannon | 20 | |
| Bullet Bill | (infinitely spawned from Turtle Cannons) | |
| Red Piranha Plant | 2 | |
| Hammer Bro | 7 | |
| Red Koopa Troopa | 1 | |
| Green Koopa Paratroopa | 1 |
Items[edit]
| Image | Name | Count | Note(s)
|
|---|---|---|---|
| Coin | 18 | 8 in ? Blocks, and 10 in one Coin Block. | |
| Mushroom/Fire Flower | 1 |
Level maps[edit]
Gallery[edit]
Super Mario All-Stars version


