World D-2: Difference between revisions
PlugMeister (talk | contribs) No edit summary |
|||
| (10 intermediate revisions by 6 users not shown) | |||
| Line 1: | Line 1: | ||
{{ | {{level infobox | ||
|title=World D-2 | |title=World D-2 | ||
|image=[[File:SMBLL World D-2 Screenshot.png]] | |image=[[File:SMBLL World D-2 Screenshot.png]] | ||
| Line 6: | Line 6: | ||
|game=''[[Super Mario Bros.: The Lost Levels]]'' | |game=''[[Super Mario Bros.: The Lost Levels]]'' | ||
|limit=400 seconds | |limit=400 seconds | ||
| | |before_alt= | ||
|before=[[World D-1|<<]] | |before=[[World D-1|<<]] | ||
|after=[[World D-3|>>]] | |after=[[World D-3|>>]] | ||
|secret= | |secret= | ||
}} | }} | ||
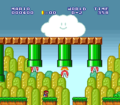
'''World D-2''' is the second level of [[World D]] in ''[[Super Mario Bros.: The Lost Levels]]''. | '''World D-2''' is the second level of [[World D]] in ''[[Super Mario Bros.: The Lost Levels]]'' and the eighteenth secret level overall in said game. | ||
==Layout== | ==Layout== | ||
The player starts at the bottom of a flight of stairs, at the top of which is a Red [[Koopa Troopa]] the player can kick to defeat some enemies below. After a group of [[Koopa Paratroopa]]s are some hanging pipes with [[Piranha Plant]]s the player must avoid as they jump between small platforms. Next is a stack of [[Bill Blaster]]s with Koopa Troopas falling above it. In the second-from-the-right [[Brick Block]] of the top row of Brick Blocks ahead is a [[Beanstalk]] that will take the player to [[Coin Heaven]], which will drop the player at the end onto a platform with a [[Warp Pipe]] leading to an underground area with a power-up and some [[Coin]]s, before looping around to just before the Brick Blocks. After a [[Springboard]] to help the player reach a high block over a pool of water is the [[Goal Pole]]. | The player starts at the bottom of a flight of stairs, at the top of which is a Red [[Koopa Troopa]] the player can kick to defeat some enemies below. After a group of [[Koopa Paratroopa]]s are some hanging pipes with [[Piranha Plant]]s the player must avoid as they jump between small platforms. Next is a stack of [[Bill Blaster]]s with Koopa Troopas falling above it. In the second-from-the-right [[Brick Block]] of the top row of Brick Blocks ahead is a [[Beanstalk]] that will take the player to [[Coin Heaven]], which will drop the player at the end onto a platform with a [[Warp Pipe]] leading to an underground area with a power-up and some [[Coin]]s, before looping around to just before the Brick Blocks. After a [[Springboard]] to help the player reach a high block over a pool of water is the [[Goal Pole]]. | ||
{{br|left}} | {{br|left}} | ||
==Enemies== | ==Enemies and obstacles== | ||
{| | {{Number of enemies | ||
|image1=[[File:SMB Red Koopa Troopa.gif]] | |||
|name1=[[Koopa Troopa|Red Koopa Troopa]] | |||
|count1=1 | |||
|image2=[[File:SMBBuzzyBeetle.gif]] | |||
|name2=[[Buzzy Beetle]] | |||
|1 | |count2=1 (5 in ''All-Stars''){{Footnote|main|*}} | ||
| | |image3=[[File:SMB Goomba Sprite.gif]] | ||
|name3=[[Goomba]] | |||
|1 | |count3=4 (none in ''All-Stars''){{Footnote|main|*}} | ||
| | |image4=[[File:SMB Green Koopa Paratroopa Sprite.gif]] | ||
|[[File:SMB Goomba Sprite.gif]] | |name4=[[Koopa Paratroopa|Green Koopa Paratroopa]] | ||
|4 | |count4=5 | ||
| | |image5=[[File:SMBLL Red Piranha Plant.png]] | ||
|[[File:SMB Green Koopa Paratroopa Sprite.gif]] | |name5=[[Piranha Plant|Red Piranha Plant]] | ||
|5 | |count5=10 | ||
| | |image6=[[File:Green Koopa Troopa SMB.gif]] | ||
|name6=Green Koopa Troopa | |||
|10 | |count6=3 | ||
| | |image7=[[File:Bill Blaster Sprite SMB.png]] | ||
|name7=[[Bill Blaster|Turtle Cannon]] | |||
|3 | |count7=2 | ||
| | |image8=[[File:Bullet Bill Super Mario Bros.png]] | ||
|name8=[[Bullet Bill]] | |||
|2 | |count8=(infinitely spawned from Turtle Cannons) | ||
| | |image9=[[File:SMB Red Koopa Paratroopa Sprite.gif]] | ||
|name9=Red Koopa Paratroopa | |||
|(infinitely spawned from [[ | |count9=2 | ||
| | }} | ||
|[[File:SMB | {{footnote|note|*|In ''Super Mario All-Stars'', all Goombas in the letter worlds are replaced with [[Buzzy Beetle]]s.}} | ||
| | |||
|} | ==Items== | ||
[[File:SMAS LL World D-2 Title Card.png|thumb|Course Icon]] | |||
{{Item locations | |||
|image1=[[File:SMBCoin.gif]] | |||
|name1=[[Coin]] | |||
|count1=75 | |||
|notes1=Up to 10 in one [[Coin Block]] in the first secret area, and 65 in open air in the two secret areas. | |||
|image2=[[File:SMBLL Super Mushroom Sprite.png]][[File:Fire Flower SMB.gif]] | |||
|name2=[[Super Mushroom|Mushroom]]/[[Fire Flower]] | |||
|count2=1 | |||
|notes2= | |||
}} | |||
==Level | ==Level maps== | ||
{{Wide image|NES LL World D-2 Map.png|4576|Map of World D-2}} | |||
{{Wide image|SMAS LL World D-2 Map.png|2560|Map of World D-2 (''[[Super Mario All-Stars]]'' version)}} | |||
==Gallery== | ==Gallery== | ||
| Line 64: | Line 71: | ||
</gallery> | </gallery> | ||
{{SMBTLL | {{SMBTLL levels}} | ||
[[Category:Grasslands]] | [[Category:Grasslands]] | ||
[[Category:Super Mario Bros.: The Lost Levels | [[Category:Super Mario Bros.: The Lost Levels levels]] | ||
Latest revision as of 13:00, July 17, 2024
| Level | |
|---|---|
| World D-2 | |

| |
| Level code | World D-2 |
| World | World D |
| Game | Super Mario Bros.: The Lost Levels |
| Time limit | 400 seconds |
| << Directory of levels >> | |
World D-2 is the second level of World D in Super Mario Bros.: The Lost Levels and the eighteenth secret level overall in said game.
Layout[edit]
The player starts at the bottom of a flight of stairs, at the top of which is a Red Koopa Troopa the player can kick to defeat some enemies below. After a group of Koopa Paratroopas are some hanging pipes with Piranha Plants the player must avoid as they jump between small platforms. Next is a stack of Bill Blasters with Koopa Troopas falling above it. In the second-from-the-right Brick Block of the top row of Brick Blocks ahead is a Beanstalk that will take the player to Coin Heaven, which will drop the player at the end onto a platform with a Warp Pipe leading to an underground area with a power-up and some Coins, before looping around to just before the Brick Blocks. After a Springboard to help the player reach a high block over a pool of water is the Goal Pole.
Enemies and obstacles[edit]
| Image | Name | Count |
|---|---|---|
| Red Koopa Troopa | 1 | |
| Buzzy Beetle | 1 (5 in All-Stars)* | |
| Goomba | 4 (none in All-Stars)* | |
| Green Koopa Paratroopa | 5 | |
| Red Piranha Plant | 10 | |
| Green Koopa Troopa | 3 | |
| Turtle Cannon | 2 | |
| Bullet Bill | (infinitely spawned from Turtle Cannons) | |
| Red Koopa Paratroopa | 2 |
* - In Super Mario All-Stars, all Goombas in the letter worlds are replaced with Buzzy Beetles.
Items[edit]

| Image | Name | Count | Note(s)
|
|---|---|---|---|
| Coin | 75 | Up to 10 in one Coin Block in the first secret area, and 65 in open air in the two secret areas. | |
| Mushroom/Fire Flower | 1 |
Level maps[edit]


Gallery[edit]
Super Mario All-Stars version
