3 Lemmy's Castle: Difference between revisions
No edit summary Tag: Reverted |
No edit summary |
||
| (2 intermediate revisions by 2 users not shown) | |||
| Line 2: | Line 2: | ||
{{level infobox | {{level infobox | ||
|title=#3 Lemmy's Castle | |title=#3 Lemmy's Castle | ||
|image=[[File:Lemmy's Castle.png]]<br>Mario | |image=[[File:Lemmy's Castle.png]]<br>Screenshot from ''Super Mario World'' | ||
|code=3-Castle | |code=3-Castle | ||
|game=''[[Super Mario World]]'' | |game=''[[Super Mario World]]'' | ||
| Line 14: | Line 14: | ||
'''#3 Lemmy's Castle''' is the third [[castle]] in ''[[Super Mario World]]'' and [[Super Mario World: Super Mario Advance 2|its reissue]]. It is guarded by [[Lemmy Koopa]] and can be accessed by completing [[Vanilla Dome 4]]. By completing this castle, the player gains access to the [[Cheese Bridge Area]]. | '''#3 Lemmy's Castle''' is the third [[castle]] in ''[[Super Mario World]]'' and [[Super Mario World: Super Mario Advance 2|its reissue]]. It is guarded by [[Lemmy Koopa]] and can be accessed by completing [[Vanilla Dome 4]]. By completing this castle, the player gains access to the [[Cheese Bridge Area]]. | ||
== | ==Layout== | ||
The first part of the hallway contains some [[Magikoopa]]s who cast spells at the Mario Bros. If these spells hit one of the many [[Rotating Block]]s in the castle, that block will be transformed into a [[Koopa Troopa|Yellow Koopa Troopa]], a [[Thwimp]], or a [[coin]] | The first part of the hallway contains some [[Magikoopa]]s who cast spells at the Mario Bros. If these spells hit one of the many [[Rotating Block]]s in the castle, that block will be transformed into a [[Koopa Troopa|Yellow Koopa Troopa]], a [[Thwimp]], or a [[coin]]. After the Rotating Block section, the player will have to pass through a pool with platforms bobbing in the water. Here, a [[Midway Gate]] can be reached if the player hits the [[P Switch|Switch Block]] and reaches the closest [[Warp Door|door]] before the time limit is up. The second part of this castle is a long hallway containing several large blocks that move up and down in a set amount of time. In order to reach the other side, the player must move carefully in order not to get crushed by the large blocks or hurt by the [[Dry Bones]] that patrol this area. | ||
[[File:SMW LemmyKoopa.png|thumb|left|The boss fight against Lemmy in the [[Super Mario World: Super Mario Advance 2|GBA reissue]]]] | |||
In his battle, Lemmy pops out of one of the many pipes that make up the floor of the room, along with two decoys.<ref>{{cite|language=en-us|date=Winter 2002|publisher=Nintendo of America|title=''Nintendo Power Advance'' Volume 4|page=43 and 69}}</ref> [[Mario]] or [[Luigi]] must identify the real Lemmy and stomp on him three times to defeat him, all the while avoiding a [[Lava Bubble]] that is bouncing around the room. Afterwards, a short cutscene depicts Mario destroying the castle by smashing it with a [[hammer]] repeatedly, and Mario proceeds to the [[Twin Bridges]] area, though it is possible to reach the Twin Bridges area by completing [[Vanilla Fortress]] and therefore skip it entirely. | |||
[[File:SMW LemmyKoopa.png|thumb|left | |||
Lemmy pops out of one of the many pipes that make up the floor of the room, along with two decoys.<ref>''Nintendo Power Advance'' | |||
{{br|left}} | {{br|left}} | ||
==Enemies== | ==Enemies== | ||
{| | {{number of enemies | ||
|image1=[[File:SMW Magikoopa.png]] | |||
|name1=[[Magikoopa]] | |||
|count1=1 | |||
|image2=[[File:SMW KoopaTroopa Yellow.png]] | |||
|name2=[[Koopa Troopa]] (yellow) | |||
|[[Magikoopa]] | |count2=(from Rotating Blocks) | ||
|1 | |image3=[[File:Thwimp.png]] | ||
| | |name3=[[Thwimp]] | ||
|count3=(from Rotating Blocks) | |||
|[[Koopa Troopa]] (yellow) | |image4=[[File:Rainbowshell.gif]] | ||
|(from Rotating Blocks) | |name4=[[Shell (flashing)|Flashing shell]] | ||
| | |count4=(nearby shell) | ||
|image5=[[File:SMW Lava Blubbe.png]] | |||
|[[Thwimp]] | |name5=[[Lava Bubble]] | ||
|(from Rotating Blocks) | |count5=11 | ||
| | |image6=[[File:SMW ZigzagLavaBubble.png]] | ||
|name6=Lava Bubble (zigzag) | |||
|[[Shell (flashing)|Flashing shell]] | |count6=1 | ||
|(nearby shell) | |image7=[[File:SMWDB.png]] | ||
| | |name7=[[Dry Bones]] | ||
|count7=8 | |||
|[[Lava Bubble]] | |image8=[[File:SMW LemmyKoopaSprite.png]] | ||
|11 | |name8=[[Lemmy Koopa]] | ||
| | |count8=1 (boss) | ||
}} | |||
|Lava Bubble (zigzag) | |||
|1 | |||
| | |||
|[[Dry Bones]] | |||
|8 | |||
| | |||
|[[Lemmy Koopa]] | |||
|1 (boss) | |||
==Gallery== | ==Gallery== | ||
| Line 76: | Line 62: | ||
|Spa=Castillo 3º. Lemmy | |Spa=Castillo 3º. Lemmy | ||
|SpaM=3rd Castle. Lemmy | |SpaM=3rd Castle. Lemmy | ||
|Fre=#3 Chateau de Lemmy | |Fre=<nowiki>#</nowiki>3 Chateau de Lemmy | ||
|FreM=#3 Lemmy's Fortress | |FreM=<nowiki>#</nowiki>3 Lemmy's Fortress | ||
|Ger=3. Lemmys Festung | |Ger=3. Lemmys Festung | ||
|GerM=3. Lemmy's Fortress | |GerM=3. Lemmy's Fortress | ||
Latest revision as of 00:49, July 5, 2024
| Level | |
|---|---|
| #3 Lemmy's Castle | |
 Screenshot from Super Mario World | |
| Level code | 3-Castle |
| World | Vanilla Dome |
| Game | Super Mario World |
| Time limit | 400 seconds 300 seconds (Japanese version) |
| Boss | Lemmy Koopa |
| << Directory of levels >> | |
- “Mario has triumphed over Lemmy Koopa of castle #3. Mario's quest is starting to get much more difficult. Have you found the Red and Green Switches yet?”
- —In-game text, Super Mario World
#3 Lemmy's Castle is the third castle in Super Mario World and its reissue. It is guarded by Lemmy Koopa and can be accessed by completing Vanilla Dome 4. By completing this castle, the player gains access to the Cheese Bridge Area.
Layout[edit]
The first part of the hallway contains some Magikoopas who cast spells at the Mario Bros. If these spells hit one of the many Rotating Blocks in the castle, that block will be transformed into a Yellow Koopa Troopa, a Thwimp, or a coin. After the Rotating Block section, the player will have to pass through a pool with platforms bobbing in the water. Here, a Midway Gate can be reached if the player hits the Switch Block and reaches the closest door before the time limit is up. The second part of this castle is a long hallway containing several large blocks that move up and down in a set amount of time. In order to reach the other side, the player must move carefully in order not to get crushed by the large blocks or hurt by the Dry Bones that patrol this area.

In his battle, Lemmy pops out of one of the many pipes that make up the floor of the room, along with two decoys.[1] Mario or Luigi must identify the real Lemmy and stomp on him three times to defeat him, all the while avoiding a Lava Bubble that is bouncing around the room. Afterwards, a short cutscene depicts Mario destroying the castle by smashing it with a hammer repeatedly, and Mario proceeds to the Twin Bridges area, though it is possible to reach the Twin Bridges area by completing Vanilla Fortress and therefore skip it entirely.
Enemies[edit]
| Image | Name | Count |
|---|---|---|
| Magikoopa | 1 | |
| Koopa Troopa (yellow) | (from Rotating Blocks) | |
| Thwimp | (from Rotating Blocks) | |
| Flashing shell | (nearby shell) | |
| Lava Bubble | 11 | |
| Lava Bubble (zigzag) | 1 | |
| Dry Bones | 8 | |
| Lemmy Koopa | 1 (boss) |
Gallery[edit]
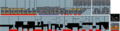
#3 Lemmy's Castle
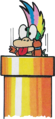
Artwork of Lemmy during his fight against Mario
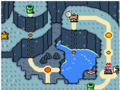
World Map of the Vanilla Dome


Names in other languages[edit]
| Language | Name | Meaning |
|---|---|---|
| Japanese | バニラドームのしろ Banira Dōmu no Shiro |
Vanilla Dome's Castle |
| French | #3 Chateau de Lemmy |
#3 Lemmy's Fortress |
| German | 3. Lemmys Festung |
3. Lemmy's Fortress |
| Italian | Castello di Cupola Vaniglia |
Vanilla Dome Castle |
| Spanish | Castillo 3º. Lemmy |
3rd Castle. Lemmy |
References[edit]
- ^ Winter 2002. Nintendo Power Advance Volume 4. Nintendo of America (American English). Page 43 and 69.