Item Shop (Wario Land 4): Difference between revisions
From the Super Mario Wiki, the Mario encyclopedia
Jump to navigationJump to search
m (Text replacement - "({{[Ff]oreign names[^{}]+}}) ({{[^b]|==)" to "$1 $2") |
(Looks better like this, you know.) |
||
| Line 9: | Line 9: | ||
{|width=100% cellspacing=0 border=1 cellpadding=3 style="border-collapse:collapse;" | {|width=100% cellspacing=0 border=1 cellpadding=3 style="border-collapse:collapse;" | ||
|- | |- | ||
!Item name | !rowspan="2"|Item name | ||
!colspan="3" |Price in [[Medal (Wario Land 4)|medal]]s | !colspan="3" |Price in [[Medal (Wario Land 4)|medal]]s | ||
|- | |- | ||
!align="center" style="background: #48D1C9;" |Normal | !align="center" style="background: #48D1C9;" |Normal | ||
!align="center" style="background: #FFCC07;" |Hard | !align="center" style="background: #FFCC07;" |Hard | ||
!align="center" style="background: #E35148;" |S-Hard | !align="center" style="background: #E35148;" |S-Hard | ||
|- | |- | ||
!align="center" |[[Apple Bomb]] | !align="center" |[[File:WL4 Item Shop Apple Bomb.png]]<br>[[Apple Bomb]] | ||
|align="center" style="background: #48D1C9;" |2 | |align="center" style="background: #48D1C9;" |2 | ||
|align="center" style="background: #FFCC07;" |3 | |align="center" style="background: #FFCC07;" |3 | ||
|align="center" style="background: #E35148;" |4 | |align="center" style="background: #E35148;" |4 | ||
|- | |- | ||
!align="center" |[[Blast Cannon]] | !align="center" |[[File:Blast Cannon.png]]<br>[[Blast Cannon]] | ||
|align="center" style="background: #48D1C9;" |2 | |align="center" style="background: #48D1C9;" |2 | ||
|align="center" style="background: #FFCC07;" |3 | |align="center" style="background: #FFCC07;" |3 | ||
|align="center" style="background: #E35148;" |4 | |align="center" style="background: #E35148;" |4 | ||
|- | |- | ||
!align="center" |[[Vizorman]] | !align="center" |[[File:WL4 Item Shop Vizorman.png]]<br>[[Vizorman]] | ||
|align="center" style="background: #48D1C9;" |4 | |align="center" style="background: #48D1C9;" |4 | ||
|align="center" style="background: #FFCC07;" |6 | |align="center" style="background: #FFCC07;" |6 | ||
|align="center" style="background: #E35148;" |8 | |align="center" style="background: #E35148;" |8 | ||
|- | |- | ||
!align="center" |[[Bugle]] | !align="center" |[[File:WL4 Item Shop Bugle.png]]<br>[[Bugle]] | ||
|align="center" style="background: #48D1C9;" |6 | |align="center" style="background: #48D1C9;" |6 | ||
|align="center" style="background: #FFCC07;" |9 | |align="center" style="background: #FFCC07;" |9 | ||
|align="center" style="background: #E35148;" |12 | |align="center" style="background: #E35148;" |12 | ||
|- | |- | ||
!align="center" |[[Black Dog]] | !align="center" |[[File:WL4 Item Shop Black Dog.png]]<br>[[Black Dog]] | ||
|align="center" style="background: #48D1C9;" |10 | |align="center" style="background: #48D1C9;" |10 | ||
|align="center" style="background: #FFCC07;" |15 | |align="center" style="background: #FFCC07;" |15 | ||
|align="center" style="background: #E35148;" |20 | |align="center" style="background: #E35148;" |20 | ||
|- | |- | ||
!align="center" |[[Large Lips]] | !align="center" |[[File:Large Lips WL4.png]]<br>[[Large Lips]] | ||
|align="center" style="background: #48D1C9;" |10 | |align="center" style="background: #48D1C9;" |10 | ||
|align="center" style="background: #FFCC07;" |15 | |align="center" style="background: #FFCC07;" |15 | ||
|align="center" style="background: #E35148;" |20 | |align="center" style="background: #E35148;" |20 | ||
|- | |- | ||
!align="center" |[[Big Fist]] | !align="center" |[[File:Big Fist.png]]<br>[[Big Fist]] | ||
|align="center" style="background: #48D1C9;" |10 | |align="center" style="background: #48D1C9;" |10 | ||
|align="center" style="background: #FFCC07;" |15 | |align="center" style="background: #FFCC07;" |15 | ||
|align="center" style="background: #E35148;" |20 | |align="center" style="background: #E35148;" |20 | ||
|- | |- | ||
!align="center" |[[Black Dragon]] | !align="center" |[[File:Black Dragon.png]]<br>[[Black Dragon]] | ||
|align="center" style="background: #48D1C9;" |10 | |align="center" style="background: #48D1C9;" |10 | ||
|align="center" style="background: #FFCC07;" |15 | |align="center" style="background: #FFCC07;" |15 | ||
|align="center" style="background: #E35148;" |20 | |align="center" style="background: #E35148;" |20 | ||
|- | |- | ||
!align="center" |[[Smile]] | !align="center" |[[File:WL4 Item Shop Smile.png]]<br>[[Smile]] | ||
|align="center" style="background: #48D1C9;" |''N/A | |align="center" style="background: #48D1C9;" |''N/A | ||
|align="center" style="background: #FFCC07;" |''N/A | |align="center" style="background: #FFCC07;" |''N/A | ||
| Line 156: | Line 155: | ||
<gallery> | <gallery> | ||
WL4-Item Shop Entrance.png|The Item Shop entrance. | WL4-Item Shop Entrance.png|The Item Shop entrance. | ||
</gallery> | </gallery> | ||
Revision as of 12:17, September 4, 2022

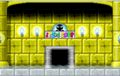
The Item Shop.
- This article is about the item shop from Wario Land 4. For the various item shops from other games, see Item Shop.
The Item Shop in the Game Boy Advance game Wario Land 4 is a place where Wario can spend his medals earned in the Mini-Game Shop in exchange for items. These assist him in defeating a boss by dealing damage before the battle begins. The shop owner is suggested to be Princess Shokora/Kuro Neko. The Smile is the only item in the shop that is free. This is a joke item, as it simply makes the shop owner smile and plays a sound effect.
Cost of items
All items and prices in different game modes are as follows:
| Item name | Price in medals | ||
|---|---|---|---|
| Normal | Hard | S-Hard | |
Apple Bomb |
2 | 3 | 4 |
Blast Cannon |
2 | 3 | 4 |
Vizorman |
4 | 6 | 8 |
Bugle |
6 | 9 | 12 |
Black Dog |
10 | 15 | 20 |
Large Lips |
10 | 15 | 20 |
Big Fist |
10 | 15 | 20 |
Black Dragon |
10 | 15 | 20 |
Smile |
N/A | N/A | N/A |
Damage dealt by items
Each item deals a fixed amount of damage to each boss. All damage totals are shown below. The last four items are not available for use against the first boss, Spoiled Rotten.
| Item | Boss / Damage taken by Item | |||||
|---|---|---|---|---|---|---|
| Spoiled Rotten | Cractus | Cuckoo Condor | Aerodent | Catbat | Golden Diva | |
| Apple Bomb | 2 | 2 | 2 | 1 | 2 | 1 |
| Blast Cannon | 3 | 3 | 2 | 2 | 1 | 1 |
| Vizorman | 6 | 4 | 3 | 3 | 3 | 2 |
| Bugle | 8 | 5 | 4 | 4 | 4 | 3 |
| Black Dog | N/A | 7 | 9 | 8 | 10 | 8 |
| Large Lips | N/A | 9 | 8 | 14 | 7 | 5 |
| Big Fist | N/A | 8 | 12 | 7 | 9 | 6 |
| Black Dragon | N/A | 10 | 7 | 9 | 8 | 7 |
Profiles
- Nintendo 3DS Ambassador Program digital manual bio: "You will be able to buy items from an Item Shop before facing a boss. You can buy these with the medals you won in the mini-games. Once you have purchased an item, you will automatically proceed to the boss chamber. The shop owner will then come and use your purchased item on the boss."
Media
| File info 1:20 |
Gallery
The Item Shop entrance.

Names in other languages
| Language | Name | Meaning | Notes |
|---|---|---|---|
| Chinese (simplified) | 物品商店[?] Wùpǐn Shāngdiàn |
Item Shop | |
| Italian | Negozio Strumenti[?] | Item Shop | |
| Spanish | Tienda de objetos[?] | Object store |