The 'Shroom:Issue LXXIII/MK:WTC
Welcome Mario Karters to the Mario Kart:Wheel Tips Corner. Coincollector is here to tell you the tip of this month. I'm so sorry that I couldn't give you the tip of the last month as I've had a hard time those days (and unfortunately, I'm still having them: Lots of study, lots of work, lots of worries...) However, I won't let that hard time stop my productivity again and I'll give you the tips you always like to read and expect as much as I can.
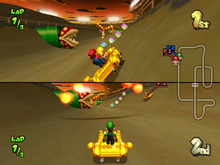
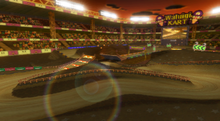
Now, let's begin with the tip of today. This one will be all about Waluigi Stadium. Wario's mean, slender, little bro has gained some respect over time, so in Mario Kart: Double Dash!!, his Mario Kart debut game, he was given a course dedicated to him. Waluigi Stadium is the last course of the Flower Cup in that game, made for intermediate–advanced players, with a theme that resembles a dirt-bike course, lots of bumps over the road that make it hard too keep the top speed, and big jumps made to impress the audience watching the race and giving some good action to it. Additionally, the course also comes with obstacles like the Podoboos forming fire rings and fire chains scattered on the road, specially at the parts where you perform the big jumps and other surprises. The course's trademark, however, is the last big jump at the end of the track. A jump, notable for having a gap that runs across a section of the track. Try to end the track with style by passing this obstacle, but remember to be very careful as you can be hit by any item, or even by the fire ring while performing your last leap and you will fall into the gap just to be brought back to the road by Lakitu to perform that last trick again. At least you don't have to start over from the spot you fell.
All the racers begin before a pronounced bump in a straight stretch of the road. Over that there is the first set of Item Boxes. Just after that, turn to the right to pass below an overhang. Turning again to the right there is a pair of other tall bumps. The first bump has a Boost Pad that makes racers jump high through the first fire ring with an Item Box in the center. Now after the jump go to the right again to go to the overhang you've crossed before. A row of other boost pads will make you jump to pass through the second ring of fire in the air with another Item Box placed in the center. After landing, swerve to the left and avoid running through the mud on the left of the curve. Racers run through a short straight path to turn to the left and enter a wide section of the track with several hazards. The first one is the chain of Podoboos that lie in the center of the track and their "arms" of fire spin vertically, touching the ground, burning any careless trespasser that wants to go straight into them. The second obstacle are giant Piranha Plant-like walls made of wood moving back and forth from pipes that are found on the sides of the road. With these obstacles together in the same area and in an alternating order (A Piranha Plant on a side, Podoboos in the center, and another Piranha Plant on the other side after), racers usually have to move in zigzag to avoid being burned and getting stuck on the Piaranha Plant walls. Here, racers will find two sets of Item Boxes.
After passing the last Piranha Plant wall, racers go to the left and right. After that they will find an uneven part of the track with two more bumps. Now, swerving to the right, racers will have to go into a short curly path with a piece of rough dirt on the left side of the road and a treacherous bump at the start of the last, tight turn that leads to the right. This last one will send players to finish the race with the spectacular jump over the bumpy track they passed beforehand. Run over the dash panel to gain a boost, passing through the last fire ring with the last Item Box in it and successfully reach the other side of the road with the finish line to complete the lap.
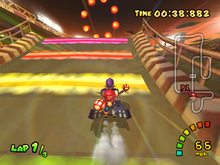
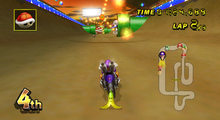
Waluigi Stadium makes a return in Mario Kart Wii as the last course of the Banana Cup. The course got slight changes to fit to the new mechanics of the game. The track is slightly bigger and wider. A nuisance in Double Dash!!, bumps, are now useful to perform tricks, as well as great jumps to gain extra boosts after landing. There are also blue ramps to perform tricks with Item Boxes, located in the farthest side of some curves of the track. The area with Fire chains and Piranha Plants is a lot wider and one more of each obstacles was added (In Double Dash!! There are three Podoboo chains and three Piranha Plants, in Mario Kart Wii, there are four each one). A pair of blue pads were added to the sides, making this area rather less hindering than it was before. Going to the sides is safer and quicker, specially because the Item Boxes that were found between the obstacles are now placed on the sides, despite the extra number of obstacles.
Waluigi Stadium has some shortcuts. The most basic and prominent are the mud and the rough soil that can be passed with a booster like a Mushroom or Star. Although not noticeable, trying to skip some of the bumps and parts in the road also saves a lot of time. For example: Instead of taking the boost pad to jump, it's much better to go to the sides because you don't lose so much speed compared to when you jump into the air. Another example is hitting the "invisible walls" of the second high jump by going directly to the sides after jumping and quickly doing your trick, so that you don't need to wait longer for the boost once you land. This one is only useful if you play the Mario Kart Wii version. Another example is when you go through the bumpy stretch below the last jump, take to the sides so you can keep the speed instead of jumping pointlessly over the bumps that cover mostly the center of the road actually. And last, in Mario Kart Wii, never take the blue pads of the curves. However, the most remarkable (and kinda obscure) shortcut is the one found in the hazard area with the Podoboos and Piranha Plants. Right before going to the left, turn instantly behind the last Piranha Plant wall to go to the corner of the slope where the giant pipe is placed. There, gain some boost (such as a mini-turbo) very quickly and swerve slightly to the left just before hitting the protection bar located on the top of the slope. If you do it correctly you can see how your vehicle jumps very high and falls directly (or very near) onto the last jump ramp. As there is a "bottomless pit" below that jump, you'll fall defenselessly into the gap and Lakitu will rescue you to put you before the ramp of the jump, and thereby quite near the finish. Although this sounds simple, it needs a lot of training to use it in competitive play. Failing in the process will waste your time and the jump makes you quite slow (similar to being hit by a Blue Shell or Bob-omb but much worse). Additionally, not all of the vehicles can do this, and it's really necessary to go at high speeds to cover a great distance when jumping in order to reach that gap. The best way to use this shortcut is if you use a speedy kart, preferably the Barrel Train or the Toad Kart and perform it in 100cc or 150cc class. Another way to achieve the shortcut is going directly to the slope on the farthest side of the curve. Swerve a bit to the section of the slope that has a wall of blocks on the top and make a very slight turn to the left to direct the jump towards the gap. This is more difficult to do well but the good side is that almost any kart can do this and the only requirement is to use a boost to jump higher after the bump, like the Mushroom or the Star (rarely a Mini-turbo can be enough too). This shortcut only works in Mario Kart: Double Dash!!. Due to changes of the physics and the resize of the track, this shortcut is not possible to do in Mario Kart Wii.
Now, to understand the last bit of info about the shortcut I told you better, here is a demo of it:
And that's all, Shy Guys. Hope you've enjoyed this tip as much as I did and remember: Expect more tips here the next month in the Mario Kart: Wheel Tips Corner.
| Issue LXXIII | |
|---|---|
| Previous Section | |


