Bloomps of the Desert Skies is a course in Sunbaked Desert in Super Mario Bros. Wonder. As its name suggests, it features many Bloomps. It is unlocked after clearing Sunbaked Desert House, and its own completion unlocks Break Time! Floating Wonder Tokens. This course houses two Wonder Seeds, and has a difficulty of three stars.
Layout
The course starts off with the player standing on a Semisolid Platform, with some semisolid platforms, Goombrats and green Bloomps to the right. A Bloomp pump pointing to the left that pumps out purple Bloomps follows, leading to a ? Block with a Brick Block and a downhill slope with more Goombrats and another Bloomp pump facing upwards that helps the player reach the top of a hill. Above the Bloomp pump is some coins and two flower coins. Next is two semisolid platforms with a red Koopa Troopa and a Goombrat walking on them, before two Bloomps pumps. After a yellow pipe and a semisolid platform is a Bloomp pump pointing to the right, before two semisolid platforms, a Goombrat, and some green Bloomps. There is a Happy Flower on one of the platforms that releases a Lifting Shabon that releases coins, flower coins and a Talking Flower. Then there is one last gentle slope before the Checkpoint Flag.
The course continues with purple Bloomps that go down as well as some gaps. After the first gap is a ? Block in between Brick Blocks and a Goombrat below it. Then there are three semisolid platforms with Goombrats on them, followed by a section with a Big Goombrat and a green Bloomp that has the course's Wonder Flower inside. Next are more semisolid platforms and yellow pipes that send out Goombrats. This leads to a green Bloomp with a Super Mushroom inside, and a set of green Bloomps and yellow pipes that each send out a Goombrat. Three green Bloomps follow, taking the player to the Goal Pole.
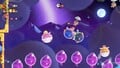
After collecting the Wonder Flower, the course's background darkens and turns the player(s) into their Balloon form. A row of purple Bloomps pointing upwards appear from below, guiding the player to go up whilst encountering Goombrats with dandelion pappi attached to them and some Super Stars. As the player goes up they encounter three Bloomp pumps on the sides, a spinning circle of coins and small flower coins, a section with some green Bloomps and more Goombrats including a big one, a split path with gray Bloomps to the left, two spinning wheels with gray Bloomps attached to them, a section with green and cyan Bloomps, and the effect's Wonder Seed surrounded by small flower coins. Collecting it ends the effect, sending the player back to where the Wonder Flower was. The effect lasts for 130 seconds.
10-flower coins
- 10-flower coin 1: Found to the right of the second Bloomp pump.
- 10-flower coin 2: Found up high in between some clouds. It can be reached by jumping on the purple Bloomps which are pumped out from the two Bloomp pumps.
- 10-flower coin 3: In between two semisolid platforms after the Checkpoint Flag, requiring a timed jump from one of the purple Bloomps.
Primary power-up
Enemies
Talking Flower quotes
- "Flyyyy!" (found on top of the hill)
- "Just hangin' out. No reason." (found below a semisolid platform after the hill)
- "A full moon..." (found near the second 10-flower coin)
- "Could be quite a night!"
- "Ta-daaaa!" (found after popping the Lifting Shabon)
- "Hello there!" (second time onwards)
- "Ta-daaaa! The sequel!" (after being pushed off by a Bloomp)
- "Homestretch!" (found near the set of yellow pipes near the goal pole)
Gallery
The course's Wonder Effect
Super Mario Bros. Wonder levels
|
Pipe-Rock Plateau |
Main courses
|
Welcome to the Flower Kingdom! • Piranha Plants on Parade • Scram, Skedaddlers! • Bulrush Coming Through! • Here Come the Hoppos • Rolla Koopa Derby • Swamp Pipe Crawl • Angry Spikes and Sinkin' Pipes • Bulrush Express • Sproings in the Twilight Forest • Cosmic Hoppos • Pipe-Rock Plateau Palace
|
Badge Challenges
|
Parachute Cap I • Wall-Climb Jump I • Jet Run I
|
Break Time!
|
Hurry, Hurry • Wonder Token Tunes • Pop Up, Hoppo!
|
KO Arena
|
Pipe-Rock Rumble
|
Wiggler Race
|
Mountaineering!
|
Poplin levels
|
Badge House in Pipe-Rock Plateau
|
Fluff-Puff Peaks |
Main courses
|
Outmaway Valley • Pokipede Pass • Condarts Away! • Pole Block Passage • Up 'n' Down with Puffy Lifts • Jump! Jump! Jump! • Countdown to Drop Down • Cruising with Linking Lifts • Fluff-Puff Peaks Flying Battleship • Fluff-Puff Peaks Palace
|
Badge Challenges
|
Wall-Climb Jump II • Floating High Jump I • Spring Feet I
|
Break Time!
|
Kick It, Outmaway • Cloud Cover • Zip-Go-Round
|
KO Arena
|
Fluff-Puff Kerfuff
|
Search Party
|
Puzzling Park
|
Poplin levels
|
Fluff-Puff Peaks Cabin
|
Shining Falls |
Main courses
|
The Hoppycat Trial: Hop, Hop, and Awaaay • The Anglefish Trial: Ready, Aim, Fly! • The Midway Trial: Hop to It • The Sharp Trial: Launch to Victory • The Sugarstar Trial: Across the Night Sky • The Final Trial: Zip Track Dash
|
POOF! Badge Challenges
|
Crouching High Jump I
|
Break Time!
|
Unreachable Treasure? • Watery Wonder Tokens • Timer-Switch Climb • Timer-Switch Dash
|
Search Party
|
An Empty Park?
|
Poplin levels
|
Master Poplin's House • Royal Seed Mansion
|
Sunbaked Desert |
Main courses
|
Armads on the Roll • The Desert Mystery • Rolling-Ball Hall • Ninji Jump Party • Bloomps of the Desert Skies • Valley Fulla Snootles • Color-Switch Dungeon • Secrets of Shova Mansion • Flight of the Bloomps • Sunbaked Desert Palace
|
Badge Challenges
|
Parachute Cap II • Crouching High Jump II • Invisibility I
|
Break Time!
|
Treasure Vault • Raise the Stage • Revver Run • Floating Wonder Tokens • Bouncy Tunes • Lights Out
|
KO Arena
|
Sunbaked Skirmish
|
Search Party
|
Pipe Park
|
Poplin levels
|
Sunbaked Desert House
|
Fungi Mines |
Main courses
|
Upshroom Downshroom • Taily's Toxic Pond • Light-Switch Mansion • Beware of the Rifts • An Uncharted Area: Wubba Ruins • Another Uncharted Area: Swaying Ruins • A Final Uncharted Area: Poison Ruins
|
Badge Challenges
|
Grappling Vine I
|
Break Time!
|
Tumble House • Trottin' Piranha Plants
|
KO Arena
|
Fungi Funk
|
Poplin levels
|
Loyal Poplin's House • Operation Poplin Rescue
|
Deep Magma Bog |
Main courses
|
Where the Rrrumbas Rule • Raarghs in the Ruins • Pull, Turn, Burn • Hot-Hot Hot! • Wavy Ride through the Magma Tube • Dragon Boneyard • Deep Magma Bog Flying Battleship • Deep Magma Bog Palace
|
Badge Challenges
|
Floating High Jump II • Boosting Spin Jump II • Grappling Vine II • Jet Run II • Invisibility II • Spring Feet II
|
Break Time!
|
Hot-Hot Rocks
|
KO Arena
|
Magma Flare-Up
|
Search Party
|
Item Park
|
Poplin levels
|
Deep Magma Bog Observatory (#1, #2, #3, #4)
|
Petal Isles |
Main courses
|
Leaping Smackerel • Robbird Cove • Blewbird Roost • Downpour Uproar • Jewel-Block Cave • Gnawsher Lair • Maw-Maw Mouthful • Muncher Fields • Petal Isles Flying Battleship • Missile Meg Mayhem • High-Voltage Gauntlet • Evade the Seeker Bullet Bills! • KnuckleFest Bowser's Blazing Beats • The Final Battle! Bowser's Rage Stage
|
Badge Challenges
|
Dolphin Kick I • Dolphin Kick II • Boosting Spin Jump I
|
KO Arena
|
Petal Meddle
|
Wiggler Race
|
Swimming! • Spelunking!
|
Poplin levels
|
Angler Poplin's House
|
Special World |
Main courses
|
Pipe-Rock Plateau Special Bounce, Bounce, Bounce • Fluff-Puff Peaks Special Climb to the Beat • Shining Falls Special Triple Threat Deluge • Sunbaked Desert Special Pole Block Allure • Fungi Mines Special Dangerous Donut Ride • Deep Magma Bog Special Solar Roller • Petal Isles Special Way of the Goomba • The Semifinal Test Piranha Plant Reprise • The Final Test Wonder Gauntlet • The Final-Final Test Badge Marathon
|
Poplin levels
|
WONDER?
|
Bonus
|
Bonus: Coins Galore!
|