Golden Pyramid: Difference between revisions
Trig Jegman (talk | contribs) mNo edit summary |
Trig Jegman (talk | contribs) m (→Gallery) |
||
| Line 58: | Line 58: | ||
Golden Pyramid Passage.png|The Golden Pyramid Passage | Golden Pyramid Passage.png|The Golden Pyramid Passage | ||
WL4 gp.PNG|[[Golden Passage]] | WL4 gp.PNG|[[Golden Passage]] | ||
WL4- | WL4-Black Cat Battle.png|[[Golden Diva]] | ||
</gallery> | </gallery> | ||
Revision as of 17:59, June 13, 2019
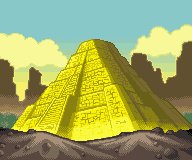
Golden Pyramid can refer to two things, both from Wario Land 4.
The Outer Pyramid is the pyramid raided by Wario. He raids it because he reads in a Template:Media link that this Pyramid has a large amount of treasure hidden inside. He then gets stuck inside the Pyramid after falling down a Template:Media link.
The Inner Pyramid is in the middle of the Template:Media link in the game. It is protected by five passages: the Entry Passage, Emerald Passage, Ruby Passage, Topaz Passage and Sapphire Passage. Upon completing all five, Wario can enter the Golden Pyramid itself. It contains one level, the Golden Passage, with the final boss, the Golden Diva following that.
Levels
The following table displays the two levels found in the Inner Golden Pyramid, with their name, icon and description.
| Image | Name | Description |
|---|---|---|
| File:WL4-Icon23.png | Golden Passage | The very last level is very different in terms of gameplay. For starters, the switch appears at the beginning of the level directly above the vortex, regardless of the game mode. This forces Wario to complete the whole level within a time limit. The whole underground area of this level consists of a river with a strong current that pulls Wario back towards the beginning of the level. In some of the overworld areas, there are places that Wario can fall down, thus causing him to travel back to a certain location due to the water's current. The enemies that appear here all first seen in the Sapphire Passage. If the player is to use an Action Replay or some other similar hacking device, they can avoid hitting the switch and a hidden theme will play as the level's true theme, instead of the normal switch music. |
| File:WL4-Icon24.png | Golden Diva (boss) | The game's final boss. She wears all four pieces of the Legendary Treasure collected from previous bosses. At the beginning of the battle, the Black Cat is brave enough to confront the Diva, but she swallows her whole and Wario is left to battle by himself. The Golden Diva has several different attacks, much more than previous bosses. She begins by hiding her face behind her fan, and Wario will have to throw ghostly heads at her. Then she will cast several different enemies, one at a time, to attempt to harm Wario. They are the Green Enemy (which Wario can throw), the Big Ball (he must ram), the Black Duck (also throw), and the Tonkachi, which he must throw up in the air so it lands back on top of him, transforming him into Bouncy Wario. He must then throw himself upward to strike the Diva, and thus damaging her. A few sequences of these enemies will bring the Golden Diva to a low point in her HP. She then unleashes her final phase, where her head grows to a fearsome size and she starts destroying the ground. Wario must ram the side of her head to know of her last few points of HP. On the last point, she will simply be greatly weakened and none but her lips will remain. A simple attack to these lips will free the swallowed Black Cat. The ending cut-scene follows. |
Media
Gallery
- WL4 gp.PNG
Names in other languages
| Language | Name | Meaning | Notes |
|---|---|---|---|
| Italian | Piramide d'Oro[?] | Gold Pyramid | |
| Spanish | Pirámide dorada[?] | Golden pyramid |
Trivia
- The Pyramid made a small minor appearance in WarioWare: Twisted!, as a picture in the opening cut scene, along with the Music Box from Wario Land 3.


