The Hidden Gorge: Difference between revisions
From the Super Mario Wiki, the Mario encyclopedia
Jump to navigationJump to search
(Created page with "{{Levelbox |image=270px |code=2-S |world=Sherbet Desert |game=''Mario + Rabbids Kingdom Battle'' |objective='''Map 1:''' Defea...") |
m (→Layout) |
||
| Line 14: | Line 14: | ||
The first part of the level is a small area consisting of three [[Buckler]]s up front and a [[Supporter]] in the back. | The first part of the level is a small area consisting of three [[Buckler]]s up front and a [[Supporter]] in the back. | ||
The next part of the level features a rematch against [[Blizzy]] and [[ | The next part of the level features a rematch against [[Blizzy]] and [[Sandy]], who are on elevated platforms behind full cover, as well as three more Bucklers and one more Supporter behind the Buckler. | ||
==Enemies== | ==Enemies== | ||
Revision as of 16:09, October 15, 2017
Template:Levelbox The Hidden Gorge is the secret tenth level of Sherbet Desert in Mario + Rabbids Kingdom Battle. It can only be accessed by completing It Came From the Freezer, then returning to Plateau Point to use Beep-0's Lift ability to carry two statues to different pedestals, then using the Push ability to push a block onto the red switch.
Layout
The first part of the level is a small area consisting of three Bucklers up front and a Supporter in the back.
The next part of the level features a rematch against Blizzy and Sandy, who are on elevated platforms behind full cover, as well as three more Bucklers and one more Supporter behind the Buckler.
Enemies
- Bucklers
- Supporters
- Blizzy (boss)
- Sandy (boss)
Battle maps
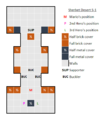
Map 1
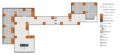
Map 2

