Snake Block Tower: Difference between revisions
m (Text replacement - "(\| *)Jap([RMCN\d]* *=)" to "$1Jpn$2") |
|||
| (10 intermediate revisions by 6 users not shown) | |||
| Line 5: | Line 5: | ||
|code={{world|5|tower}} | |code={{world|5|tower}} | ||
|world=[[Soda Jungle]] | |world=[[Soda Jungle]] | ||
|game=''[[New Super Mario Bros. U]]'' | |game=''[[New Super Mario Bros. U]]'' (''[[New Super Mario Bros. U Deluxe|Deluxe]]'') | ||
|powerup=[[Super Acorn]] | |||
|limit=500 seconds | |limit=500 seconds | ||
|boss=[[Boom Boom]] | |boss=[[Boom Boom]] | ||
| Line 16: | Line 17: | ||
==Layout== | ==Layout== | ||
The level begins in a small, one-screen room where some [[Mega Block|Big Block]]s and one [[Mega ? Block]] are found. A Warp Pipe takes the player to the second area of the tower. | [[File:Snake Block Tower Hidden Pipe.jpg|thumb|left|Mario on the hidden Warp Pipe]] | ||
[[File:Snake Block Tower Boss.jpg|thumb|right|Mario battling giant Boom Boom]] | |||
The level begins in a small, one-screen room where some [[Mega Block|Big Block]]s and one [[Mega ? Block]] are found. A [[Warp Pipe]] takes the player to the second area of the tower. | |||
The second area features a giant [[Snake Block]], which goes upwards, coming across [[Amp]]s and their [[Big Amp|larger sub-species]], [[Spinner]]s, a [[Red Ring]], a small Snake Block as well as two [[Star Coin]]s. When the Snake Block clashes with a wall, stone blocks on the ceiling break, thus revealing the [[Checkpoint Flag]]. The Warp Pipe is located on the right wall. | The second area features a giant [[Snake Block]], which goes upwards, coming across [[Amp]]s and their [[Big Amp|larger sub-species]], [[Spinner]]s, a [[Red Ring]], a small Snake Block as well as two [[Star Coin]]s. When the Snake Block clashes with a wall, stone blocks on the ceiling break, thus revealing the [[Checkpoint Flag]]. The Warp Pipe is located on the right wall. | ||
There is a Warp Pipe below the giant Snake Block on the left wall. Mario needs to go through the same area the Snake Block traveled. Entering it leads to a hidden room with three coins and a second Warp Pipe. | There is a secret Warp Pipe below the giant Snake Block on the left wall ''(pictured)''. Mario needs to go through the same area the Snake Block traveled. Entering it leads to a hidden room with three coins and a second Warp Pipe. | ||
Both Warp Pipes take [[Mario]] to | Both Warp Pipes take [[Mario]] to the third room, where he encounters bigger Spinner rows and more Big Amps. A [[P Switch]] can be found on the left wall that creates Blue Coins. The third Star Coin is found as the giant Snake Block rises. A [[Hidden Block]] containing a [[1-Up Mushroom]] is located on the right wall. To the far left is the door to the boss room. An Invisible Block hides an item on the wall next to the door. | ||
==Star | The boss of this tower is [[Boom Boom]]. Before the fight begins, [[Kamek]] swoops in and enlarges Boom Boom. Boom Boom is able to do the attacks given to him in the previous towers, which includes jumping and performing a spin attack. | ||
==[[Star Coin]]s== | |||
{|class="wikitable" style="text-align: center" | |||
|- | |||
!Image | |||
!Location | |||
|- | |||
|[[File:NSMBU 5-T Coin 1.jpg|200px]] | |||
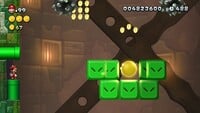
|In the second area, the first Star Coin is found just to the right of two Amps. | |||
|- | |||
|[[File:NSMBU Snake Block Tower Screenshot.jpg|200px]] | |||
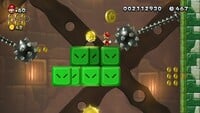
|In order to collect the second Star Coin, the player must ride the first small Snake Block in the level, found right after the first Star Coin. | |||
|- | |||
|[[File:NSMBU 5-T Coin 3.jpg|200px]] | |||
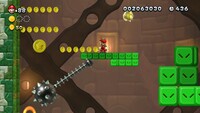
|In the third room, the player must follow another small Snake Block, which goes right to the final Star Coin. | |||
|} | |||
{{br|left}} | |||
==Enemies== | ==Enemies== | ||
{{number of enemies | |||
|image1=[[File:Amp NSMBU model.png|50px]] | |||
|name1=[[Amp]] | |||
|count1=6 | |||
|image2=[[File:NSMBU Big Amp Close-up Screenshot.png|50px]] | |||
|name2=[[Big Amp]] | |||
|count2=7 | |||
|image3=[[File:NSMBU Screenshot Spinner.jpg|50px]] | |||
|name3=[[Spinner]] | |||
|count3=10<br>(3 small, 7 large) | |||
|image4=[[File:Boom Boom NSMBU Model.png|50px]] | |||
|name4=[[Boom Boom]] | |||
|count4=(boss) | |||
}} | |||
==Names in other languages== | ==Names in other languages== | ||
{{foreign names | {{foreign names | ||
| | |Jpn=大きなスネークブロックのとりで | ||
| | |JpnR=Ōkina Sunēku Burokku no Toride | ||
| | |JpnM=Fortress of Large Snake Block | ||
| | |Fre=Tour des blocs serpent | ||
| | |FreM=Tower of snake blocks | ||
|Spa=Torre Serpenteante | |Spa=Torre Serpenteante | ||
|SpaM=Winding Tower | |SpaM=Winding Tower | ||
| Line 56: | Line 83: | ||
|RusM=Snake block tower | |RusM=Snake block tower | ||
|Kor=커다란 스네이크블록 요새 | |Kor=커다란 스네이크블록 요새 | ||
|KorR=Keodaran | |KorR=Keodaran Seuneikeu Beullok Yosae | ||
|KorM=Big Snake Block Fortress | |KorM=Big Snake Block Fortress | ||
|Chi=大蛇砖块的堡垒 (Simplified)<br>大蛇磚塊的堡壘 (Traditional) | |Chi=大蛇砖块的堡垒 (Simplified)<br>大蛇磚塊的堡壘 (Traditional) | ||
Latest revision as of 17:19, January 7, 2025
- This article is about Snake Block Tower, a level in New Super Mario Bros. U. For other uses, see Soda Jungle-Tower.
| Level | |
|---|---|
| Snake Block Tower | |

| |
| Level code | World 5- |
| World | Soda Jungle |
| Game | New Super Mario Bros. U (Deluxe) |
| Primary power-up | Super Acorn |
| Time limit | 500 seconds |
| Boss | Boom Boom |
| << << Directory of levels >> | |
Snake Block Tower, or Soda Jungle-![]() Tower, is the Tower of Soda Jungle in New Super Mario Bros. U. This level is unlocked via completion of Bridge over Poisoned Waters or Bramball Woods. Beating Boom Boom in this course unlocks a passage to Which-Way Labyrinth.
Tower, is the Tower of Soda Jungle in New Super Mario Bros. U. This level is unlocked via completion of Bridge over Poisoned Waters or Bramball Woods. Beating Boom Boom in this course unlocks a passage to Which-Way Labyrinth.
Layout[edit]
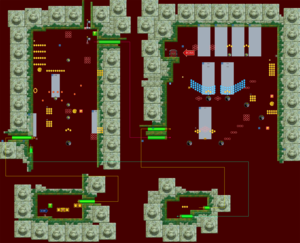
The level begins in a small, one-screen room where some Big Blocks and one Mega ? Block are found. A Warp Pipe takes the player to the second area of the tower.
The second area features a giant Snake Block, which goes upwards, coming across Amps and their larger sub-species, Spinners, a Red Ring, a small Snake Block as well as two Star Coins. When the Snake Block clashes with a wall, stone blocks on the ceiling break, thus revealing the Checkpoint Flag. The Warp Pipe is located on the right wall.
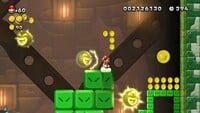
There is a secret Warp Pipe below the giant Snake Block on the left wall (pictured). Mario needs to go through the same area the Snake Block traveled. Entering it leads to a hidden room with three coins and a second Warp Pipe.
Both Warp Pipes take Mario to the third room, where he encounters bigger Spinner rows and more Big Amps. A P Switch can be found on the left wall that creates Blue Coins. The third Star Coin is found as the giant Snake Block rises. A Hidden Block containing a 1-Up Mushroom is located on the right wall. To the far left is the door to the boss room. An Invisible Block hides an item on the wall next to the door.
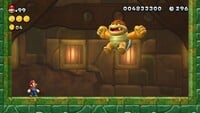
The boss of this tower is Boom Boom. Before the fight begins, Kamek swoops in and enlarges Boom Boom. Boom Boom is able to do the attacks given to him in the previous towers, which includes jumping and performing a spin attack.
Star Coins[edit]
Enemies[edit]
| Image | Name | Count |
|---|---|---|

|
Amp | 6 |

|
Big Amp | 7 |

|
Spinner | 10 (3 small, 7 large) |
| Boom Boom | (boss) |
Names in other languages[edit]
| Language | Name | Meaning | Notes |
|---|---|---|---|
| Japanese | 大きなスネークブロックのとりで[?] Ōkina Sunēku Burokku no Toride |
Fortress of Large Snake Block | |
| Chinese | 大蛇砖块的堡垒 (Simplified) 大蛇磚塊的堡壘 (Traditional)[?] Dà Shé Zhuānkuài de Bǎolěi |
Fortress of Big Snake Block | |
| Dutch | Slangenbloktoren[?] | Snake block tower | |
| French | Tour des blocs serpent[?] | Tower of snake blocks | |
| German | Schlangenblockturm[?] | Snake Block Tower | |
| Italian | Torre dei blocchi serpentini[?] | Snake Block tower | |
| Korean | 커다란 스네이크블록 요새[?] Keodaran Seuneikeu Beullok Yosae |
Big Snake Block Fortress | |
| Portuguese | Torre dos Blocos Serpente[?] | Tower of the Snake Blocks | |
| Russian | Башня блоков-змеек[?] Bashnya blokov-zmeyek |
Snake block tower | |
| Spanish | Torre Serpenteante[?] | Winding Tower |
