World 6-Fortress 3: Difference between revisions
mNo edit summary |
PlugMeister (talk | contribs) No edit summary |
||
| (12 intermediate revisions by 9 users not shown) | |||
| Line 1: | Line 1: | ||
{{ | {{image|more=yes|Needs in-game screenshot from the original NES version}} | ||
{{level infobox | |||
|image=[[File:SMAS SMB3 World 6-F3 Screenshot.png]] | |image=[[File:SMAS SMB3 World 6-F3 Screenshot.png]] | ||
|code=World 6-Fortress 3 | |code=World 6-Fortress 3 | ||
| Line 5: | Line 6: | ||
|game=''[[Super Mario Bros. 3]]'' | |game=''[[Super Mario Bros. 3]]'' | ||
|limit=300 seconds | |limit=300 seconds | ||
| | |boss=[[Boom Boom]] | ||
|before_alt= | |||
|before=[[World 6-10|<<]] | |before=[[World 6-10|<<]] | ||
|after=[[World 6-Airship (Super Mario Bros. 3)|>>]] | |after=[[World 6-Airship (Super Mario Bros. 3)|>>]] | ||
|secret= | |secret= | ||
|track=Fortress BGM | |||
|sample=[[File:Fortress Theme Super Mario Bros 3.oga]] | |||
}} | }} | ||
'''{{world|6|fortress}}''' is the third [[fortress]] level and the thirteenth level overall of [[Ice Land]] in ''[[Super Mario Bros. 3]]''. | '''{{world|6|fortress}}''' is the third [[fortress]] level and the thirteenth level overall of [[Ice Land]] in ''[[Super Mario Bros. 3]]''. | ||
==Layout== | |||
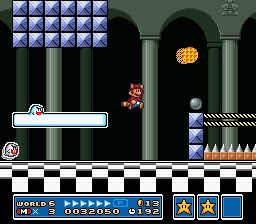
The fortress has many [[Conveyor Belt|conveyor belt]]s and [[Roto-Disc]]s, many of which are positioned over [[Spike Trap|spikes]]. There are also a couple of [[Boo]]s in the fortress as well. High above the gap between the second Roto-Disc and conveyor belt is a block containing a [[1-Up Mushroom]], which the player can reach if they start the level with a flying power-up and use the straightaway at the start to build the [[P-Meter|Power Meter]]. After the second conveyor belt is a [[? Block]] with a power-up placed between two [[Stretch]]es, with another power-up placed over the third Stretch ahead. The next conveyor belt has a [[Thwomp]] above it, and some [[Coin Block]]s on the platform above the player can reach by flying. After the conveyor belts is a Duo-Roto-Disc placed between two Stretches and over a pit of spikes. After the final jump, there is a door that will drop the player into a room with three Boos. The room's floor will rise, allowing the player to reach a door on the right. Through the door is [[Boom Boom]], in a room with five blocks he will jump between. | |||
== | ==Enemies== | ||
{|border=1 cellspacing=0 cellpadding=3 style="border-collapse:collapse"style="text-align: center" | |||
!Name | |||
!Count | |||
|- | |||
|[[File:Rotodisc.gif]]<br>[[Roto-Disc]] | |||
|8 | |||
|- | |||
|[[File:SMB3Boo.png]]<br>[[Boo]] | |||
|6 | |||
|- | |||
|[[File:StretchSMB3.gif]]<br>[[Stretch]] | |||
|6 | |||
|- | |||
|[[File:SMB3 Thwomp sprite.png]]<br>[[Thwomp]] | |||
|1 | |||
|- | |||
|align="center"style="background:#000000|[[File:Boomboom.gif]]<br>[[Boom Boom]] | |||
|1 (boss) | |||
|} | |||
==Level statistics== | |||
== Level statistics == | |||
*Power-ups: 2 ([[Super Mushroom]]s or [[Super Leaf|Super Leaves]]) | *Power-ups: 2 ([[Super Mushroom]]s or [[Super Leaf|Super Leaves]]) | ||
*[[1-Up Mushroom]]s: 1 | *[[1-Up Mushroom]]s: 1 | ||
*Secret areas: 0 | *Secret areas: 0 | ||
{{SMB3 | {{SMB3 levels}} | ||
[[Category:Super Mario Bros. 3 | [[Category:Fortresses]] | ||
[[Category:Haunted areas]] | |||
[[Category:Super Mario Bros. 3 levels]] | |||
Latest revision as of 08:36, November 1, 2024
It has been requested that more images be uploaded for this article. Remove this notice only after the additional images have been added. Specifics: Needs in-game screenshot from the original NES version
| Level | |||
|---|---|---|---|
| World 6-Fortress 3 | |||

| |||
| Level code | World 6-Fortress 3 | ||
| World | Ice Land | ||
| Game | Super Mario Bros. 3 | ||
| Time limit | 300 seconds | ||
| Boss | Boom Boom | ||
| Music track | Fortress BGM | ||
| |||
| << Directory of levels >> | |||
World 6-![]() Fortress is the third fortress level and the thirteenth level overall of Ice Land in Super Mario Bros. 3.
Fortress is the third fortress level and the thirteenth level overall of Ice Land in Super Mario Bros. 3.
Layout[edit]
The fortress has many conveyor belts and Roto-Discs, many of which are positioned over spikes. There are also a couple of Boos in the fortress as well. High above the gap between the second Roto-Disc and conveyor belt is a block containing a 1-Up Mushroom, which the player can reach if they start the level with a flying power-up and use the straightaway at the start to build the Power Meter. After the second conveyor belt is a ? Block with a power-up placed between two Stretches, with another power-up placed over the third Stretch ahead. The next conveyor belt has a Thwomp above it, and some Coin Blocks on the platform above the player can reach by flying. After the conveyor belts is a Duo-Roto-Disc placed between two Stretches and over a pit of spikes. After the final jump, there is a door that will drop the player into a room with three Boos. The room's floor will rise, allowing the player to reach a door on the right. Through the door is Boom Boom, in a room with five blocks he will jump between.
Enemies[edit]
| Name | Count |
|---|---|
 Roto-Disc |
8 |
Boo |
6 |
Stretch |
6 |
Thwomp |
1 |
Boom Boom |
1 (boss) |
Level statistics[edit]
- Power-ups: 2 (Super Mushrooms or Super Leaves)
- 1-Up Mushrooms: 1
- Secret areas: 0