Crushing-Cogs Tower: Difference between revisions
No edit summary |
m (Text replacement - "(\| *)Jap([RMCN\d]* *=)" to "$1Jpn$2") |
||
| (39 intermediate revisions by 26 users not shown) | |||
| Line 1: | Line 1: | ||
{{about|Crushing-Cogs Tower, a level in [[New Super Mario Bros. U]]|other uses|[[Acorn Plains-Tower]]}} | {{about|Crushing-Cogs Tower, a level in [[New Super Mario Bros. U]]|other uses|[[Acorn Plains-Tower]]}} | ||
{{ | {{level infobox | ||
|title=Crushing-Cogs Tower | |title=Crushing-Cogs Tower | ||
|image=[[File: | |image=[[File:NSMBU Crushing Cogs Tower Screenshot.png|250px]] | ||
|code= | |code={{world|1|tower}} | ||
|world=[[Acorn Plains]] | |world=[[Acorn Plains]] | ||
|game=''[[New Super Mario Bros. U]]'' | |game=''[[New Super Mario Bros. U]]'' (''[[New Super Mario Bros. U Deluxe|Deluxe]]'') | ||
|limit=500 seconds | |powerup=[[Ice Flower]] | ||
|boss=[[ | |limit=500 seconds<br>600 seconds (''Deluxe'') | ||
|boss=[[Boom Boom]] | |||
|before=[[Tilted Tunnel|<<]] | |before=[[Tilted Tunnel|<<]] | ||
|after=[[Yoshi Hill|>>]] | |after=[[Yoshi Hill|>>]] | ||
}} | }} | ||
'''Crushing-Cogs Tower''', or '''{{world|Acorn|tower}}''', is the tower level of [[Acorn Plains]] and the first overall tower in ''[[New Super Mario Bros. U]]''. It has large moving stone [[Cog (obstacle)|cogs]] and [[Dry Bones]]. This course is the first to have the [[Ice Flower]]. | '''Crushing-Cogs Tower''', or '''{{world|Acorn|tower}}''', is the tower level of [[Acorn Plains]] and the first overall tower in ''[[New Super Mario Bros. U]]''. It has large moving stone [[Cog (obstacle)|cogs]] and [[Dry Bones]]. This course is the first to have the [[Ice Flower]]. The level is unlocked via completion of [[Tilted Tunnel]] and its own completion unlocks [[Yoshi Hill]]. | ||
==Layout== | ==Layout== | ||
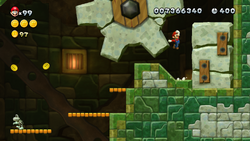
[[ | The level begins with stone [[cog (obstacle)|cogs]], allowing the player to reach the platform with a [[Dry Bones]] and two [[? Block]]s, one of which contains a power-up. Another cog allows the player to reach a platform, leading to another cog and a moving platform that acts as a lift. Following the cog, there are more platforms with Dry Bones. Another moving platform and a cog follow, along with a [[Red Ring]]. The [[Checkpoint Flag]] is then found. A group of four cogs must be climbed, and a group of Dry Bones on platforms is found at the top. One more cog is found, allowing the boss door to be reached. | ||
[[Boom Boom]] is the boss of the tower. Boom Boom attacks by charging at the player, and is defeated after being jumped on three times. | |||
{{br}} | {{br}} | ||
==[[Star Coin]]s== | ==[[Star Coin]]s== | ||
[[File: | {|class="wikitable" style="text-align: center" | ||
|- | |||
!Image | |||
!Location | |||
{{br}} | |- | ||
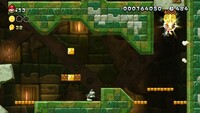
|[[File:NSMBU 1-T Coin 1.jpg|200px]] | |||
|Near the start of the course, the first Star Coin is periodically covered up by a moving stone platform. | |||
|- | |||
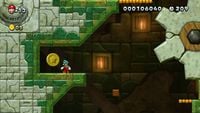
|[[File:NSMBU Crushing Cogs Tower Star Coin 2.jpg|200px]] | |||
|The second Star Coin is found on the left side of the course after many stone cogs. | |||
|- | |||
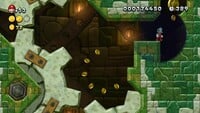
|[[File:NSMBU 1-T Coin 3.jpg|200px]] | |||
|Near the end of the course, the Star Coin can be found in the wall on the right side. The Star Coin is visible, and the wall underneath it can be entered. While the player can wall jump to the Star Coin, one can also use the [[Pipe Cannon]] to reach it. | |||
|} | |||
{{br|left}} | |||
==Enemies== | ==Enemies== | ||
{{number of enemies | |||
|image1=[[File:MP8 DryBones.png|50px]] | |||
|name1=[[Dry Bones]] | |||
|count1=17 | |||
|image2=[[File:Boom_Boom_NSMBU_Model.png|50px]] | |||
|name2=[[Boom Boom]] | |||
|count2=(boss) | |||
}} | |||
==Names in other languages== | ==Names in other languages== | ||
{{foreign names | {{foreign names | ||
| | |Jpn=ぐるぐる はぐるまのとりで | ||
| | |JpnR=Guruguru Haguruma no Toride | ||
| | |JpnM=Round'n'round Gear Fortress | ||
|Spa=Torre Engranaje | |Spa=Torre Engranaje | ||
|SpaM=Gear Tower | |SpaM=Gear Tower | ||
| | |Fre=Tour tic-tac | ||
| | |FreM=Tick-tock tower | ||
|Dut=Tandwieltoren | |Dut=Tandwieltoren | ||
|DutM=Cogs tower | |DutM=Cogs tower | ||
|Ger=Risiko im Ritzelturm | |Ger=Risiko im Ritzelturm | ||
|GerM=Risk in the Gear Tower | |GerM=Risk in the Gear Tower | ||
|Ita=Torre degli ingranaggi | |||
|ItaM=Gear tower | |||
|Por=Torre das Rodas Dentadas | |Por=Torre das Rodas Dentadas | ||
|PorM=Cogwheel Tower | |PorM=Cogwheel Tower | ||
| Line 50: | Line 67: | ||
|RusR=Bashnya s shesternyami | |RusR=Bashnya s shesternyami | ||
|RusM=Tower with cogs | |RusM=Tower with cogs | ||
|Kor=빙글빙글 톱니바퀴 요새 | |||
|KorR=Binggeulbinggeul Tomnibakwi Yosae | |||
|KorM=Spinning Cogwheel Fortress | |||
|Chi=旋转齿轮的堡垒 (Simplified)<br>旋轉齒輪的堡壘 (Traditional)<ref>[[User:Xzonn/Chinese#New 超级马力欧兄弟U 豪华版(国际版本/International Version)|Text strings extracted from the game files in Xzonn's user page]]</ref> | |||
|ChiR=Xuánzhuǎn Chǐlún de Bǎolěi | |||
|ChiM=Spinning Gear Fortress | |||
}} | }} | ||
{{ | |||
{{NSMBU | ==Level map== | ||
[[File:NSMBU Crushing-Cogs Tower Map.jpg|200px|thumb|left|]] | |||
{{br|left}} | |||
==References== | |||
<references/> | |||
{{NSMBU levels}} | |||
[[Category:Towers]] | [[Category:Towers]] | ||
[[Category:New Super Mario Bros. U levels]] | |||
[[de:Risiko im Ritzelturm]] | |||
[[it:Torre degli ingranaggi]] | |||
Latest revision as of 14:21, January 7, 2025
- This article is about Crushing-Cogs Tower, a level in New Super Mario Bros. U. For other uses, see Acorn Plains-Tower.
| Level | |
|---|---|
| Crushing-Cogs Tower | |

| |
| Level code | World 1- |
| World | Acorn Plains |
| Game | New Super Mario Bros. U (Deluxe) |
| Primary power-up | Ice Flower |
| Time limit | 500 seconds 600 seconds (Deluxe) |
| Boss | Boom Boom |
| << Directory of levels >> | |
Crushing-Cogs Tower, or Acorn Plains-![]() Tower, is the tower level of Acorn Plains and the first overall tower in New Super Mario Bros. U. It has large moving stone cogs and Dry Bones. This course is the first to have the Ice Flower. The level is unlocked via completion of Tilted Tunnel and its own completion unlocks Yoshi Hill.
Tower, is the tower level of Acorn Plains and the first overall tower in New Super Mario Bros. U. It has large moving stone cogs and Dry Bones. This course is the first to have the Ice Flower. The level is unlocked via completion of Tilted Tunnel and its own completion unlocks Yoshi Hill.
Layout[edit]
The level begins with stone cogs, allowing the player to reach the platform with a Dry Bones and two ? Blocks, one of which contains a power-up. Another cog allows the player to reach a platform, leading to another cog and a moving platform that acts as a lift. Following the cog, there are more platforms with Dry Bones. Another moving platform and a cog follow, along with a Red Ring. The Checkpoint Flag is then found. A group of four cogs must be climbed, and a group of Dry Bones on platforms is found at the top. One more cog is found, allowing the boss door to be reached.
Boom Boom is the boss of the tower. Boom Boom attacks by charging at the player, and is defeated after being jumped on three times.
Star Coins[edit]
| Image | Location |
|---|---|

|
Near the start of the course, the first Star Coin is periodically covered up by a moving stone platform. |

|
The second Star Coin is found on the left side of the course after many stone cogs. |

|
Near the end of the course, the Star Coin can be found in the wall on the right side. The Star Coin is visible, and the wall underneath it can be entered. While the player can wall jump to the Star Coin, one can also use the Pipe Cannon to reach it. |
Enemies[edit]
| Image | Name | Count |
|---|---|---|

|
Dry Bones | 17 |
| Boom Boom | (boss) |
Names in other languages[edit]
| Language | Name | Meaning | Notes |
|---|---|---|---|
| Japanese | ぐるぐる はぐるまのとりで[?] Guruguru Haguruma no Toride |
Round'n'round Gear Fortress | |
| Chinese | 旋转齿轮的堡垒 (Simplified) 旋轉齒輪的堡壘 (Traditional)[1] Xuánzhuǎn Chǐlún de Bǎolěi |
Spinning Gear Fortress | |
| Dutch | Tandwieltoren[?] | Cogs tower | |
| French | Tour tic-tac[?] | Tick-tock tower | |
| German | Risiko im Ritzelturm[?] | Risk in the Gear Tower | |
| Italian | Torre degli ingranaggi[?] | Gear tower | |
| Korean | 빙글빙글 톱니바퀴 요새[?] Binggeulbinggeul Tomnibakwi Yosae |
Spinning Cogwheel Fortress | |
| Portuguese | Torre das Rodas Dentadas[?] | Cogwheel Tower | |
| Russian | Башня с шестернями[?] Bashnya s shesternyami |
Tower with cogs | |
| Spanish | Torre Engranaje[?] | Gear Tower |
