World 1-Castle (New Super Mario Bros. Wii): Difference between revisions
Jacob Koopa (talk | contribs) No edit summary |
Nintendo101 (talk | contribs) m (→Enemies) |
||
| (77 intermediate revisions by 40 users not shown) | |||
| Line 1: | Line 1: | ||
{{ | {{italic title|id=yes}} | ||
{{ | {{level infobox | ||
|title= | |title={{world|1|castle}} | ||
|image=[[File:World 1- | |image=[[File:NSMBW World 1-C Screenshot.png|250px]] | ||
|code= | |code= | ||
|world=[[World 1 (New Super Mario Bros. Wii)|World 1]] | |world=[[World 1 (New Super Mario Bros. Wii)|World 1]] | ||
|game=''[[New Super Mario Bros. Wii]]'' | |game=''[[New Super Mario Bros. Wii]]'' | ||
|limit= | |limit=600 seconds (700 in multiplayer) | ||
| | |boss=[[Larry|Larry Koopa]] | ||
| | |before_alt= | ||
|before=[[World 1-6 (New Super Mario Bros. Wii)|<<]] | |before=[[World 1-5 (New Super Mario Bros. Wii)|<<]] [[World 1-6 (New Super Mario Bros. Wii)|<<]] | ||
|after=[[World 2-1 (New Super Mario Bros. Wii)|>>]] | |after=[[World 2-1 (New Super Mario Bros. Wii)|>>]] [[World 2-2 (New Super Mario Bros. Wii)|>>]] | ||
|secret= | |secret= | ||
}} | }} | ||
''' | '''{{world|1|castle}}''' is the first [[castle]] level in ''[[New Super Mario Bros. Wii]]'' and the final [[level]] of [[World 1 (New Super Mario Bros. Wii)|World 1]]. It is unlocked by completing either [[World 1-5 (New Super Mario Bros. Wii)|World 1-5]] or [[World 1-6 (New Super Mario Bros. Wii)|World 1-6]]. The level introduces [[Thwomp]]s and [[Big Thwomp]]s, which make their first and only appearances in the game here. [[Larry|Larry Koopa]] awaits the players at the end of the level; defeating him allows the players to advance to [[World 2 (New Super Mario Bros. Wii)|World 2]]. This is the first level to feature the castle theme. | ||
==Layout== | |||
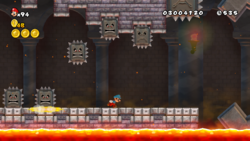
This castle is filled with [[lava]] and features many [[cog (obstacle)|cogs]]. The players must take shelter in the gears' gaps to avoid being crushed, as this causes them to lose a life. If the players ride one of the gears upward, they can find a small area with [[coin]]s, a [[Propeller Mushroom]], and two [[1-Up Mushroom]]s. After the [[Checkpoint Flag|midway point]], multiple Thwomps and Big Thwomps are encountered. Between the second and third Big Thwomps is a ledge with coins and an [[Hidden Block|Invisible Block]] with a 1-Up Mushroom in the center. A [[Red Ring]] is found before a row of Thwomps. Larry Koopa is fought again at the end of the level through the blue doors. In this fight, [[Kamek|Magikoopa]] animates five platforms, causing them to start moving up and down. The first, third, and fifth go the opposite way of the second and fourth. As in the tower battle, it takes three hits to defeat Larry. | |||
{{NSMBW | ==[[Star Coin]]s== | ||
[[ | {| class="wikitable" style="text-align: center" | ||
[[Category: | !Image | ||
!Location | |||
|- | |||
|[[File:NSMBW W1-C 1st Star Coin.jpg|150px]] | |||
|The first Star Coin is floating above the fourth gear. The player can either [[jump]] to it from that gear or use the third gear to access a hidden platform and fall to it. | |||
|- | |||
|[[File:NSMBW W1-C 2nd Star Coin.jpg|150px]] | |||
|The second Star Coin is located under the first Big Thwomp, blocked off by blocks. The player should trigger the Thwomp to fall to break the blocks, then collect the now-liberated Star Coin while the Thwomp is ascending. | |||
|- | |||
|[[File:NSMBW W1-C 3rd Star Coin.jpg|150px]] | |||
|At the final gear, instead of getting off and heading toward the boss door, The player should remain on the gear until they can access the green [[Warp Pipe]] directly below. This leads to a small area with a [[P Switch]], a row of coins over lava, and a row of [[Brick Block|brick]]s. The player must then activate the P Switch to make the rows switch places, then use the new rows to reach the third Star Coin high up to the right before the P Switch expires. | |||
|} | |||
==Enemies== | |||
{|class="wikitable sortable" style="text-align:center;border-collapse:separate" | |||
!class=unsortable|Image | |||
!Name | |||
!Count | |||
|- | |||
|[[File:DryBones_NSMBW.png]] | |||
|[[Dry Bones]] | |||
|6 | |||
|- | |||
|[[File:Thwomp NSMBW.png]] | |||
|[[Thwomp]] | |||
|9 | |||
|- | |||
|[[File:SuperThwomp NSMBW.png]] | |||
|[[Big Thwomp]] | |||
|5 | |||
|} | |||
==Level map== | |||
[[File:NSMBW World 1-C Map.png|500px|thumb|left|]] | |||
{{NSMBW levels}} | |||
[[Category:Castles]] | |||
[[Category:Volcanic areas]] | |||
[[Category:New Super Mario Bros. Wii levels]] | |||
Latest revision as of 17:59, March 1, 2025
| Level | |
|---|---|
| World 1- | |

| |
| World | World 1 |
| Game | New Super Mario Bros. Wii |
| Time limit | 600 seconds (700 in multiplayer) |
| Boss | Larry Koopa |
| << << Directory of levels >> >> | |
World 1-![]() Castle is the first castle level in New Super Mario Bros. Wii and the final level of World 1. It is unlocked by completing either World 1-5 or World 1-6. The level introduces Thwomps and Big Thwomps, which make their first and only appearances in the game here. Larry Koopa awaits the players at the end of the level; defeating him allows the players to advance to World 2. This is the first level to feature the castle theme.
Castle is the first castle level in New Super Mario Bros. Wii and the final level of World 1. It is unlocked by completing either World 1-5 or World 1-6. The level introduces Thwomps and Big Thwomps, which make their first and only appearances in the game here. Larry Koopa awaits the players at the end of the level; defeating him allows the players to advance to World 2. This is the first level to feature the castle theme.
Layout
This castle is filled with lava and features many cogs. The players must take shelter in the gears' gaps to avoid being crushed, as this causes them to lose a life. If the players ride one of the gears upward, they can find a small area with coins, a Propeller Mushroom, and two 1-Up Mushrooms. After the midway point, multiple Thwomps and Big Thwomps are encountered. Between the second and third Big Thwomps is a ledge with coins and an Invisible Block with a 1-Up Mushroom in the center. A Red Ring is found before a row of Thwomps. Larry Koopa is fought again at the end of the level through the blue doors. In this fight, Magikoopa animates five platforms, causing them to start moving up and down. The first, third, and fifth go the opposite way of the second and fourth. As in the tower battle, it takes three hits to defeat Larry.
Star Coins
| Image | Location |
|---|---|

|
The first Star Coin is floating above the fourth gear. The player can either jump to it from that gear or use the third gear to access a hidden platform and fall to it. |

|
The second Star Coin is located under the first Big Thwomp, blocked off by blocks. The player should trigger the Thwomp to fall to break the blocks, then collect the now-liberated Star Coin while the Thwomp is ascending. |

|
At the final gear, instead of getting off and heading toward the boss door, The player should remain on the gear until they can access the green Warp Pipe directly below. This leads to a small area with a P Switch, a row of coins over lava, and a row of bricks. The player must then activate the P Switch to make the rows switch places, then use the new rows to reach the third Star Coin high up to the right before the P Switch expires. |
Enemies
| Image | Name | Count |
|---|---|---|
| Dry Bones | 6 | |

|
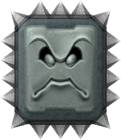
Thwomp | 9 |

|
Big Thwomp | 5 |
