Battle Master: Difference between revisions
(→Quotes) Tags: Mobile edit Advanced mobile edit |
(→Tattle: Added the tattle for when the Battle Master has been turned into a pig.) |
||
| (36 intermediate revisions by 19 users not shown) | |||
| Line 1: | Line 1: | ||
{{ | {{distinguish|The Master|Master Toad}} | ||
{{character infobox | {{character infobox | ||
|title=Battle Master | |title=Battle Master | ||
|image=[[File:PMTTYD NS Battle Master Artwork.png|100px]] | |image=[[File:PMTTYD NS Battle Master Artwork.png|100px]]<br>Artwork from ''Paper Mario: The Thousand-Year Door'' (Nintendo Switch) | ||
|species=[[Toad (species)|Toad]] | |species=[[Toad (species)|Toad]] | ||
|first_appearance=''[[Paper Mario: The Thousand-Year Door (Nintendo Switch)|Paper Mario: The Thousand-Year Door]]'' ([[Nintendo Switch]]) ([[List of games by date#2024|2024]]) | |first_appearance=''[[Paper Mario: The Thousand-Year Door (Nintendo Switch)|Paper Mario: The Thousand-Year Door]]'' ([[Nintendo Switch]]) ([[List of games by date#2024|2024]]) | ||
}} | }} | ||
The '''Battle Master''' is a [[Toad (species)|Toad]] who appears in the [[Paper Mario: The Thousand-Year Door (Nintendo Switch)|Nintendo Switch remake of ''Paper Mario: The Thousand-Year Door'' | {{Quote|Hey there, kid. You got a minute to learn what it means to fight? Like, to fight with your whole heart?|Battle Master|''[[Paper Mario: The Thousand-Year Door (Nintendo Switch)|Paper Mario: The Thousand-Year Door]]'' ([[Nintendo Switch]])}} | ||
The '''Battle Master''' or '''Battle Master Toad'''<ref>{{cite|url=https://www.nintendo.com/jp/software/feature/magazine_2024summer/index_en.html?page=5|page=9|title=Nintendo Magazine 2024 summer|format=Digital English edition|publisher=nintendo.co.jp|accessdate=July 12, 2024|archive=https://web.archive.org/web/20240712023245/https://www.nintendo.com/jp/software/feature/magazine_2024summer/index_en.html?page=5&device=pc}}</ref> is a [[Toad (species)|Toad]] who appears in the [[Paper Mario: The Thousand-Year Door (Nintendo Switch)|Nintendo Switch remake]] of ''[[Paper Mario: The Thousand-Year Door]]''. He wears a purple {{wp|tangzhuang}} coat and guapi mao cap. He introduces himself after [[Professor Frankly]] instructs Mario and [[Goombella]] to go to Petal Meadows, and can be found in various locations throughout the world afterwards. | |||
When Mario talks to the Battle Master, he is given two choices. One is to go into a practice battle against three [[Goomboard]]s, indestructible enemies that deal no damage, similar to the [[Action Command Dojo]] and [[Battle Lab]] from previous [[Paper Mario (series)|''Paper Mario'']] games. Mario can either take turns practicing his attacks with no FP or SP cost, or have the Battle Master jump at him holding a Goomboard to practice his guards. This battle also has a unique theme, titled "Master of Action Commands," which is composed with Chinese instruments. The other option is to read various tips for battles, including explanations for the stage and action commands. | When Mario talks to the Battle Master, he is given two choices. One is to go into a practice battle against three [[Goomboard]]s, indestructible enemies that deal no damage, similar to the [[Action Command Dojo]] and [[Battle Lab]] from previous [[Paper Mario (series)|''Paper Mario'']] games. Mario can either take turns practicing his attacks with no FP or SP cost, or have the Battle Master jump at him holding a Goomboard to practice his guards. During these battles, Mario is able to use any move for each badge in his possession, even if the corresponding badge is not equipped, and Attack FX badges along with [[W Emblem]] and [[L Emblem]] are disabled. This battle also has a unique theme, titled "Master of Action Commands," which is composed with Chinese instruments. The other option is to read various tips for battles, including explanations for the stage and action commands. For the duration of the time that Mario has lost his name, the Battle Master instead refers to Mario as "Nameless Frank". | ||
== | ==Locations== | ||
*"'' | The Battle Master can be found in the following locations: | ||
*[[Rogueport]], Rogueport East next to the pipe leading to [[Rogueport Underground]]. | |||
*[[Petalburg]], outside [[Toce T.]]'s house. | |||
*[[The Great Tree]], near the exit to [[Boggly Woods]]. | |||
*[[Glitzville]], near the juice shop. | |||
*[[Twilight Town]], by the pumpkin patch in the second area. | |||
*[[Keelhaul Key]], outside [[Keelhaul Galleria]]. | |||
*[[Riverside Station]], near the train platform. | |||
When [[Mario]] first arrives in [[Twilight Town]] at the start of Chapter 4, the Battle Master will have already been turned into a [[Pig|pig]] by [[Doopliss]]. Until Doopliss is defeated for the first time and the curse upon Twilight Town is lifted, the Battle Master cannot be interacted with, and he will not appear at any other location. | |||
==Secrets of battle== | |||
===Leveling Up and Star Points=== | |||
''Every time you earn 100 Star Points, you gain a level, Mario. And when your level goes up, you get all your HP, FP, and Star Power back! On top of that, you also get to raise the max number of your HP, your FP, or your Badge Points! Just pick one.'' | |||
===HP (Heart Points)=== | |||
''HP stands for "Heart Points." When it gets to 0, you've gotten yourself KO'd, Mario! On the other hand, you drop some enemy's HP down to 0 and they get to take a little nap. Oh yeah—when your partner's HP gets to 0, they're out for the count, but they'll be back up after the fight. But if YOU hit 0, it's game over, so keep your eyes open, Mario!'' | |||
===When Your HP Is Low=== | |||
''When you or your partner have low HP, and you're about to lose, you'll see two kinds of warning icons! If your HP falls to 5 or lower, you'll see "Danger!" pop up. If your HP gets down to 1, you'll see "Peril!" instead. And if Mario here lets his HP reach 0, it'll be game over...so take those icons seriously! Some badges are only effective when you're in "Danger!" or "Peril!" so use 'em wisely! Got it, Mario?'' | |||
===FP (Flower Points)=== | |||
''FP stands for "Flower Points." All the best moves use FP, so they're pretty important. If your FP hits 0, you won't get KO'd, but you'll be unable to use a lot of moves...so keep track of your FP!'' | |||
===BP (Badge Points)=== | |||
''BP is short for "Badge Points." You can only equip as many badges as you got points to pay for 'em. The more powerful the badge, the more points you gotta use, so watch out for that.'' | |||
===Equipping Badges=== | |||
''Some badges power up your partner, and some of them power YOU up, Mario. Capisce? You can equip as many badges as you got BP to pay for 'em on the Badge Menu. Oh, and there's a few badges that're extra effective if you equip two or more of 'em. You get your BP right back when you unequip a badge, so don't be shy about experimentin'!'' | |||
===Badge Types: Attack Moves=== | |||
''Let's talk about badges that give you new moves, Mario. There's Power Jump and Power Smash—they each let you do their attack at +2 damage. Multibounce lets you jump on all the enemies in a row. Quake Hammer hits all the enemies on the ground and ceiling, plus it ignores Defense! There's lots of badges out there with cool moves—go find 'em!'' | |||
===Badge Types: Stat Boosts=== | |||
''Let's talk about badges that boost your stats, Mario. Close Call raises your chance to dodge, but only when you're in "Danger!" HP Plus gives you five extra HP. Power Plus increases your Attack stat by +1. There's lots more, and some of them work on your partner instead o' you. Try some out!'' | |||
===Tornado Jump in Detail=== | |||
''You wanna hear about something cool you might wanna have on your adventure, Mario? Tornado Jump is a badge that'll conjure up a tornado when you pull off its Action Command. Flying enemies in particular hate this, 'cause it ignores their Defense completely. If you're havin' trouble with a lot of flying guys, maybe you wanna equip a Tornado Jump, eh?'' | |||
===Soft Stomp in Detail=== | |||
''Lemme tell you about a badge that I've found pretty handy. It's called Soft Stomp, and you can use it to lower an enemy's Defense. Even if you miss with the Action Command, it makes tough guys into soft guys. Sleepy Stomp and Shrink Stomp also do their tricks even when you miss the Action Command, by the way. Oh, and don't worry—your Attack and Defense can't go lower than 0. Isn't that a relief? Sort of?'' | |||
===Hammer Throw in Detail=== | |||
''Lemme tell you about a badge that I've found pretty handy. Hammer Throw lets you, you know, throw your hammer when you hit an Action Command. It bypasses Defense, and you can hit an enemy no matter where they are in the battle. If you're having trouble with a flier or whatever, give 'em the ol' Hammer Throw!'' | |||
===Ice Smash in Detail=== | |||
''Lemme tell you about a badge that I've found pretty handy. Ice Smash is a badge for freezing your enemies. It even works when you miss with the Action Command, which is pretty sweet of it. Head Rattle works the same way, but for Confusing your enemies.'' | |||
===POW Blocks in Detail=== | |||
''Lemme tell you about an item that I've found pretty handy. A POW Block is an item you can use to attack a whole group of enemies. They hit flying enemies and flip over the shelled or rock guys, which they do NOT like. When they're flipped, you see, their Defense drops to 0. Follow up when they're weak and finish 'em off!'' | |||
===Power Punch in Detail=== | |||
''Lemme tell you about an item that I've found pretty handy. Power Punch is like a tonic that boosts your Attack power. It works like a dream with moves like Power Bounce or Multibonk—stuff that hits a bunch of times.'' | |||
===Poison Mushrooms in Detail=== | |||
''Poison Mushrooms are dangerous items that poison you—surprise—and take half your HP if you eat one. But didja know that every now and then they completely restore your HP?! Weird, right? Anyway, you can get Zess T. to make 'em for you if you feel like takin' big risks.'' | |||
===Getting More Badges=== | |||
''There's badges all over, if you're lookin' for 'em. Some are in treasure chests or red blocks you find. There's also a badge shop in Rogueport worth checking out. It's a little tricky to find—you gotta leave the inn from the second floor. There's also a guy named Dazzle who hangs out underneath Rogueport and trades badges for Star Pieces!'' | |||
===Jumping Tips=== | |||
''When you jump, you can stomp on an enemy twice if you succeed on an Action Command. You gotta press {{button|switch|A}} at the moment you stomp on 'em if you wanna nail that Action Command.'' | |||
===Hammering Tips=== | |||
''When you use your hammer, you can hit with double Attack power if you succeed on an Action Command! Release {{button|switch|leftstickbutton}} right when ''{{color|red|✪}}'' lights up to nail that Action Command.'' | |||
===Hammer Range=== | |||
''Your hammer can only reach the enemies that are in front of you and on the ground, Mario. If you want to hit somebody in the back, you'll usually have to use Jump. But there are badges you can equip that'll let you reach enemies in the back, so that helps. Oh, and just so you know, sometimes flying enemies are low enough to the ground that you can hammer 'em.'' | |||
===Guarding Tips=== | |||
''If you succeed on a Guard Action Command, the enemy attack will do one less damage. That's great, but also, if the attack would put ya to sleep or immobilize you, the Guard prevents that too. Get good at pressing {{button|switch|A}} at just the right moment during attacks!'' | |||
===Superguard Tips=== | |||
''Not everybody knows about this, but if you pull off a Superguard, you won't take ANY damage from an attack! Not only that, but you might even sneak some damage back onto the enemy! Pretty sweet, eh? Press {{button|switch|B}} right when the attack hits to get some of that sweet Superguard action, kiddo.'' | |||
===NICE, GOOD, GREAT, Etc.=== | |||
''When you succeed on an Action Command, you'll pull a buncha Star Power up from the crowd! The amounts of Star Power'll increase in the order of NICE, GOOD, GREAT, WONDERFUL, and EXCELLENT! You can use the Simplifier badge to make those Action Commands easier, but you'll get less Star Power. You can also use the Unsimplifier badge to make 'em harder if you want a little extra Star Power.'' | |||
===Special Moves=== | |||
''So what are special moves? They're the primo moves you pick up as you go along in your adventure. Let's talk about the special move Sweet Treat as an example. This one restores HP and FP. It works by having you tilt {{button|switch|leftstickbutton}} over and over to hit the icons that fall from...somewhere high up. The more you can hit, the more HP and FP you'll get back. Simple. But if you hit a Poison Mushroom, you won't be able to move for a bit, so be careful, Mario. Also, Sweet Treat will heal any status changes you and your partners've suffered—poison or what have you. Oh, and you need Star Power to use these special moves, so it's best to save 'em for big moments.'' | |||
===Special Moves and Crystal Stars=== | |||
''You know you get more special moves as you collect Crystal Stars, right, Mario? Sure you do. Didja also know that your max Star Power goes up too? So as you collect Crystal Stars, you can use MORE special moves MORE often. Pretty swell, right?'' | |||
===Star Power=== | |||
''Special moves are powered by your Star Power, right, Mario? You get Star Power back by doing Action Commands successfully. But if you need Star Power in a hurry, you can also use Appeal to really get the crowd on your side.'' | |||
===Star Power and Stylish Moves=== | |||
''If you really wanna rack up some Star Power, get good at using Stylish moves, kiddo. You do that by pressing {{button|switch|A}} with real good timing when you or your partner attack an enemy. You'll be able to tell you pulled it off by little changes in how the move looks. You can use the Timing Tutor badge to show you the {{button|switch|A}} icon when it's the right time to show off. Oh, right—if you want to practice these, I can help you with my "Practice Action Commands" shtick.'' | |||
===Hitting "BINGO"=== | |||
''Didja know that when you hit an Action Command, a symbol appears at the top-right of the screen? So if you get a couple of matching symbols, and then hit a third Action Command, you might hit it big! Press {{button|switch|A}} a the right moment and stop the wheel so that you get three in a row and you'll win a cool effect... Mushrooms heal all your HP, Flowers restore your FP. Stars'll fill up your Star Power to max. Shine Sprites are the big prize—they restore your HP, FP, AND Star Power. Oh, and three in a row brings in a crowd for the audience, so you'll make extra Star Power for a while. Oh, but three Poison Mushrooms in a row will lose you a bunch of HP, FP, Star Power, and crowd size. Watch it.'' | |||
===Using Items=== | |||
''There are items you can use to fight enemies, and others that can heal you up. Use 'em during a battle with the Item command, obviously. Oh, and you don't have to be in a fight. Press {{button|switch|+}} to open the menu, and choose Gear, then Item.'' | |||
===Status Changes You Don't Want=== | |||
''The truth is, not all status changes are good for you, Mario. Frozen makes it so you can't move for a few turns. When the ice breaks, you'll take some damage too. Tiny lowers your Attack all the way to 0 for a while because your boots and hammer get real small. Soft lowers your Defense all the way down to 0 for a few turns because your...overalls get thinner. I guess. There's others too, so keep your eyes peeled and be ready. So how do you prevent these from happening to you? You can block 'em with a Guard or Superguard. Oh, and the Feeling Fine badge'll just make you immune to bad statuses. Stati? Whatever.'' | |||
===Switching Action Order=== | |||
''During battle, you can press {{button|switch|Y}} to swap places with your partner and change the order of your actions. When you're in front, you act first, but you're also more likely to get attacked by enemies. If someone's low on HP, one thing you can do is move 'em to the back. Remember that, Mario.'' | |||
===Running Gets You Nowhere=== | |||
''If you keep running away from fights, it gets harder and harder to do it successfully, Mario. But if you fail to run away or just win a battle, things'll go back to normal. There's probably a life lesson in there—sometimes you gotta face your fears or they'll force the issue. Also, it's easier to escape some enemies than others, and there's a few you just can't escape from at all. Running's another tool in your belt—just think about when and where to use it.'' | |||
===Merlee the Charmer=== | |||
''Do you know Merlee? She's a magical-type person who lives underneath Rogueport. If you have her cast a charm on you, good stuff'll tend to happen during your battles. If you see a building glowing blue in the distance down in those sewers, that's her! Pay her a quick visit. Her services ain't free, but they're pretty handy. Stop by sometime!'' | |||
===What Do Charms Do?=== | |||
''Lemme tell you more about the effects of Merlee's charms. Whenever a charm is about to go off, you'll see Merlee appear for a brief moment during the battle. If she appears just before you attack, your Attack will go up by 3. If she pops up right before an enemy attacks, then your Defense will be boosted by 3. And if she drops in right after you win a fight? Get this—she'll double any Star Points you earned! And one more! If she graces the stage after the battle's over, her charm'll earn you TRIPLE coins! Nice, eh? Charms will activate a certain number of times based on the path you chose. More coins gets you more magic!'' | |||
===Chet Rippo, Level Adjuster=== | |||
''You know Chet Rippo? Calls himself an adjuster, lives underground? He can adjust your stats or your partners' ranks. So he can lower one of your stats—HP, FP, or Badge Points—to raise a different one. He can also drop the rank on one of your partners to raise the rank on another one. So, if you're underneath Rogueport and see a building that glows red in the distance, maybe stop by! Oh, but Chet doesn't adjust for free, Mario. Be ready.'' | |||
===About Goombella=== | |||
''Goombella's a smart cookie, and knows all about your enemies, even their HP. When you run into an enemy type for the first time, it's a good idea to have her use Tattle on 'em. Her basic attack is called Headbonk. It works like your jump, including not working on spiky guys, so be careful.'' | |||
===About Koops=== | |||
''Koops can hit all the enemies on the ground with his Power Shell move. He also has that armored shell, so he rocks a Defense of 1, making him tougher than average. Just know that sometimes enemy attacks will flip him on his back, like any Koopa.'' | |||
===About Flurrie=== | |||
''Flurrie's Gale Force attack has a chance at blowing away all your enemies at once. Her Body Slam sometimes knocks over things on the stage, which can deal extra damage to your enemies! Just be careful not to ask her to Body Slam a spiky enemy—it never goes well.'' | |||
===About Yoshi=== | |||
''Yoshi's Gulp attack can hit up to two enemies while completely ignoring their Defense. Ground Pound hits a bunch of times! But its Attack is only 1, so it isn't very effective against a strong Defense. But...if you use Power Punch to raise his Attack, that's a different story!'' | |||
===About Vivian=== | |||
''Vivian's Shade Fist can hit enemies in the air or on the ceiling, as well as the ground. Veil lets her pull you both into the shadows and avoid enemy attacks altogether. That one's good when a bad guy is charging up for a big strike. But you should know that Vivian can't move right after she comes out of the shadows, so plan for that.'' | |||
===About Bobbery=== | |||
''Bobbery's blasts can sometimes cause things on the stage to topple over or fall down when he attacks enemies! Bomb Squad lets him throw three bombs that will explode at the end of the following turn. When one blows up, any bombs near it will blow up at that moment as well—even if two turns haven't passed!'' | |||
===About Ms. Mowz=== | |||
''Ms. Mowz can use Kiss Thief to steal items or badges that enemies are holding. If they're not holding anything, she just takes one coin. And her Love Slap is an attack that ignores enemy Defense.'' | |||
===Powering Up Partners=== | |||
''You've probably run into Merlon, the guy from the power-up shop in Rogueport? For three Shine Sprites, he'll raise the rank on one of your partners. It's a good deal—they get more HP and learn another attack skill. You can find him next to Professor Frankly's house in Rogueport.'' | |||
===Leveling Up: Bigger Stages=== | |||
''As your level goes up, the stages you fight on will get bigger and fancier. The maximum audience size will also go up, so you'll gain Star Power faster and faster. The downside, though, is that bigger stages mean more stuff can fall on you, so watch out for that.'' | |||
===Shaking Up the Stage=== | |||
''Certain attacks shake up the stage, which can cause accidents. Things might fall from the ceiling, or the whole backdrop might collapse on you. You can use Guard against these, so keep your peepers peeled and be ready.'' | |||
===Watch Out for Errant Nozzles=== | |||
''You've noticed the nozzles on the stage now that your level's higher and you're on a fancy stage? When attacks shake the stage, those nozzles'll sometimes fall over and hurt you! Don't worry though—stagehands will come and get those things fixed up in a jiffy.'' | |||
===Audience Participation=== | |||
''Sometimes, the audience gets a little too excited and throws something while you're choosing your actions. Some of 'em are trying to help, and they'll throw you items or hearts to heal your HP. But some are troublemakers tryin' to bean you with a tin can or something. If you're paying attention, you can prevent them throwing anything by pressing {{button|switch|X}}. This'll stop both the good and the bad stuff though, so try to notice what they're throwing first!'' | |||
===Types of Audience Members, Part 1=== | |||
''Lots o' different folks show up to watch the battles on stage. Let's run through some, Mario. Toads throw only good stuff. Luigi throws really good stuff, but doesn't show up often. Goombas and Dull Bones only throw trash, so watch out for those guys. Shy Guys throw good stuff, trash, or even just charge onto the stage and cause accidents sometimes.'' | |||
===Types of Audience Members, Part 2=== | |||
''There are other types of spectators too. Let's talk about more of them. Koopas throw good stuff or trash, and sometimes hole up in their shells. X-Nauts throw trash, but when your attacks miss, they'll throw a hail of stones! A whole hail! Piranha Plants sometimes just eat the spectators next to them. Punies throw good stuff, but will run away and leave the theater if they're surprised.'' | |||
===Types of Audience Members, Part 3=== | |||
''And there's still more kinds of spectators! Let's review a few more. You will be shocked when I tell you that Hammer Bros will throw hammers at you. Shocked. Dayzees will sing their creepy lullabyes and put nearby spectators to sleep. Boos will throw all sorts of things but also might run onto the stage and make someone invisible! Bulky Bob-Ombs are huge and will sometimes light their fuses and blow up out there!'' | |||
===Enemies with Spikes=== | |||
''When you or your partners use attacks that throw you right onto an enemy with spikes, it hurts you. You can use the Spike Shield badge to protect yourself as one option. But that won't help you against the enemies that counterattack with fire, lightning, ice, or poison. Be careful!'' | |||
===Enemies that Fly=== | |||
''Your hammer can't reach enemies up in the air. Disappointing, I know. In those situations, you gotta use Jump or rely on a partner with attacks that reach high enough. Oh, and there is a Hammer Throw badge that lets you use that sweet, sweet hammer against anyone.'' | |||
===Enemies on the Ceiling=== | |||
''Enemies on the ceiling are protected from both hammer and jump attacks. Which stinks. In those cases, you need to attack with partners that can reach up there. As an example, Flurrie's Body Slam should knock 'em right down. There's probably others as well. Oh, and there's also the Quake Hammer badge, which hits all enemies on the ground AND ceiling.'' | |||
===Defense and Damage=== | |||
''If you can crank up your or your partners' Defense stats, you'll block some damage before it gets to you. One way to do that is to choose Defend on the Tactics menu. That'll automatically increase it by 1. Another option is to equip a Defend Plus badge. That'll boost Defense by 1 as long as you're wearing it!'' | |||
===Enemies that Ignore Defense=== | |||
''Don't just rely on a high Defense, 'cause some enemies ignore it with magic or beams or whatnot. If you're up against piercing attacks like that, look into badges that lower incoming damage. For example, the Last Stand badge halves all incoming damage when your HP is 5 or less. There's also the P-Down, D-Up badge, which lowers your Attack by 1, but also lowers incoming damage by 1. Oh, and if you get good at Guard action commands, you drop damage by 1. And Super Guard makes it 0!'' | |||
===Piercing Enemy Defenses=== | |||
''If you use a piercing attack, you can ignore an enemy's Defense. The Piercing Blow and Hammer Throw badges both let you make piercing attacks. Some of your partners also have piercing attacks. Experiment, see what they can do! Oh, and there's items out there that do piercing damage too. Try a lot of different stuff.'' | |||
===Enemies with Items=== | |||
''Have you noticed that sometimes enemies will start the battle holding an item, Mario? Try to eliminate those guys quickly, before they get a chance to use their gear.'' | |||
===Enemies with Badges=== | |||
''Some enemies have actually figured out how badges work and start the battle with one equipped. They really are stronger with those things, so watch out.'' | |||
===Enemies that Drop Items=== | |||
''You know how enemies drop coins when you beat 'em? Sometimes they drop other stuff too! There might be hearts that restore your HP or flowers that fix your FP. They may even drop items or badges, especially when those enemies were holding that stuff in the battle.'' | |||
==Tattle== | ==Tattle== | ||
*"''That's the Battle Master. He's a master of battling. Let me know if I'm going too fast here. He'll teach you the secrets of battling and help you practice tricky Action Commands. So if you're having trouble mastering any aspects of battles, just ask the Battle Master! I mean, obviously.''" | *"''That's the Battle Master. He's a master of battling. Let me know if I'm going too fast here. He'll teach you the secrets of battling and help you practice tricky Action Commands. So if you're having trouble mastering any aspects of battles, just ask the Battle Master! I mean, obviously.''" | ||
;As a pig | |||
*"''This little fella seems oddly relaxed, don't you think? Something tells me this is not a normal pig...''" | |||
==Related media== | |||
{{media table | |||
|file1=PMTTYDNS Master of Action Commands.oga | |||
|title1=Master of Action Commands | |||
|description1=The music that plays during the Battle Master's practice battles. | |||
|length1=0:30 | |||
}} | |||
==Gallery== | |||
<gallery> | |||
PMTTYDNS Battle Master Stage.jpg|The practice battle stage | |||
PMTTYDNS credits image 6.png|The Battle Master in a credits image | |||
PMTTYDNS concept art characters 2.png|Concept art showing early designs of the Battle Master | |||
Nintendo Magazine Summer 2024 TTYD Relationship Chart.png|The Battle Master on the Nintendo Magazine for summer 2024, showing a relationship chart featuring many characters from ''Paper Mario: The Thousand-Year Door'' | |||
</gallery> | |||
==Names in other languages== | ==Names in other languages== | ||
{{foreign names | {{foreign names | ||
| | |Jpn=バトルたつじん | ||
| | |JpnR=Batoru tatsujin | ||
| | |JpnM=Battle Master | ||
|ChiS=战斗达人奇诺比奥 | |||
|ChiSR=Zhàndǒu Dárén Qínuòbǐ'ào | |||
|ChiSM=Battle Master Toad | |||
|ChiT=戰鬥達人奇諾比奧 | |ChiT=戰鬥達人奇諾比奧 | ||
|ChiTR=Zhàndǒu Dárén Qínuòbǐ'ào | |ChiTR=Zhàndǒu Dárén Qínuòbǐ'ào | ||
|ChiTM=Battle Master Toad | |ChiTM=Battle Master Toad | ||
| | |Dut=Knokcoach | ||
| | |DutM=Brawl Coach | ||
|FreA=Maître Martial | |FreA=Maître Martial | ||
|FreAM=Martial Master | |FreAM=Martial Master | ||
|FreE=Maître Castagne | |FreE=Maître Castagne | ||
|FreEM=Brawl Master | |FreEM=Brawl Master | ||
|Ger=Kampf-Coach | |Ger=Kampf-Coach | ||
|GerM=Battle Coach | |GerM=Battle Coach | ||
|Ita=Maestro di lotta | |Ita=Maestro di lotta | ||
|ItaM=Battle Master | |ItaM=Battle Master | ||
| | |Spa=Maestro del combate | ||
| | |SpaM=Combat master | ||
|Kor=배틀달인 | |||
|KorR=Baeteul-Darin | |||
|KorM=Battle Master | |||
}} | }} | ||
| Line 47: | Line 255: | ||
[[Category:Toads]] | [[Category:Toads]] | ||
[[Category:Allies]] | [[Category:Allies]] | ||
[[Category:Martial artists]] | |||
[[Category:Paper Mario: The Thousand-Year Door characters]] | [[Category:Paper Mario: The Thousand-Year Door characters]] | ||
[[it:Maestro di lotta]] | |||
Latest revision as of 02:47, February 23, 2025
- Not to be confused with The Master or Master Toad.
| Battle Master | |
|---|---|
 Artwork from Paper Mario: The Thousand-Year Door (Nintendo Switch) | |
| Species | Toad |
| First appearance | Paper Mario: The Thousand-Year Door (Nintendo Switch) (2024) |
- “Hey there, kid. You got a minute to learn what it means to fight? Like, to fight with your whole heart?”
- —Battle Master, Paper Mario: The Thousand-Year Door (Nintendo Switch)
The Battle Master or Battle Master Toad[1] is a Toad who appears in the Nintendo Switch remake of Paper Mario: The Thousand-Year Door. He wears a purple tangzhuang coat and guapi mao cap. He introduces himself after Professor Frankly instructs Mario and Goombella to go to Petal Meadows, and can be found in various locations throughout the world afterwards.
When Mario talks to the Battle Master, he is given two choices. One is to go into a practice battle against three Goomboards, indestructible enemies that deal no damage, similar to the Action Command Dojo and Battle Lab from previous Paper Mario games. Mario can either take turns practicing his attacks with no FP or SP cost, or have the Battle Master jump at him holding a Goomboard to practice his guards. During these battles, Mario is able to use any move for each badge in his possession, even if the corresponding badge is not equipped, and Attack FX badges along with W Emblem and L Emblem are disabled. This battle also has a unique theme, titled "Master of Action Commands," which is composed with Chinese instruments. The other option is to read various tips for battles, including explanations for the stage and action commands. For the duration of the time that Mario has lost his name, the Battle Master instead refers to Mario as "Nameless Frank".
Locations[edit]
The Battle Master can be found in the following locations:
- Rogueport, Rogueport East next to the pipe leading to Rogueport Underground.
- Petalburg, outside Toce T.'s house.
- The Great Tree, near the exit to Boggly Woods.
- Glitzville, near the juice shop.
- Twilight Town, by the pumpkin patch in the second area.
- Keelhaul Key, outside Keelhaul Galleria.
- Riverside Station, near the train platform.
When Mario first arrives in Twilight Town at the start of Chapter 4, the Battle Master will have already been turned into a pig by Doopliss. Until Doopliss is defeated for the first time and the curse upon Twilight Town is lifted, the Battle Master cannot be interacted with, and he will not appear at any other location.
Secrets of battle[edit]
Leveling Up and Star Points[edit]
Every time you earn 100 Star Points, you gain a level, Mario. And when your level goes up, you get all your HP, FP, and Star Power back! On top of that, you also get to raise the max number of your HP, your FP, or your Badge Points! Just pick one.
HP (Heart Points)[edit]
HP stands for "Heart Points." When it gets to 0, you've gotten yourself KO'd, Mario! On the other hand, you drop some enemy's HP down to 0 and they get to take a little nap. Oh yeah—when your partner's HP gets to 0, they're out for the count, but they'll be back up after the fight. But if YOU hit 0, it's game over, so keep your eyes open, Mario!
When Your HP Is Low[edit]
When you or your partner have low HP, and you're about to lose, you'll see two kinds of warning icons! If your HP falls to 5 or lower, you'll see "Danger!" pop up. If your HP gets down to 1, you'll see "Peril!" instead. And if Mario here lets his HP reach 0, it'll be game over...so take those icons seriously! Some badges are only effective when you're in "Danger!" or "Peril!" so use 'em wisely! Got it, Mario?
FP (Flower Points)[edit]
FP stands for "Flower Points." All the best moves use FP, so they're pretty important. If your FP hits 0, you won't get KO'd, but you'll be unable to use a lot of moves...so keep track of your FP!
BP (Badge Points)[edit]
BP is short for "Badge Points." You can only equip as many badges as you got points to pay for 'em. The more powerful the badge, the more points you gotta use, so watch out for that.
Equipping Badges[edit]
Some badges power up your partner, and some of them power YOU up, Mario. Capisce? You can equip as many badges as you got BP to pay for 'em on the Badge Menu. Oh, and there's a few badges that're extra effective if you equip two or more of 'em. You get your BP right back when you unequip a badge, so don't be shy about experimentin'!
Badge Types: Attack Moves[edit]
Let's talk about badges that give you new moves, Mario. There's Power Jump and Power Smash—they each let you do their attack at +2 damage. Multibounce lets you jump on all the enemies in a row. Quake Hammer hits all the enemies on the ground and ceiling, plus it ignores Defense! There's lots of badges out there with cool moves—go find 'em!
Badge Types: Stat Boosts[edit]
Let's talk about badges that boost your stats, Mario. Close Call raises your chance to dodge, but only when you're in "Danger!" HP Plus gives you five extra HP. Power Plus increases your Attack stat by +1. There's lots more, and some of them work on your partner instead o' you. Try some out!
Tornado Jump in Detail[edit]
You wanna hear about something cool you might wanna have on your adventure, Mario? Tornado Jump is a badge that'll conjure up a tornado when you pull off its Action Command. Flying enemies in particular hate this, 'cause it ignores their Defense completely. If you're havin' trouble with a lot of flying guys, maybe you wanna equip a Tornado Jump, eh?
Soft Stomp in Detail[edit]
Lemme tell you about a badge that I've found pretty handy. It's called Soft Stomp, and you can use it to lower an enemy's Defense. Even if you miss with the Action Command, it makes tough guys into soft guys. Sleepy Stomp and Shrink Stomp also do their tricks even when you miss the Action Command, by the way. Oh, and don't worry—your Attack and Defense can't go lower than 0. Isn't that a relief? Sort of?
Hammer Throw in Detail[edit]
Lemme tell you about a badge that I've found pretty handy. Hammer Throw lets you, you know, throw your hammer when you hit an Action Command. It bypasses Defense, and you can hit an enemy no matter where they are in the battle. If you're having trouble with a flier or whatever, give 'em the ol' Hammer Throw!
Ice Smash in Detail[edit]
Lemme tell you about a badge that I've found pretty handy. Ice Smash is a badge for freezing your enemies. It even works when you miss with the Action Command, which is pretty sweet of it. Head Rattle works the same way, but for Confusing your enemies.
POW Blocks in Detail[edit]
Lemme tell you about an item that I've found pretty handy. A POW Block is an item you can use to attack a whole group of enemies. They hit flying enemies and flip over the shelled or rock guys, which they do NOT like. When they're flipped, you see, their Defense drops to 0. Follow up when they're weak and finish 'em off!
Power Punch in Detail[edit]
Lemme tell you about an item that I've found pretty handy. Power Punch is like a tonic that boosts your Attack power. It works like a dream with moves like Power Bounce or Multibonk—stuff that hits a bunch of times.
Poison Mushrooms in Detail[edit]
Poison Mushrooms are dangerous items that poison you—surprise—and take half your HP if you eat one. But didja know that every now and then they completely restore your HP?! Weird, right? Anyway, you can get Zess T. to make 'em for you if you feel like takin' big risks.
Getting More Badges[edit]
There's badges all over, if you're lookin' for 'em. Some are in treasure chests or red blocks you find. There's also a badge shop in Rogueport worth checking out. It's a little tricky to find—you gotta leave the inn from the second floor. There's also a guy named Dazzle who hangs out underneath Rogueport and trades badges for Star Pieces!
Jumping Tips[edit]
When you jump, you can stomp on an enemy twice if you succeed on an Action Command. You gotta press ![]() at the moment you stomp on 'em if you wanna nail that Action Command.
at the moment you stomp on 'em if you wanna nail that Action Command.
Hammering Tips[edit]
When you use your hammer, you can hit with double Attack power if you succeed on an Action Command! Release ![]() right when ✪ lights up to nail that Action Command.
right when ✪ lights up to nail that Action Command.
Hammer Range[edit]
Your hammer can only reach the enemies that are in front of you and on the ground, Mario. If you want to hit somebody in the back, you'll usually have to use Jump. But there are badges you can equip that'll let you reach enemies in the back, so that helps. Oh, and just so you know, sometimes flying enemies are low enough to the ground that you can hammer 'em.
Guarding Tips[edit]
If you succeed on a Guard Action Command, the enemy attack will do one less damage. That's great, but also, if the attack would put ya to sleep or immobilize you, the Guard prevents that too. Get good at pressing ![]() at just the right moment during attacks!
at just the right moment during attacks!
Superguard Tips[edit]
Not everybody knows about this, but if you pull off a Superguard, you won't take ANY damage from an attack! Not only that, but you might even sneak some damage back onto the enemy! Pretty sweet, eh? Press ![]() right when the attack hits to get some of that sweet Superguard action, kiddo.
right when the attack hits to get some of that sweet Superguard action, kiddo.
NICE, GOOD, GREAT, Etc.[edit]
When you succeed on an Action Command, you'll pull a buncha Star Power up from the crowd! The amounts of Star Power'll increase in the order of NICE, GOOD, GREAT, WONDERFUL, and EXCELLENT! You can use the Simplifier badge to make those Action Commands easier, but you'll get less Star Power. You can also use the Unsimplifier badge to make 'em harder if you want a little extra Star Power.
Special Moves[edit]
So what are special moves? They're the primo moves you pick up as you go along in your adventure. Let's talk about the special move Sweet Treat as an example. This one restores HP and FP. It works by having you tilt ![]() over and over to hit the icons that fall from...somewhere high up. The more you can hit, the more HP and FP you'll get back. Simple. But if you hit a Poison Mushroom, you won't be able to move for a bit, so be careful, Mario. Also, Sweet Treat will heal any status changes you and your partners've suffered—poison or what have you. Oh, and you need Star Power to use these special moves, so it's best to save 'em for big moments.
over and over to hit the icons that fall from...somewhere high up. The more you can hit, the more HP and FP you'll get back. Simple. But if you hit a Poison Mushroom, you won't be able to move for a bit, so be careful, Mario. Also, Sweet Treat will heal any status changes you and your partners've suffered—poison or what have you. Oh, and you need Star Power to use these special moves, so it's best to save 'em for big moments.
Special Moves and Crystal Stars[edit]
You know you get more special moves as you collect Crystal Stars, right, Mario? Sure you do. Didja also know that your max Star Power goes up too? So as you collect Crystal Stars, you can use MORE special moves MORE often. Pretty swell, right?
Star Power[edit]
Special moves are powered by your Star Power, right, Mario? You get Star Power back by doing Action Commands successfully. But if you need Star Power in a hurry, you can also use Appeal to really get the crowd on your side.
Star Power and Stylish Moves[edit]
If you really wanna rack up some Star Power, get good at using Stylish moves, kiddo. You do that by pressing ![]() with real good timing when you or your partner attack an enemy. You'll be able to tell you pulled it off by little changes in how the move looks. You can use the Timing Tutor badge to show you the
with real good timing when you or your partner attack an enemy. You'll be able to tell you pulled it off by little changes in how the move looks. You can use the Timing Tutor badge to show you the ![]() icon when it's the right time to show off. Oh, right—if you want to practice these, I can help you with my "Practice Action Commands" shtick.
icon when it's the right time to show off. Oh, right—if you want to practice these, I can help you with my "Practice Action Commands" shtick.
Hitting "BINGO"[edit]
Didja know that when you hit an Action Command, a symbol appears at the top-right of the screen? So if you get a couple of matching symbols, and then hit a third Action Command, you might hit it big! Press ![]() a the right moment and stop the wheel so that you get three in a row and you'll win a cool effect... Mushrooms heal all your HP, Flowers restore your FP. Stars'll fill up your Star Power to max. Shine Sprites are the big prize—they restore your HP, FP, AND Star Power. Oh, and three in a row brings in a crowd for the audience, so you'll make extra Star Power for a while. Oh, but three Poison Mushrooms in a row will lose you a bunch of HP, FP, Star Power, and crowd size. Watch it.
a the right moment and stop the wheel so that you get three in a row and you'll win a cool effect... Mushrooms heal all your HP, Flowers restore your FP. Stars'll fill up your Star Power to max. Shine Sprites are the big prize—they restore your HP, FP, AND Star Power. Oh, and three in a row brings in a crowd for the audience, so you'll make extra Star Power for a while. Oh, but three Poison Mushrooms in a row will lose you a bunch of HP, FP, Star Power, and crowd size. Watch it.
Using Items[edit]
There are items you can use to fight enemies, and others that can heal you up. Use 'em during a battle with the Item command, obviously. Oh, and you don't have to be in a fight. Press ![]() to open the menu, and choose Gear, then Item.
to open the menu, and choose Gear, then Item.
Status Changes You Don't Want[edit]
The truth is, not all status changes are good for you, Mario. Frozen makes it so you can't move for a few turns. When the ice breaks, you'll take some damage too. Tiny lowers your Attack all the way to 0 for a while because your boots and hammer get real small. Soft lowers your Defense all the way down to 0 for a few turns because your...overalls get thinner. I guess. There's others too, so keep your eyes peeled and be ready. So how do you prevent these from happening to you? You can block 'em with a Guard or Superguard. Oh, and the Feeling Fine badge'll just make you immune to bad statuses. Stati? Whatever.
Switching Action Order[edit]
During battle, you can press ![]() to swap places with your partner and change the order of your actions. When you're in front, you act first, but you're also more likely to get attacked by enemies. If someone's low on HP, one thing you can do is move 'em to the back. Remember that, Mario.
to swap places with your partner and change the order of your actions. When you're in front, you act first, but you're also more likely to get attacked by enemies. If someone's low on HP, one thing you can do is move 'em to the back. Remember that, Mario.
Running Gets You Nowhere[edit]
If you keep running away from fights, it gets harder and harder to do it successfully, Mario. But if you fail to run away or just win a battle, things'll go back to normal. There's probably a life lesson in there—sometimes you gotta face your fears or they'll force the issue. Also, it's easier to escape some enemies than others, and there's a few you just can't escape from at all. Running's another tool in your belt—just think about when and where to use it.
Merlee the Charmer[edit]
Do you know Merlee? She's a magical-type person who lives underneath Rogueport. If you have her cast a charm on you, good stuff'll tend to happen during your battles. If you see a building glowing blue in the distance down in those sewers, that's her! Pay her a quick visit. Her services ain't free, but they're pretty handy. Stop by sometime!
What Do Charms Do?[edit]
Lemme tell you more about the effects of Merlee's charms. Whenever a charm is about to go off, you'll see Merlee appear for a brief moment during the battle. If she appears just before you attack, your Attack will go up by 3. If she pops up right before an enemy attacks, then your Defense will be boosted by 3. And if she drops in right after you win a fight? Get this—she'll double any Star Points you earned! And one more! If she graces the stage after the battle's over, her charm'll earn you TRIPLE coins! Nice, eh? Charms will activate a certain number of times based on the path you chose. More coins gets you more magic!
Chet Rippo, Level Adjuster[edit]
You know Chet Rippo? Calls himself an adjuster, lives underground? He can adjust your stats or your partners' ranks. So he can lower one of your stats—HP, FP, or Badge Points—to raise a different one. He can also drop the rank on one of your partners to raise the rank on another one. So, if you're underneath Rogueport and see a building that glows red in the distance, maybe stop by! Oh, but Chet doesn't adjust for free, Mario. Be ready.
About Goombella[edit]
Goombella's a smart cookie, and knows all about your enemies, even their HP. When you run into an enemy type for the first time, it's a good idea to have her use Tattle on 'em. Her basic attack is called Headbonk. It works like your jump, including not working on spiky guys, so be careful.
About Koops[edit]
Koops can hit all the enemies on the ground with his Power Shell move. He also has that armored shell, so he rocks a Defense of 1, making him tougher than average. Just know that sometimes enemy attacks will flip him on his back, like any Koopa.
About Flurrie[edit]
Flurrie's Gale Force attack has a chance at blowing away all your enemies at once. Her Body Slam sometimes knocks over things on the stage, which can deal extra damage to your enemies! Just be careful not to ask her to Body Slam a spiky enemy—it never goes well.
About Yoshi[edit]
Yoshi's Gulp attack can hit up to two enemies while completely ignoring their Defense. Ground Pound hits a bunch of times! But its Attack is only 1, so it isn't very effective against a strong Defense. But...if you use Power Punch to raise his Attack, that's a different story!
About Vivian[edit]
Vivian's Shade Fist can hit enemies in the air or on the ceiling, as well as the ground. Veil lets her pull you both into the shadows and avoid enemy attacks altogether. That one's good when a bad guy is charging up for a big strike. But you should know that Vivian can't move right after she comes out of the shadows, so plan for that.
About Bobbery[edit]
Bobbery's blasts can sometimes cause things on the stage to topple over or fall down when he attacks enemies! Bomb Squad lets him throw three bombs that will explode at the end of the following turn. When one blows up, any bombs near it will blow up at that moment as well—even if two turns haven't passed!
About Ms. Mowz[edit]
Ms. Mowz can use Kiss Thief to steal items or badges that enemies are holding. If they're not holding anything, she just takes one coin. And her Love Slap is an attack that ignores enemy Defense.
Powering Up Partners[edit]
You've probably run into Merlon, the guy from the power-up shop in Rogueport? For three Shine Sprites, he'll raise the rank on one of your partners. It's a good deal—they get more HP and learn another attack skill. You can find him next to Professor Frankly's house in Rogueport.
Leveling Up: Bigger Stages[edit]
As your level goes up, the stages you fight on will get bigger and fancier. The maximum audience size will also go up, so you'll gain Star Power faster and faster. The downside, though, is that bigger stages mean more stuff can fall on you, so watch out for that.
Shaking Up the Stage[edit]
Certain attacks shake up the stage, which can cause accidents. Things might fall from the ceiling, or the whole backdrop might collapse on you. You can use Guard against these, so keep your peepers peeled and be ready.
Watch Out for Errant Nozzles[edit]
You've noticed the nozzles on the stage now that your level's higher and you're on a fancy stage? When attacks shake the stage, those nozzles'll sometimes fall over and hurt you! Don't worry though—stagehands will come and get those things fixed up in a jiffy.
Audience Participation[edit]
Sometimes, the audience gets a little too excited and throws something while you're choosing your actions. Some of 'em are trying to help, and they'll throw you items or hearts to heal your HP. But some are troublemakers tryin' to bean you with a tin can or something. If you're paying attention, you can prevent them throwing anything by pressing ![]() . This'll stop both the good and the bad stuff though, so try to notice what they're throwing first!
. This'll stop both the good and the bad stuff though, so try to notice what they're throwing first!
Types of Audience Members, Part 1[edit]
Lots o' different folks show up to watch the battles on stage. Let's run through some, Mario. Toads throw only good stuff. Luigi throws really good stuff, but doesn't show up often. Goombas and Dull Bones only throw trash, so watch out for those guys. Shy Guys throw good stuff, trash, or even just charge onto the stage and cause accidents sometimes.
Types of Audience Members, Part 2[edit]
There are other types of spectators too. Let's talk about more of them. Koopas throw good stuff or trash, and sometimes hole up in their shells. X-Nauts throw trash, but when your attacks miss, they'll throw a hail of stones! A whole hail! Piranha Plants sometimes just eat the spectators next to them. Punies throw good stuff, but will run away and leave the theater if they're surprised.
Types of Audience Members, Part 3[edit]
And there's still more kinds of spectators! Let's review a few more. You will be shocked when I tell you that Hammer Bros will throw hammers at you. Shocked. Dayzees will sing their creepy lullabyes and put nearby spectators to sleep. Boos will throw all sorts of things but also might run onto the stage and make someone invisible! Bulky Bob-Ombs are huge and will sometimes light their fuses and blow up out there!
Enemies with Spikes[edit]
When you or your partners use attacks that throw you right onto an enemy with spikes, it hurts you. You can use the Spike Shield badge to protect yourself as one option. But that won't help you against the enemies that counterattack with fire, lightning, ice, or poison. Be careful!
Enemies that Fly[edit]
Your hammer can't reach enemies up in the air. Disappointing, I know. In those situations, you gotta use Jump or rely on a partner with attacks that reach high enough. Oh, and there is a Hammer Throw badge that lets you use that sweet, sweet hammer against anyone.
Enemies on the Ceiling[edit]
Enemies on the ceiling are protected from both hammer and jump attacks. Which stinks. In those cases, you need to attack with partners that can reach up there. As an example, Flurrie's Body Slam should knock 'em right down. There's probably others as well. Oh, and there's also the Quake Hammer badge, which hits all enemies on the ground AND ceiling.
Defense and Damage[edit]
If you can crank up your or your partners' Defense stats, you'll block some damage before it gets to you. One way to do that is to choose Defend on the Tactics menu. That'll automatically increase it by 1. Another option is to equip a Defend Plus badge. That'll boost Defense by 1 as long as you're wearing it!
Enemies that Ignore Defense[edit]
Don't just rely on a high Defense, 'cause some enemies ignore it with magic or beams or whatnot. If you're up against piercing attacks like that, look into badges that lower incoming damage. For example, the Last Stand badge halves all incoming damage when your HP is 5 or less. There's also the P-Down, D-Up badge, which lowers your Attack by 1, but also lowers incoming damage by 1. Oh, and if you get good at Guard action commands, you drop damage by 1. And Super Guard makes it 0!
Piercing Enemy Defenses[edit]
If you use a piercing attack, you can ignore an enemy's Defense. The Piercing Blow and Hammer Throw badges both let you make piercing attacks. Some of your partners also have piercing attacks. Experiment, see what they can do! Oh, and there's items out there that do piercing damage too. Try a lot of different stuff.
Enemies with Items[edit]
Have you noticed that sometimes enemies will start the battle holding an item, Mario? Try to eliminate those guys quickly, before they get a chance to use their gear.
Enemies with Badges[edit]
Some enemies have actually figured out how badges work and start the battle with one equipped. They really are stronger with those things, so watch out.
Enemies that Drop Items[edit]
You know how enemies drop coins when you beat 'em? Sometimes they drop other stuff too! There might be hearts that restore your HP or flowers that fix your FP. They may even drop items or badges, especially when those enemies were holding that stuff in the battle.
Tattle[edit]
- "That's the Battle Master. He's a master of battling. Let me know if I'm going too fast here. He'll teach you the secrets of battling and help you practice tricky Action Commands. So if you're having trouble mastering any aspects of battles, just ask the Battle Master! I mean, obviously."
- As a pig
- "This little fella seems oddly relaxed, don't you think? Something tells me this is not a normal pig..."
Related media[edit]
| File info 0:30 |
Gallery[edit]
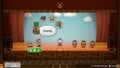
The practice battle stage
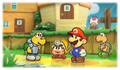
The Battle Master in a credits image
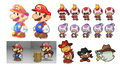
Concept art showing early designs of the Battle Master
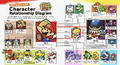
The Battle Master on the Nintendo Magazine for summer 2024, showing a relationship chart featuring many characters from Paper Mario: The Thousand-Year Door


Names in other languages[edit]
| Language | Name | Meaning | Notes |
|---|---|---|---|
| Japanese | バトルたつじん[?] Batoru tatsujin |
Battle Master | |
| Chinese (simplified) | 战斗达人奇诺比奥[?] Zhàndǒu Dárén Qínuòbǐ'ào |
Battle Master Toad | |
| Chinese (traditional) | 戰鬥達人奇諾比奧[?] Zhàndǒu Dárén Qínuòbǐ'ào |
Battle Master Toad | |
| Dutch | Knokcoach[?] | Brawl Coach | |
| French (NOA) | Maître Martial[?] | Martial Master | |
| French (NOE) | Maître Castagne[?] | Brawl Master | |
| German | Kampf-Coach[?] | Battle Coach | |
| Italian | Maestro di lotta[?] | Battle Master | |
| Korean | 배틀달인[?] Baeteul-Darin |
Battle Master | |
| Spanish | Maestro del combate[?] | Combat master |
References[edit]
- ^ Nintendo Magazine 2024 summer (Digital English edition). nintendo.co.jp. Page 9. Retrieved July 12, 2024. (Archived July 12, 2024, 02:32:45 UTC via Wayback Machine.)