Emerald Passage: Difference between revisions
From the Super Mario Wiki, the Mario encyclopedia
Jump to navigationJump to search
m (Robot: Changing template: Foreignname) |
|||
| (32 intermediate revisions by 13 users not shown) | |||
| Line 1: | Line 1: | ||
__NOTOC__ | __NOTOC__ | ||
{{WL4 | {{WL4 map}} | ||
[[File: | [[File:Emerald Passage.png|frame|left|The Emerald Passage]] | ||
The '''Emerald Passage''' is | The '''Emerald Passage''' is a location in ''[[Wario Land 4]]''. It is the second passage of the [[Gold Pyramid]]. It has a nature theme to it, with all of its levels featuring botanical elements like as a swampy lake or a thick jungle in the monsoon season. The [[Wario Land 4#Bosses|boss]] of the passage, [[Cractus]], is a giant monstrous potted plant. As in all Passages, [[Wario]] needs to collect four [[jewel piece]]s to make a [[jewel]], plus a [[Keyzer]] in each level in order to move on to the next one. | ||
{{br}} | {{br}} | ||
==Levels== | ==Levels== | ||
The following table displays the five levels found in the Emerald Passage, with their name, icon and description. | The following table displays the five levels found in the Emerald Passage, with their name, icon and description. | ||
{ | |||
{{content description | |||
|image1=[[File:WL4 Palm Tree Paradise Level Icon.png]] | |||
|name1=[[Palm Tree Paradise]] | |||
|description1=The first level of the Emerald Passage is very straightforward and of extremely low difficulty. It takes place on a tropical setting with lots of palm trees. [[Marumen]] and [[Spear-Mask]]s in low numbers patrol the grounds of this level. The level's path has no alternate routes for the player to take. The [[Switch (Wario Land 4)|switch]] is at the end, and the player must go back the way they came to reach the [[vortex]]. The level's theme is a shortened version of the [[Karaoke (Medamayaki)|Karaoke]] soundtrack. | |||
| | |image2=[[File:WL4 Wildflower Fields Level Icon.png]] | ||
|name2=[[Wildflower Fields]] | |||
| | |description2=The level Wildflower Fields takes place in a sunny field blossoming with wild flora. Throughout the stage, there are many [[flower (Wario Land 4)|flower]]s that are pollinated by [[Beezley]]s, which will swell and release [[Coin (Wario Land 4)|coins]]. The Beezleys can also sting Wario and transform him into [[Puffy Wario]], which will enable him to reach greater heights in the level. A lot of the level's structure is made up of giant sunflowers, which are hollow so Wario is able to pass through them. | ||
|The first level of the Emerald Passage is very straightforward and of extremely low difficulty. It takes place on a tropical setting with lots of palm trees. [[Marumen]] and [[Spear-Mask]]s in low numbers patrol the grounds of this level. The level's path has no alternate routes for the player to take. The [[Switch (Wario Land 4)|switch]] is at the end, and the player must go back the way they came to reach the [[vortex]]. The level's theme is a shortened version of the [[Karaoke (Medamayaki)|Karaoke]] soundtrack. | |image3=[[File:WL4 Mystic Lake Level Icon.png]] | ||
| | |name3=[[Mystic Lake]] | ||
|description3=The Mystic Lake is a location of great beauty, with lush grasses and cool lakes. A large part of the level is underwater, where Wario must swim most of the way. The waters are abundant in [[Goggley-Blade]]s and [[Utsuboankō]], which harm Wario. In the mid-way point of the level, a [[Togenobi]] guards the [[Keyzer]], which is essential for progressing to the next level. After hitting the [[Switch (Wario Land 4)|switch]], the upper part of the level is unlocked, which mainly consists of blocks and falling boulders. | |||
| | |image4=[[File:WL4 Monsoon Jungle Level Icon.png]] | ||
|The level Wildflower Fields takes place in a sunny field blossoming with wild flora. Throughout the stage, there are many [[ | |name4=[[Monsoon Jungle]] | ||
| | |description4=The Monsoon Jungle takes place in a swampy setting with lots of water. The water is vastly infested with [[Tobawani]], which will snap at Wario if he swims nearby. Swinging Platforms are in abundance above the water, in order to allow Wario to safely cross without harm from the Tobawani. However, the swing is often difficult to time, and the player may often find themselves falling in the water. After hitting the [[Switch (Wario Land 4)|switch]], Wario will gain access to the underground area of the level, where he will make his final progress through the level. | ||
|image5=[[File:WL4 Cractus Level Icon.png]] | |||
| | |name5=[[Cractus]] (boss) | ||
|The Mystic Lake is a location of great beauty, with lush grasses and cool lakes. A large part of the level is underwater, where Wario must | |description5=The boss of the Emerald Passage is Cractus, a possessed venus flytrap with a huge head that can skewer Wario with its claws and drool a poisonous liquid on him, turning Wario into [[Zombie Wario]]. Wario can cause it damage by [[Ground Pound|ground pounding]] its head. After taking a certain amount of damage, Cractus will stand upright making it harder for Wario to inflict damage on the creature. He will then have to climb a vine above the plant. Defeating Cractus restores the [[legendary treasure|Crown]] to the [[Golden Pyramid]]. | ||
| | }} | ||
| | |||
|The Monsoon Jungle takes place in a swampy setting with lots of water. The water is vastly infested with [[Tobawani]], which will snap at Wario if he swims nearby. Swinging Platforms are in abundance above the water, in order to allow Wario to safely cross without harm from the Tobawani. However, the swing is often difficult to time, and the player may often find themselves falling in the water. After hitting the [[Switch (Wario Land 4)|switch]], Wario will gain access to the underground area of the level, where he will make his final progress through the level. | |||
| | |||
| | |||
|The boss of the Emerald Passage is Cractus, a possessed venus flytrap with a huge head that can skewer Wario with its claws and drool a poisonous liquid on him, turning Wario into [[Zombie Wario]]. Wario can cause it damage by [[ | |||
==CDs found== | ==CDs found== | ||
There are four [[CD]]s found in the Emerald Passage, one in each level. Once collected, the track can be played in the [[Sound Room]]. | There are four [[CD]]s found in the Emerald Passage, one in each level. Once collected, the track can be played in the [[Sound Room]]. | ||
{ | |||
{{content description | |||
|image1=[[File:Sound Room-About That Shepherd.png]] | |||
|name1=[[About That Shepherd]] | |||
|description1=The wind is blowing and several dogs are barking. The ''baas'' of sheep are also heard. As the CD plays for longer, the barking gets faster and faster, and then begins to slow down. The track ends with the dogs whimpering. | |||
| | |image2=[[File:Sound Room-Things That Never Change.png]] | ||
| | |name2=[[Things That Never Change]] | ||
|The wind is blowing and several dogs are barking. The ''baas'' of sheep | |description2=Raindrops and frog croaks can be heard at the beginning. Crickets, birds and owls come in later. The "Things That Never Change" tells the story of how many things on our planet change, but the beauty of nature stays the same. | ||
| | |image3=[[File:Sound Room-Tomorrow's Blood Pressure.png]] | ||
|name3=[[Tomorrow's Blood Pressure]] | |||
| | |description3=Several mechanical sounds introduce this CD. Wheels are turning, and electricity is flowing. It is a very stress-filled CD. A lot of the sound effects heard are from the level [[The Curious Factory]]. | ||
|Raindrops and frog croaks can be heard at the beginning. Crickets, birds and owls come in later. The "Things That Never Change" tells the story of how many things on our planet change, but the beauty of nature stays the same. | |image4=[[File:Sound Room-Beyond the Headrush.png]] | ||
| | |name4=[[Beyond the Headrush]] | ||
|description4=Loud, confusing sound effects gives the listener the impression that a lot is happening at once, very quickly. Mysterious, [[Castle]]-like themes follow. The wind can be heard in the background. | |||
| | }} | ||
|Several mechanical sounds introduce this CD. Wheels are turning, and electricity is flowing. It is a very stress-filled CD. A lot of the sound effects heard are from the level [[The Curious Factory]]. | |||
| | |||
| | |||
|Loud, confusing sound effects gives the listener the impression that a lot is happening at once, very quickly. Mysterious, [[Castle]]-like themes follow. The wind can be heard in the background. | |||
==Media== | ==Media== | ||
{{media table | {{media table | ||
| | |file1=WL4-Palm Tree Paradise.oga | ||
|title1=Emerald Passage | |||
| | |||
|description1=[[Palm Tree Paradise]] | |description1=[[Palm Tree Paradise]] | ||
|length1= | |length1=0:30 | ||
|file2=WL4-Wildflower Fields.oga | |||
|title2=Emerald Passage | |||
| | |||
| | |||
|description2=[[Wildflower Fields]] | |description2=[[Wildflower Fields]] | ||
|length2= | |length2=0:30 | ||
|file3=WL4-Mystic Lake.oga | |||
|title3=Emerald Passage | |||
| | |||
| | |||
|description3=[[Mystic Lake]] | |description3=[[Mystic Lake]] | ||
|length3= | |length3=0:30 | ||
|file4=WL4-Monsoon Jungle.oga | |||
|title4=Emerald Passage | |||
| | |||
| | |||
|description4=[[Monsoon Jungle]] | |description4=[[Monsoon Jungle]] | ||
|length4= | |length4=0:30 | ||
|file5=WL4-Boss Battle.oga | |||
|title5=Emerald Passage | |||
| | |||
| | |||
|description5=Music heard in the battle against [[Cractus]] | |description5=Music heard in the battle against [[Cractus]] | ||
|length5= | |length5=0:30 | ||
}} | }} | ||
==Gallery== | ==Gallery== | ||
<gallery> | <gallery> | ||
WL4-Emerald Passage Symbol Artwork.png|Artwork of the Emerald Passage symbol | |||
Palm Tree Paradise.png|[[Palm Tree Paradise]] | |||
WildflowerFields.png|[[Wildflower Fields]] | |||
WL4 invisible Frog Blocks.png|[[Mystic Lake]] | |||
WL4-Tobawani.png|[[Monsoon Jungle]] | |||
WL4-Cractus Battle.png|[[Cractus]] | |||
</gallery> | </gallery> | ||
==Names in other languages== | ==Names in other languages== | ||
{{foreign names | {{foreign names | ||
|Chi=绿宝石通道<ref>阿快尔瑞斯 | |Jap=みどりのつうろ | ||
|JapR=Midori no Tsūro | |||
|JapM=Green Passage | |||
|Chi=绿宝石通道<ref>{{cite|language=zh-hans|author=阿快尔瑞斯|date=July 19, 2014|url=www.bilibili.com/video/av1306272/index_2.html|title=【完结】【童年游戏】瓦力欧寻宝记流程 (6P)|publisher=Bilibili|accessdate=July 7, 2024}}{{dead link}}</ref> | |||
|ChiR=Lǜbǎoshí Tōngdào | |ChiR=Lǜbǎoshí Tōngdào | ||
|ChiM=Green Gemstone Passage | |ChiM=Green Gemstone Passage | ||
|Fre=Chemin d'Emeraude<ref>{{cite|title=''[[Wario Land 4]]'' European manual|page=49|publisher=Nintendo of Europe|language=fr|date=2001}}</ref> | |||
|FreM=Emerald Path | |||
|Ger=Smaragd-Passage<ref>{{cite|title=''[[Wario Land 4]]'' European manual|page=29|publisher=Nintendo of Europe|language=de|date=2001}}</ref> | |||
|GerM=Emerald Passage | |||
|Ita=Passaggio smeraldo<ref>{{cite|title=''[[Wario Land 4]]'' European manual|page=109|publisher=Nintendo of Europe|language=it|date=2001}}</ref> | |||
|ItaM=Emerald passage | |||
|Spa=Pasaje Esmeralda<ref>{{cite|title=''[[Wario Land 4]]'' European manual|page=89|publisher=Nintendo of Europe|language=es|date=2001}}</ref> | |||
|SpaM=Emerald Passage | |||
}} | }} | ||
| Line 112: | Line 100: | ||
{{WL4}} | {{WL4}} | ||
[[Category: | [[Category:Temples]] | ||
[[Category:Wario Land 4 worlds]] | |||
[[Category:Wario Land 4 | |||
Latest revision as of 20:57, September 20, 2024
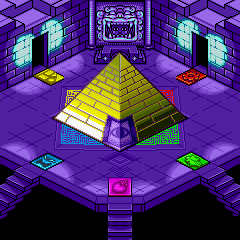

A map of the Golden Pyramid. Click on an area to open that relevant article.

The Emerald Passage
The Emerald Passage is a location in Wario Land 4. It is the second passage of the Gold Pyramid. It has a nature theme to it, with all of its levels featuring botanical elements like as a swampy lake or a thick jungle in the monsoon season. The boss of the passage, Cractus, is a giant monstrous potted plant. As in all Passages, Wario needs to collect four jewel pieces to make a jewel, plus a Keyzer in each level in order to move on to the next one.
Levels[edit]
The following table displays the five levels found in the Emerald Passage, with their name, icon and description.
| Image | Name | Description
|
|---|---|---|
| Palm Tree Paradise | The first level of the Emerald Passage is very straightforward and of extremely low difficulty. It takes place on a tropical setting with lots of palm trees. Marumen and Spear-Masks in low numbers patrol the grounds of this level. The level's path has no alternate routes for the player to take. The switch is at the end, and the player must go back the way they came to reach the vortex. The level's theme is a shortened version of the Karaoke soundtrack. | |
| Wildflower Fields | The level Wildflower Fields takes place in a sunny field blossoming with wild flora. Throughout the stage, there are many flowers that are pollinated by Beezleys, which will swell and release coins. The Beezleys can also sting Wario and transform him into Puffy Wario, which will enable him to reach greater heights in the level. A lot of the level's structure is made up of giant sunflowers, which are hollow so Wario is able to pass through them. | |
| Mystic Lake | The Mystic Lake is a location of great beauty, with lush grasses and cool lakes. A large part of the level is underwater, where Wario must swim most of the way. The waters are abundant in Goggley-Blades and Utsuboankō, which harm Wario. In the mid-way point of the level, a Togenobi guards the Keyzer, which is essential for progressing to the next level. After hitting the switch, the upper part of the level is unlocked, which mainly consists of blocks and falling boulders. | |
| Monsoon Jungle | The Monsoon Jungle takes place in a swampy setting with lots of water. The water is vastly infested with Tobawani, which will snap at Wario if he swims nearby. Swinging Platforms are in abundance above the water, in order to allow Wario to safely cross without harm from the Tobawani. However, the swing is often difficult to time, and the player may often find themselves falling in the water. After hitting the switch, Wario will gain access to the underground area of the level, where he will make his final progress through the level. | |
| Cractus (boss) | The boss of the Emerald Passage is Cractus, a possessed venus flytrap with a huge head that can skewer Wario with its claws and drool a poisonous liquid on him, turning Wario into Zombie Wario. Wario can cause it damage by ground pounding its head. After taking a certain amount of damage, Cractus will stand upright making it harder for Wario to inflict damage on the creature. He will then have to climb a vine above the plant. Defeating Cractus restores the Crown to the Golden Pyramid. |
CDs found[edit]
There are four CDs found in the Emerald Passage, one in each level. Once collected, the track can be played in the Sound Room.
| Image | Name | Description
|
|---|---|---|
| About That Shepherd | The wind is blowing and several dogs are barking. The baas of sheep are also heard. As the CD plays for longer, the barking gets faster and faster, and then begins to slow down. The track ends with the dogs whimpering. | |
| Things That Never Change | Raindrops and frog croaks can be heard at the beginning. Crickets, birds and owls come in later. The "Things That Never Change" tells the story of how many things on our planet change, but the beauty of nature stays the same. | |
| Tomorrow's Blood Pressure | Several mechanical sounds introduce this CD. Wheels are turning, and electricity is flowing. It is a very stress-filled CD. A lot of the sound effects heard are from the level The Curious Factory. | |
| Beyond the Headrush | Loud, confusing sound effects gives the listener the impression that a lot is happening at once, very quickly. Mysterious, Castle-like themes follow. The wind can be heard in the background. |
Media[edit]
| File info 0:30 |
| File info 0:30 |
| File info 0:30 |
| File info 0:30 |
| File info 0:30 |
Gallery[edit]

Artwork of the Emerald Passage symbol


Names in other languages[edit]
| Language | Name | Meaning | Notes |
|---|---|---|---|
| Japanese | みどりのつうろ[?] Midori no Tsūro |
Green Passage | |
| Chinese | 绿宝石通道[1] Lǜbǎoshí Tōngdào |
Green Gemstone Passage | |
| French | Chemin d'Emeraude[2] | Emerald Path | |
| German | Smaragd-Passage[3] | Emerald Passage | |
| Italian | Passaggio smeraldo[4] | Emerald passage | |
| Spanish | Pasaje Esmeralda[5] | Emerald Passage |
References[edit]
- ^ 阿快尔瑞斯 (July 19, 2014). 【完结】【童年游戏】瓦力欧寻宝记流程 (6P). Bilibili (Simplified Chinese). Retrieved July 7, 2024.[dead link]
- ^ 2001. Wario Land 4 European manual. Nintendo of Europe (French). Page 49.
- ^ 2001. Wario Land 4 European manual. Nintendo of Europe (German). Page 29.
- ^ 2001. Wario Land 4 European manual. Nintendo of Europe (Italian). Page 109.
- ^ 2001. Wario Land 4 European manual. Nintendo of Europe (Spanish). Page 89.