Construction Zone: Difference between revisions
(Updated article formatting) |
No edit summary |
||
| Line 1: | Line 1: | ||
{{distinguish|Construction Site|Work Zone}} | {{distinguish|Construction Site|Work Zone}} | ||
'''Construction Zone''' is a game mode which allows the player to create and save their own levels. It is introduced in ''[[Mario vs. Donkey Kong 2: March of the Minis]]'', and returns in ''[[Mario vs. Donkey Kong: Minis March Again!]]'', ''[[Mario vs. Donkey Kong: Mini-Land Mayhem!]]'', and ''[[Mario vs. Donkey Kong: Tipping Stars]]'', where in the latter it is known as the '''Workshop''' mode. In ''[[Mario and Donkey Kong: Minis on the Move]]'', a similar mode | [[File:ConstructionZone.png|thumb|right|256px|The Construction Zone menu screen in ''Mario vs. Donkey Kong 2: March of the Minis'']] | ||
'''Construction Zone''' is a game mode which allows the player to create and save their own levels. It is introduced in ''[[Mario vs. Donkey Kong 2: March of the Minis]]'', and returns in ''[[Mario vs. Donkey Kong: Minis March Again!]]'', ''[[Mario vs. Donkey Kong: Mini-Land Mayhem!]]'', and ''[[Mario vs. Donkey Kong: Tipping Stars]]'', where in the latter it is known as the '''Workshop''' mode. In ''[[Mario and Donkey Kong: Minis on the Move]]'', a similar mode known as '''Create & Share''' makes its debut. Prior to the discontinuation of the [[Nintendo Wi-Fi Connection]] service in 2014, players could utilize the service to distribute their own levels online. | |||
The concept for the Construction Zone dates back to the | The concept for the Construction Zone dates back to the DESIGN mode of ''[[Wrecking Crew]]'', with a similar level editor being [[List of Mario vs. Donkey Kong pre-release and unused content|planned]] for the original ''[[Mario vs. Donkey Kong]]''. | ||
==History== | ==History== | ||
===''Mario vs. Donkey Kong 2: March of the Minis''=== | ===''Mario vs. Donkey Kong 2: March of the Minis''=== | ||
The Construction Zone game mode is introduced in ''Mario vs. Donkey Kong 2: March of the Minis'', allowing the player to create, play, and share their own levels, as well as receive levels from other players. | |||
The Construction Zone is introduced in ''Mario vs. Donkey Kong 2: March of the Minis'' | |||
====Play Level==== | ====Play Level==== | ||
If the player selects ''Play Level'', they can play certain levels made in the Construction Zone. | If the player selects '''Play Level''', they can play certain levels made in the Construction Zone. | ||
*'''Your Levels''': levels that the player has created which have passed the play test. Up to 8 of these levels can be stored. | *'''Your Levels''': levels that the player has created which have passed the play test. Up to 8 of these levels can be stored. | ||
*'''Received Levels''': levels that the player has received from other players, either locally or via Nintendo Wi-Fi Connection. Up to 24 of these levels can be stored. | *'''Received Levels''': levels that the player has received from other players, either locally or via Nintendo Wi-Fi Connection. Up to 24 of these levels can be stored. | ||
====Edit Level==== | ====Edit Level==== | ||
[[File:ConstructionZoneKits.png|thumb| | [[File:ConstructionZoneKits.png|thumb|256px|The construction kit selection screen, with all of the kits unlocked]] | ||
To create or edit a level, the player must select ''Edit Level'', then select | To create or edit a level, the player must select '''Edit Level''', then select one of 8 slots to edit. Slots with a blue outline indicate a level which has passed the play test, while all other slots use a yellow outline. To erase a level, the player must tap ''Erase Level'' and select a level to erase. | ||
If the player chooses an empty slot, they must select a construction kit to begin creating a new level. Before selecting a construction kit, the player can toggle the ''Template'' button to create a sample level instead of a level with only one Mini | If the player chooses an empty slot, they must select a construction kit to begin creating a new level. Before selecting a construction kit, the player can toggle the ''Template'' button to create a sample level instead of a level with only one [[Mini]] and [[Goal Door (Mario vs. Donkey Kong series)|the exit]]. There are a total of 11 construction kits. | ||
{| class="wikitable" | {| class="wikitable" | ||
|- | |- | ||
| Line 55: | Line 55: | ||
|Reach the goal score for Shy Guy Smash! in Spooky Attic and Jungle Hijinks. | |Reach the goal score for Shy Guy Smash! in Spooky Attic and Jungle Hijinks. | ||
|} | |} | ||
{{br}} | |||
[[File:EditLevels.png|thumb|right|200px|The | [[File:EditLevels.png|thumb|right|200px|The level creation screen]] | ||
The level creation screen features a '''Full View'''<ref name=manual>[https://www.nintendo.com/consumer/gameslist/manuals/DS_Mario_vs_Donkey_Kong_March_of_the_Minis.pdf ''Mario vs. Donkey Kong 2: March of the Minis'' North American instruction booklet]. Page 27. ''nintendo.com''. Retrieved June 30, 2022.</ref> on the top screen, allowing the player to view their entire level. A toolbar with several buttons is displayed on the top of the Touch Screen: | |||
*'''Confirmation Menu''':<ref name=manual/> Represented by a green [[Mini Mario (toy)|Mini Mario]] button. Opens a drop-down menu with objects the player can use in their level. Tapping an object highlights it; tapping it again selects it and closes the menu. Tapping an empty space in the level inserts that object into the level. The player can drag the stylus across some objects (such as [[Pink Block]]s) to change their size. | |||
*'''Edit Menu''':<ref name=manual/> Represented by a blue hammer button. Lets the player change the current mode. | *'''Edit Menu''':<ref name=manual/> Represented by a blue hammer button. Lets the player change the current mode, indicated by an icon to the immediate right of the button; if no icon is displayed, the player has selected an object from the Confirmation Menu. | ||
*'''End Menu''':<ref name=manual/> Represented by a red gear button. Lets the player save the level, test it, or exit editing. | **''Erase'': Lets the player remove objects by tapping them. Dragging the stylus across multiple objects removes them all at once. | ||
**''Move'': Lets the player move objects by dragging them. Dragging the stylus across multiple objects selects them, allowing them to be moved all at once. | |||
**''Flip'': Lets the player flip certain objects by tapping them, including Minis, most enemies, [[conveyor belt]]s, [[raft]]s, and [[Lift|Moving Platform]]s. | |||
**''Reset'': Clears the level (if ''Template'' is set to off) or resets the level back to the sample level (if ''Template'' is set to on). | |||
*'''End Menu''':<ref name=manual/> Represented by a red gear button. Lets the player save the level, test it, or exit editing. The player must name their level before saving it for the first time. | |||
*'''Undo''' & '''Redo'''<ref name=manual/> buttons: Let the player undo their last action or restore their last undone action, respectively. | *'''Undo''' & '''Redo'''<ref name=manual/> buttons: Let the player undo their last action or restore their last undone action, respectively. | ||
*'''Meter''':<ref name=manual/> Decreases as more level elements are placed. If the meter runs out, the player cannot place any more objects into the level. | *'''Meter''':<ref name=manual/> Decreases as more level elements are placed. If the meter runs out, the player cannot place any more objects into the level. | ||
=====Play test===== | =====Play test===== | ||
[[File:TestingLevel.png|thumb|200px|Testing a custom level made with the | [[File:TestingLevel.png|thumb|200px|Testing a custom level made with the Magnet Mania construction kit]] | ||
To share a level created in the Construction Zone with other players, the level must pass the play test. To test a level, the player must tap the | To share a level created in the Construction Zone with other players, the level must pass the play test. To test a level, the player must tap the '''Play Test''' button in the End Menu. The player must save their level before testing it. To pass the play test, the player must direct all of the Minis in the level so that they reach the exit within 600 seconds; otherwise, the level does not pass the play test. | ||
====Nintendo WFC==== | ====Nintendo WFC==== | ||
| Line 95: | Line 77: | ||
*'''Synchronize''' - By connecting to Nintendo Wi-Fi Connection, players could synchronize their levels to make them available to others. | *'''Synchronize''' - By connecting to Nintendo Wi-Fi Connection, players could synchronize their levels to make them available to others. | ||
*'''Receive''' - As long as players knew each other's friend codes and had them installed under their friends list, they could receive levels from each other. Every so often, Nintendo also published an official level.{{ref needed}} | *'''Receive''' - As long as players knew each other's friend codes and had them installed under their friends list, they could receive levels from each other. Every so often, Nintendo also published an official level.{{ref needed}} | ||
*'''Nintendo WFC Config''' - Allows the player to enter Nintendo Wi-Fi Connection Setup. | |||
*'''WFC Friends''' - Up to 60 friends can be stored here, registered with a friend code. The player's friend code is displayed on the top screen. | |||
====Multi-Card==== | ====Multi-Card==== | ||
Revision as of 20:11, July 21, 2022
- Not to be confused with Construction Site or Work Zone.
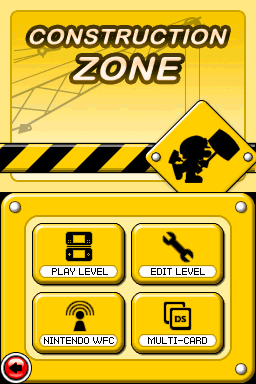
Construction Zone is a game mode which allows the player to create and save their own levels. It is introduced in Mario vs. Donkey Kong 2: March of the Minis, and returns in Mario vs. Donkey Kong: Minis March Again!, Mario vs. Donkey Kong: Mini-Land Mayhem!, and Mario vs. Donkey Kong: Tipping Stars, where in the latter it is known as the Workshop mode. In Mario and Donkey Kong: Minis on the Move, a similar mode known as Create & Share makes its debut. Prior to the discontinuation of the Nintendo Wi-Fi Connection service in 2014, players could utilize the service to distribute their own levels online.
The concept for the Construction Zone dates back to the DESIGN mode of Wrecking Crew, with a similar level editor being planned for the original Mario vs. Donkey Kong.
History
Mario vs. Donkey Kong 2: March of the Minis
The Construction Zone game mode is introduced in Mario vs. Donkey Kong 2: March of the Minis, allowing the player to create, play, and share their own levels, as well as receive levels from other players.
Play Level
If the player selects Play Level, they can play certain levels made in the Construction Zone.
- Your Levels: levels that the player has created which have passed the play test. Up to 8 of these levels can be stored.
- Received Levels: levels that the player has received from other players, either locally or via Nintendo Wi-Fi Connection. Up to 24 of these levels can be stored.
Edit Level
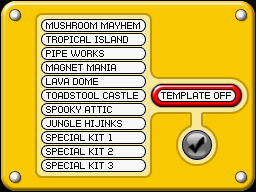
To create or edit a level, the player must select Edit Level, then select one of 8 slots to edit. Slots with a blue outline indicate a level which has passed the play test, while all other slots use a yellow outline. To erase a level, the player must tap Erase Level and select a level to erase. If the player chooses an empty slot, they must select a construction kit to begin creating a new level. Before selecting a construction kit, the player can toggle the Template button to create a sample level instead of a level with only one Mini and the exit. There are a total of 11 construction kits.
| Construction kit | How to unlock |
|---|---|
| Mushroom Mayhem | Available from the start. |
| Tropical Island | Complete Boss Game 2. |
| Pipe Works | Complete Boss Game 3. |
| Magnet Mania | Complete Boss Game 4. |
| Lava Dome | Complete Boss Game 5. |
| Toadstool Castle | Complete Boss Game 6. |
| Spooky Attic | Complete Boss Game 7. |
| Jungle Hijinks | Complete Boss Game 8. |
| Special Kit 1 | Reach the goal score for Shy Guy Smash! in Mushroom Mayhem, Tropical Island, and Pipe Works. |
| Special Kit 2 | Reach the goal score for Shy Guy Smash! in Magnet Mania, Lava Dome, and Toadstool Castle. |
| Special Kit 3 | Reach the goal score for Shy Guy Smash! in Spooky Attic and Jungle Hijinks. |
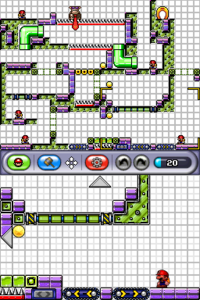
The level creation screen features a Full View[1] on the top screen, allowing the player to view their entire level. A toolbar with several buttons is displayed on the top of the Touch Screen:
- Confirmation Menu:[1] Represented by a green Mini Mario button. Opens a drop-down menu with objects the player can use in their level. Tapping an object highlights it; tapping it again selects it and closes the menu. Tapping an empty space in the level inserts that object into the level. The player can drag the stylus across some objects (such as Pink Blocks) to change their size.
- Edit Menu:[1] Represented by a blue hammer button. Lets the player change the current mode, indicated by an icon to the immediate right of the button; if no icon is displayed, the player has selected an object from the Confirmation Menu.
- Erase: Lets the player remove objects by tapping them. Dragging the stylus across multiple objects removes them all at once.
- Move: Lets the player move objects by dragging them. Dragging the stylus across multiple objects selects them, allowing them to be moved all at once.
- Flip: Lets the player flip certain objects by tapping them, including Minis, most enemies, conveyor belts, rafts, and Moving Platforms.
- Reset: Clears the level (if Template is set to off) or resets the level back to the sample level (if Template is set to on).
- End Menu:[1] Represented by a red gear button. Lets the player save the level, test it, or exit editing. The player must name their level before saving it for the first time.
- Undo & Redo[1] buttons: Let the player undo their last action or restore their last undone action, respectively.
- Meter:[1] Decreases as more level elements are placed. If the meter runs out, the player cannot place any more objects into the level.
Play test
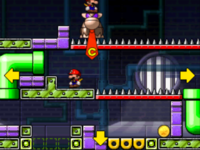
To share a level created in the Construction Zone with other players, the level must pass the play test. To test a level, the player must tap the Play Test button in the End Menu. The player must save their level before testing it. To pass the play test, the player must direct all of the Minis in the level so that they reach the exit within 600 seconds; otherwise, the level does not pass the play test.
Nintendo WFC
Before Nintendo Wi-Fi Connection was discontinued, players could use it to send or receive levels from other players.
- Synchronize - By connecting to Nintendo Wi-Fi Connection, players could synchronize their levels to make them available to others.
- Receive - As long as players knew each other's friend codes and had them installed under their friends list, they could receive levels from each other. Every so often, Nintendo also published an official level.[citation needed]
- Nintendo WFC Config - Allows the player to enter Nintendo Wi-Fi Connection Setup.
- WFC Friends - Up to 60 friends can be stored here, registered with a friend code. The player's friend code is displayed on the top screen.
Multi-Card
Two players, each with a copy of the game and with Nintendo DS systems close to each other, can locally send and receive levels made in the Construction Zone.
- Broadcast - One player can send a level to another player, if the other player chooses "Receive".
- Receive - One player can receive a level from another player, if the other player chooses "Broadcast".
Names in other languages
| Language | Name | Meaning | Notes |
|---|---|---|---|
| Japanese | エディタールーム[?] Editā Rūmu |
Editor Room |


